This panel of the Object Properties dialog displays general object information, as well as controls for rendering the object and displaying it in viewports.

This group displays information about the selected object, including the following:
The color swatch shows the object's color. You can click it to display the Object Color dialog and select a different color.
Displays the X, Y, and Z dimensions of the object's extents.
Display the number of vertices and faces in the object. For shapes, these values are the values used if you have made the shape renderable. Faces for renderable shapes are generated only at rendering time.
Appear only for shape objects. Shape Vertices is the number of vertices in the shape, and Shape Curves is the number of polygons. (Shape Curves is the value that appeared as "Polygons" in previous releases.)
These values can change over time: they are valid only for the current frame and the current view.
Hides the selected object or objects.
Hidden objects exist in the scene, but do not appear in the viewports or rendered images. To unhide hidden objects, use the
Display panel or choose Tools  Display Floater.
Freezes the selected object or objects.
Frozen objects appear in the viewports, but cannot be manipulated. To unfreeze frozen objects, use the Display panel or choose Tools  Display Floater.
 Display Floater.
Toggles between setting display properties on a per-object basis and at the layer level. When set to By Layer, the object display properties are unavailable; set the layer properties on the Layer Properties dialog.
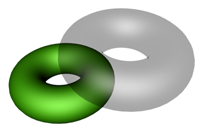
Makes the object or selection translucent in viewports. This setting has no effect on rendering: it simply lets you see what is behind an object in a crowded scene, and especially to adjust the position of objects behind the see-through object. Default=off.
You can customize the color of see-through objects by using the Colors panel of the Customize  Customize User Interface dialog.
Keyboard shortcut (default): Alt+X
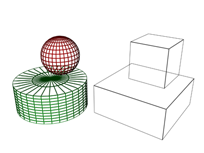
Toggles the display of selected objects, both 3D objects and 2D shapes, as bounding boxes. Produces minimum geometric complexity for rapid display in viewports. Default=off.
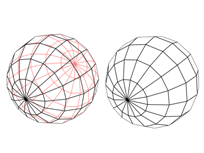
Toggles the display of faces with normals that point away from the view. When on, you see through the wireframe to the backfaces. Applies only to wireframe viewports. Default=off.
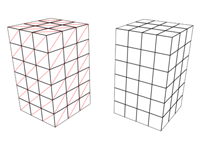
Toggles the display of hidden edges and polygon diagonals. When on, only outside edges appear. When off, all mesh geometry appears. Applies to Wireframe viewport display mode, as well as other modes with Edged Faces turned on.
When on, this object is ignored when you use the display controls Zoom Extents and Zoom Extents All.
Keyboard shortcut: No default, but you can customize it using the Keyboard panel of the Customize  Customize User Interface dialog.
When on, the object is not subject to adaptive degradation.
For editable mesh, editable poly, and editable patch objects, displays the assigned vertex colors in viewports. The drop-down list lets you choose to display Vertex Color, Vertex Illumination, Vertex Alpha, Map Channel Color, or Soft Selection Color. Default=off.
You can assign vertex colors at all sub-object levels except Edge.
Toggles between setting rendering controls on a per-object basis and at the layer level. When set to By Layer, the object rendering control settings are unavailable; set the layer properties on the Layer Properties dialog.
Controls the rendered visibility of the object. At 1.0, the object is fully visible. At 0.0, the object is completely invisible when rendered. Default=1.0.
You can animate this parameter. Animating Visibility assigns a visibility controller to the object. By default this is a Bezier float controller.
Makes an object or selected objects appear or disappear from rendered output. Nonrenderable objects don't cast shadows or affect the visual component of the rendered scene. Like dummy objects, nonrenderable objects can manipulate other objects in the scene.
For lights, this is the only available control in the Rendering Controls group. Making a light non-renderable effectively turns it off.
Shape objects have the Renderable option turned on by default. In addition, each shape has an Enable In Renderer parameter. When both check boxes are on, the shape appears in rendered output. If the Renderable object properties setting is off, the shape is not renderable, regardless of the state of its local Enable In Renderer check box.
If you apply a modifier that converts the shape into a mesh object, such as a Lathe modifier or Extrude modifier, the shape automatically becomes renderable regardless of the state of its local Enable In Renderer setting.
Causes the object to inherit a percentage of the visibility of its parent (as determined by the parent's Visibility track in Track View). When a group parent is assigned a visibility track, Inherit Visibility is automatically turned on for all children in the group. The children will have the maximum visibility of the parent. Transparent materials and hidden objects have no effect on this function.
Allows special effects to affect objects in the scene that are occluded by this object. The special effects, typically applied by plug-ins such as Glow, use G-buffer layers to access occluded objects. Turning on this control makes the object transparent for the purposes of special effects. This makes no difference when you render to most image files. When you render to either the RLA or RPF file format, however, occluded objects appear with the effect applied on their designated G-buffer layer. Default=off.
Allows you to tag an object as a target for a render effect based on the G-buffer channel. Assigning the object a nonzero ID creates a G-buffer channel that can be associated with a render effect.
The Object ID property is also used with the Multi/Sub-Map shader, and can be displayed in the Rendered Frame Window when rendering to RLA and RPF formats.
Setting Object ID to a nonzero value means that the object will receive the rendering effects associated with that channel in Render Effects and the post-processing effects associated with that channel in Video Post.
To save the channel data with the rendering, render to either the RLA or RPF file format.
Toggles between setting motion blur properties on a per-object basis and at the layer level. When set to By Layer, the motion blur settings are unavailable; set the layer properties on the Layer Properties dialog.
Affects the length of the motion-blur streak.
If you choose either form of motion blur here in the Object Properties dialog, you must also choose to apply that type of blur in the Render Setup dialog.
The rendering speed of object motion blur depends on the complexity of the geometry to which it's assigned. The rendering speed of image motion blur depends on the amount of rendered screen space taken up by the blurring object. In most cases image motion blur renders more quickly. Object motion blur renders more quickly when applied to very simple objects, and image motion blur renders more slowly when the object takes up a lot of screen space, and moves all the way across the screen in a single frame.
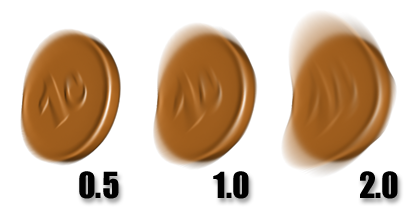
Changing the Object Blur Multiplier value.
When on, enables motion blur for this object. When off, motion blur is disabled regardless of the other blur settings. Default=on.
You can animate the Enabled check box. The main use of animating Enable is to apply motion blur over only a limited range of frames. This can save a tremendous amount of time when you are rendering an animation.
You can enable motion blur for lights and cameras. With the mental ray renderer, moving lights and cameras can generate motion blur. However, they do not generate motion blur with the default scanline renderer.