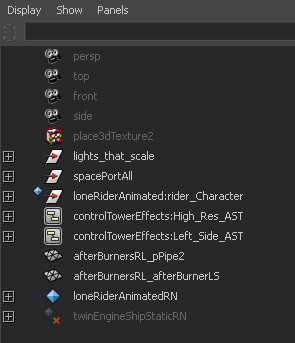
The Outliner shows a hierarchical list of all objects in the scene in outline form.
| To... | Do this |
|---|---|
| Select an object. |
Click the object node name. |
| Pan in the Outliner. |
Use |
| Expand or collapse the level under a node. |
Click the square plus |
| Expand all levels under a node. |
|
| Change a node’s order in the hierarchy. |
|
| Make a node a child of another node. |
If you can’t see both nodes at the same time in the Outliner, use Edit > Parent instead. |
| Bring a node out from under its parent. |
Select the child node and select Edit > Unparent. |
| Split the Outliner window. |
Drag the divider bar at the bottom of the window up. When the pointer is over the bar the cursor changes to a up/down drag To unsplit the window, drag the divider back down to the bottom of the window. |
| Rename a node. |
Double-click the node name. In node names, all punctuation except for the underscore (_) and the pound sign (#) are illegal characters. |
| Allow the display of attributes (channels) in the Outliner. |
Turn on Display > Attributes (Channels). You can also limit the display of attributes with the Outliner’s Show > Attributes submenu. |
| Show or hide the attributes on a node. |
Click the round plus ( You can further expand multi-value attributes. You cannot edit attribute values in the Outliner. |
| Open a node in the Attribute Editor. |
Double-click the icon next to the node’s name. |
| Open an attribute in the Expression Editor. |
Double-click the attribute name. |
Select how nodes encapsulated in an advanced asset appear in the Outliner. You can select from the following options.
Under Asset only shows the node as a child of its asset while
Under Parent only shows the node in the hierarchy.
Both displays the same node under both its asset and in the hierarchy.
Select which attribute types to show in the Outliner. Select Clear Below to turn off all filters.
User-defined attributes. For more information, see Create, edit, or delete custom attributes.
Opens the Select Attributes window, which lets you filter which attributes display for a selected object.
The Select Attributes window displays a grid of checkboxes for the Translate, Rotate, and Scale XYZ attributes, as well as a list of any other attributes for the selected object. Use these checkboxes to turn the display of each attribute on and off. (For example, see Filter curve display in the Graph Editor.)
Shows only object types of the same type as the current selection. This option lets you create a filter that limits the types of objects and attributes displayed in the Outliner to the same type of object or attribute as the current selection.
For example, if you select an object’s Translate X, Y, and Z attributes in the Outliner, then select Show Selected Type(s). All non-translation attributes will be filtered and only translation attributes will appear in the Outliner. The Show Selected Type(s) filter remains active until you select another Show menu option (such as Show All).
Lets you set which nodes are considered “auxiliary”.
You can customize which nodes are hidden to reduce clutter in the editors. Generally, these are nodes that are not normally useful to see or edit. Select this option to display the Auxiliary Nodes editor and customize the node types that are hidden in editors. See Auxiliary Nodes for more information.
To access the Reference menu,  -click either an empty area, or a reference node in the Outliner.

Exports selected objects as referenced files. When you export objects as file references, Maya creates a new scene file in the specified location and references that file into the open parent scene. See Export Selection As Reference Options and Exporting file references.
Loads or unloads the selected reference. If the current reference is already loaded, reload updates the loaded reference. This is useful when the reference file is being edited simultaneously. See Unload and reload file references.
Duplicates the file associated with the selected reference. See Duplicate file references.
Imports the selected reference’s objects directly into the current scene. See Import file references.
Saves edits that were made within the parent scene for a selected file reference to the corresponding referenced file on disk. The edits get transferred so they no longer reside within the parent scene. See Reference edits.
Exports edits made to objects in a scene, such as connected nodes, to a file you specify. You can then apply these edits to other scenes with the Assign Offline File option.
See File > Export to Offline File and Export to an offline file.
References the edits from the file you select and applies them to the reference node selected in the Outliner or Reference Editor. Maya applies edits by matching each nodename.attribute in the edit file to the file its being applied to.
For example, you can export a reference edit for pSphere1.translateX in the scene sphere.ma. This edit is saved in the reference file as <main>:sphere_pSphere1.translateX. You can then apply this edit to the scene ball.ma so that ball:pSphere1.translateX is edited.
Displays a current list of edits on the selected reference. You can refresh this window manually by clicking the Refresh Edits List button or remove specific edits by selecting them and clicking Remove Selected Edits. See List copy or remove reference edits.
Locks or unlocks all of the nodes and attributes for a selected file reference. A lock icon appears beside the listed file reference within the Reference Editor to indicate the locked status. See Locking a file reference.
To access the following Scene Assembly menu items, select an assemblyReference or assemblyDefinition node, then -click in the Outliner or scene view. Select Scene Assembly from the menu that appears.
Removes the current object displayed as a representation from the scene view, and sets the Active Representation to None. See Unload active assembly representations.
Displays a list of edits to the representation of a nested assembly reference node. See List Assembly Edits window.
Scene assembly edits are managed by the assembly reference nodes. See Scene assembly edits.
Adds the specified representation type to the selected assemblyDefinition node. See Add assembly representations.
 Except where otherwise noted, this work is licensed under a Creative Commons Attribution-NonCommercial-ShareAlike 3.0 Unported License


 +
+  to pan the
  or minus
  next to the node name.
 -click the
  -drag and drop it between two other nodes.
 indicator.
 ) or minus (
 ) next to the node’s name.