Viewport Canvas provides tools for painting color and patterns onto any bitmap in an object’s material in the viewport. You can paint in multiple layers directly onto a 3D object, or on a 2D canvas superimposed on the viewport. Viewport Canvas can export the painting in PSD format so you can modify it in Adobe Photoshop or a compatible program, and then save the file and update the texture in 3ds Max.
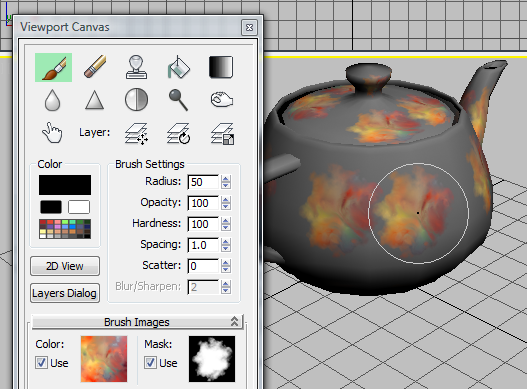
You start by choosing a brush and activating one of the painting tools: Paint, Erase, Clone, and a number of others. You then paint directly on the object, switching tools and changing layers whenever you like.
Among the Viewport Canvas features are the ability to use a custom palette, randomize brush settings, use a graphics tablet and pen to vary brush radius and other settings based on pressure, mirror brush strokes, and save and load all settings. You can also switch instantly between painting on an object and a 2D canvas with real-time feedback in both areas.
For maximum accuracy, use TIFF or another lossless file format. Also, make sure the viewport display of textures uses the
highest possible resolution. You can do that by going into Customize  Preferences
  Viewports
  Configure Driver and, setting Download Texture Size to 512, and turning on Match Bitmap Size As Closely As Possible. Viewport
Canvas requires DirectX 9.0 as the viewport display driver.
To use Viewport Canvas (optionally, with layers):
This procedure serves as both a general-purpose introduction to Viewport Canvas and a guide to using the Layers feature.
The object need not have a material assigned, but it must have mapping coordinates. If not, Viewport Canvas will not work with it.
 Viewport Canvas.
The Viewport Canvas dialog opens. Position it so doesn’t obscure your object, if necessary.
 (Paint) or any other tool.
If the object does not have a material assigned, the Assign Material dialog opens, giving you the option to assign a Standard material, browse for a material using the Material/Map Browser , or cancel. For details on these options, see Assign Material Dialog. To get started quickly, choose Assign Standard Material.
After you assign a material, or if the object already has a material, a list of available map types opens. The list also shows any assigned maps.
If the map type does not have a bitmap image file assigned, choosing the map type opens the Create Texture dialog, where you can use the browse button ([...]) to specify a new or existing bitmap file. Otherwise Viewport Canvas uses the current bitmap.
After setting up the material and map, if necessary, the Layers dialog opens and the mouse cursor becomes the icon for the active tool when over the active viewport, such as a circle for the Paint and Erase tools. When using the Paint tool and the cursor is over the object to be painted, the paint image is visible within the brush icon.
The background layer is now active and ready for painting on.
However, you might want to paint in a new layer instead; see the following note.
 (Add New Layer).
A new layer is added to the painting and becomes the active layer.
While painting, you can switch tools, colors, and brush images; add, delete, and switch layers, change the layer order, and specify filters and how layers interact; and navigate the viewport to paint different parts of the object.
If you’ve added one or more layers to a single-layer bitmap, the Save Texture Layers dialog opens, prompting you to specify what to do with your painting. These options are detailed here.
To preserve the layers in the current map, choose “Save as PSD and replace texture in material,” then use the file dialog that opens to specify the PSD file to save. This file becomes the new map in the object’s material.
You can return to editing that map by activating any painting tool, or, to edit a different map in the material, choose it from the Options rollout.
Example: To use the Clone tool in Viewport Canvas:
The Clone tool enables painting a texture from a different part of the object, using one or all layers of its bimap, or from anywhere in the active viewport. For example, you can clone a texture from one object to another. This procedure provides an example of using all three cloning sources.
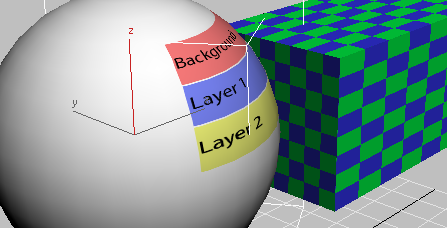
 Viewport Canvas.
The Viewport Canvas dialog opens. If necessary, position the dialog so it doesn’t obscure the viewport.
This lets you experiment without saving changes to the original bitmap file.
 (Clone) and choose the material’s Diffuse map.
The Layers dialog opens, showing the bitmap’s layers.
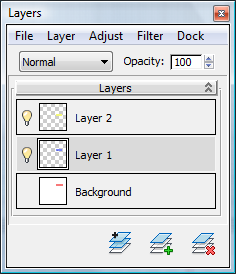
A green dot appears on the texture where you clicked, showing the center of the area to be cloned.
The area of the cloned texture that fits inside the brush circle moves with the brush as a preview, while the green dot remains stationary.
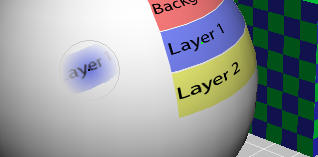
Cloning from a single layer
The cloned image is copied to the selected object.
All subsequent painting with the Clone brush, before exiting the tool or changing a setting, copies the texture relative to this point.
The brush now appears to be sliding over the cloned texture and the green dot moves around, previewing exactly which portions of the texture will be cloned when start painting again.
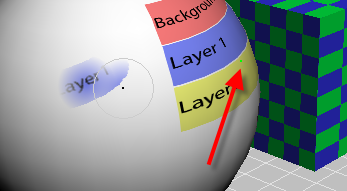
The green dot is over the part of the bitmap in Layer 2.
The green dot goes away because you’ve changed a setting. The Clone brush is still active, but if you tried to paint now, no paint would be deposited because the clone point has been lost. However, at any time you can specify a new clone point in the current layer by Alt+clicking again.
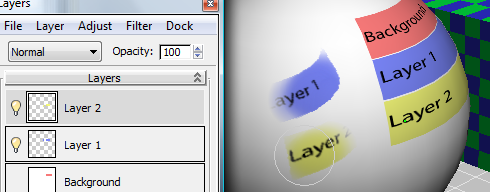
Cloning from Layer 2
Now you’re cloning from every layer, not just the active one.
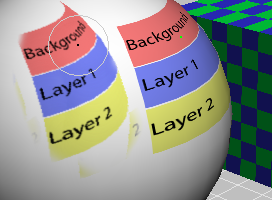
Cloning from all layers
Now you’re cloning from the entire viewport, including the grid (if visible) and the viewport background.
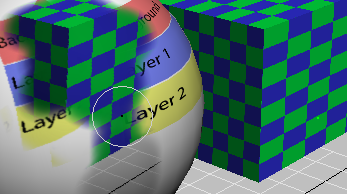
Cloning from the entire viewport
This initial section describes the controls on the upper portion of the Viewport Canvas dialog: painting tools, brush and color settings, and buttons for opening 2D View and the Layer dialog. The remaining controls are available from separate rollouts on the dialog and are described in Additional Viewport Canvas Rollouts.
 Left or Right. When docked, you can float the dialog by dragging or by right-clicking near the top and choosing Float.
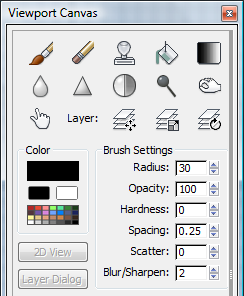
To paint an object with Viewport Canvas, select one object and then choose a painting tool from the upper section of the Viewport Canvas dialog. The painting tools work only with a single selected object, and the object must have a material with a bitmap file assigned to at least one map. If necessary, Viewport Canvas can apply the material and create the map for you. The object also needs UVW coordinates, which Viewport Canvas cannot create.
For details, see this procedure.
The following mouse and keyboard options are available while using the painting tools:
If you right-click or otherwise exit a painting tool after adding one or more layers to a single-layer bitmap, the Save Texture Layers dialog opens to prompt you to determine how to treat the multi-layer image.
To prevent applying the paint to the model (for example, when experimenting), turn off Options rollout  Save Texture. Right-clicking then simply discards the painting before exiting the tool. Also, most brushes have an optional preview mode.
 Paint
PaintStarts the Paint tool for adding color to an object surface. You can paint with solid colors, or with a bitmap in the form of a brush image.
You can paint anywhere on the model, changing the color, opacity, brush image and other settings and navigating the viewport as you go.
 Erase
EraseWhen active, you remove the contents of the layer by painting, using the current brush settings.
While using other painting tools, you can activate Erase temporarily by pressing and holding Shift. When you release the key, the tool returns to its original function.
 Clone
Clone Starts the Clone tool, which lets you copy part of the image from elsewhere on the object or in the viewport.
To use Clone, first press and hold Alt while clicking a point on the screen to clone from, then release Alt and paint on the selected object. The paint is sampled from the area you first clicked. For more information, see this procedure.
While using Clone, you can choose to sample from the current layer, all layers, or the active viewport. For details, see Clone Source.
 Texel Lookup to Nearest, if possible. This provides the sharpest representation of the texture in the viewport, thus producing more accurate
results when the paint is projected. This is because you can clone only from what is visible in the viewport.
 Fill
FillWhen painting a 3D surface, applies the current color or brush image to the entire element you click on. Depending on the object’s UVW mapping, this might affect other elements as well.
When painting the 2D View canvas, fills the entire layer with the current color or brush image.
When filling with a brush image, use the Fill Tool - Brush Images to specify whether the filled image is tiled or simply wrapped once.
 Gradient
Applies the color or brush image as a gradient. In effect, Gradient is a partial fill with edge falloff that you set with the mouse.
To use, click at the starting point of the gradient and drag to the endpoint. The fill is performed on the part of the object “behind” the drag direction, perpendicular to the viewing plane, and then falls off to full transparency at the endpoint that you set.
 Blur
Blur Sharpen
To adjust the degree of sharpening, use the Blur/Sharpen setting.
 Contrast
 Dodge
Dodge Burn
Burn Smudge
Pushes pixels around on the screen, somewhat like finger-painting. For a rougher smudging effect, use a brush image mask instead of a solid color.
 Move Layer
 Rotate Layer
When on, rotate the active layer by dragging anywhere in the viewport. While dragging, a message next to the mouse cursor shows the rotation angle.
Rotate Layer is not available for the background layer.
 Scale Layer
When on, scale the active layer by dragging anywhere in the viewport. While dragging, a message next to the mouse cursor shows the scaling percentage.
Scale Layer is not available for the background layer.

Click the color swatch to open the Color Selector, which lets you change the paint color.
 Black/White
 Open Color Palette
Opens the custom Color Palette dialog with an array of color swatches; click a swatch to use its color.
To customize a swatch, right-click it and use the Color Selector that opens to adjust the color. Use the buttons at the bottom of the dialog to load a custom palette, save the current palette, or save the current palette as the default.
Toggles the 2D Paint window for painting on a rectangular canvas.
Toggles the Layers dialog for managing bitmap layers.
In addition to the main interface with the painting tools and brush settings, the Viewport Canvas dialog includes a number of rollouts with additional settings, tools, and options. These are covered in this topic.
The Assign Material dialog opens when you start to paint an object to which no material is assigned. It has a shortcut for assigning a Standard material, or you can choose another material. You can use Viewport Canvas with any material in 3ds Max.
This dialog lets you specify the settings for a new bitmap for painting with Viewport Canvas tools. You can an existing bitmap for overwriting or let Viewport Canvas create a new one.
The Viewport Canvas Brush Images dialog lets you choose an image and mask to paint with using the Brush Image feature.
2D View lets you paint a map onto a flat, rectangular 2D Paint window superimposed on the viewports. This window is visible only in the active viewport, and can thus be truncated in a multi-viewport display. For best results when using 2D View, maximize the active viewport (press Alt+W to toggle viewport maximization).
Viewport Canvas supports painting in and editing individual layers, with full control over how layers interact with each other. You can apply transform layers, apply filters to them, and save a layered image in the Adobe Photoshop-native PSD format.