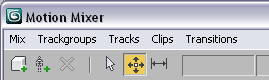
The Motion Mixer interface contains five menus located at the top of Motion Mixer window.
The Mix menu provides tools for managing your bipeds and non-biped objects when they are selected. If an object is already added to the Motion Mixer, right-clicking its name displays the menu. Use commands on this menu to load and save MIX files, adjust track colors and balance parameters, and activate and deactivate the Mixer mode.
Opens the Edit Max Mix Object dialog, which lets you modify the content of the highlighted non-biped object mix. This dialog is comparable to the Max Objects To Mix dialog with the exception of the Bake Removed Nodes option.

Adds a trackgroup to the top of the selected object's mixes.
Opens the Balance Parameters dialog. These values influence the effects of balance compensation on the biped's pelvis and spine when you use different motions on the upper and lower parts of the biped. See Adjusting Biped Balance in the Mixer.

In order for this setting to affect spine rotation, the lower body motion must have some spine animation as part of the motion clip.
A Propagation setting above 0.0 is appropriate when the upper body motion causes the spine to bend over a great deal during a large part of the animation. Range=0.0 to 1.0; Default=0.0.
Opens a dialog where you can select a MIX file to load into the Mixer.
Opens a dialog where you can save the current object's mix to a MIX file.
The following Mixdown-related tools are available only for biped object mixes.
Performs a mixdown on the selected bipeds. A Mixdown track appears at the bottom of each biped’s mix. Clicking the Mixdown track deactivates or activates it. When the Mixdown track is active, each biped inherits this single track's animation rather than the transition and layer tracks in the mix. When the Mixdown track is inactive, the biped uses the raw mix instead.

An inactive Mixdown track (above) and an active Mixdown track (below)

An inactive Mixdown track (above) and an active Mixdown track (below)
A mixdown can make automatic adjustments to transitions between planted foot motions. Creating a Mixdown track makes it possible to copy the mixdown to the biped so it can be saved as a BIP file. See Exporting Animation to the Biped.
When a trackgroup is selected, you can access the commands in the Trackgroup menu. Alternately, you can right-click a trackgroup label to open the menu.
The Trackgroups menu lets you administer the bipeds in the mixer. Each biped you add to the Motion Mixer gets its own trackgroup, a selection of biped parts.
Opens the Trackgroup Filter dialog where you can customize the object body parts that are included in a trackgroup mix. This command is only available when a single trackgroup is selected. For more information, see Trackgroup Filter Dialog (Non-Biped Object), Trackgroup Filter Dialog (Biped Object), or Filtering Mixer Tracks.
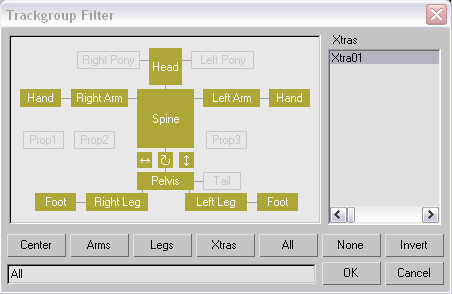
The Trackgroup Filter dialog for biped object mixes.

The Trackgroup Filter dialog for non-biped object mixes.
The commands in the Tracks menu are only active when you have a track, or tracks, selected in the Mixer. These menu commands are also available when you right-click a track in the Mixer window.
Opens a dialog where you can choose one or more BIP files or XAF files to add to the selected track. If a selected BIP file has been saved for this release of 3ds Max , a thumbnail is displayed in the Motion Preview where you can move the slider and get an idea of what the motion looks like.
Any clip you add to a track using this method is automatically added to the Reservoir.
Allows you to import clips and transitions from a motion flow script to the selected track. You can import a script only if it is active on the currently selected biped, and if it has been loaded or saved as part of an MFE file. If scripts are available for import, the Motion Flow Scripts dialog displays a list of available scripts. The imported script replaces the currently selected track with a transition track containing all the clips and transitions in the script.
The Clips menu is active when a clip is selected or when you right-click a clip in the Mixer. Some menu commands are not available when multiple clips are selected.
Applies the ability to be time warped to the selected clips. A time warp allows you to alter clip speeds. It gives you the ability to stretch or squeeze time for parts of selected clips. For more details and procedures, see Adding Time Warps.
Tiles the selected clip along the width of the Motion Mixer. The number of duplicated clips depends upon the clip's length and the number of frames displayed across the Motion Mixer. For example, if a clip is 100 frames long and the number of frames across the Motion Mixer is 500, the clip will tile five times.
Tiles the selected clip along the range of the active time segment. The number of duplicated clips depends upon the clip's length and the number of frames in the active time segment. For example, if a clip is 100 frames long and the number of frames in the active time segment is 500, then the clip will tile five times.
Opens a dialog where you can choose a new BIP or XAF file to replace selected clips. After selecting the new clip, the Mixer Clip Source Options dialog is displayed.
Opens the Copy Biped Animation To Clip dialog, where you can choose a biped from which to copy animation to selected clips.
Opens the Reservoir File Groups dialog, where you can choose a clip from the Reservoir to replace selected clips.
Saves a collapsed version of the selected clip to a new BIP file. Collapsing removes all scaling, trims, and time warps from the clip, and prompts for a new BIP file name for the collapsed version of the clip. The original selected clip is replaced by the new clip. Collapsing a clip does not affect the selected clip itself.
Select a transition track to make commands on this menu active. Right-clicking a transition also opens this menu.
Opens either the Mixer Transition Editor dialog (Biped Object) or the Mixer Transition Editor dialog (Non-Biped Object), based on the kind of mix the transition is applied to. The dialogs are similar to the Transition Editor accessed from the Motion Flow rollout.
Allows you to create a loopable clip from a transition between two clips that are clones of one another. The two clips must share the same source file, meaning they must point to the same clip in the reservoir and they must have identical time warps and scales. Although the two clips don't have to be created via cloning, it is probably the best way to create them.
The loopable clip will replace the two original clips and their transition and will begin exactly one frame before the transition starts, so at that frame, the animation will appear the same as it did before you created the loopable clip. If you tile the loopable clip after you create it, it should loop perfectly.


 Motion panel