


Display the Transition Editor by selecting a clip in the list of the Scripts group and clicking Edit Transition in the same group or right-clicking a transition arrow in the Motion Flow Graph.
A good transition links two clips together seamlessly; the motion through the transition should appear natural, as though the motion was captured as one long motion sequence. Like an AB roll transition in video editing, an appropriate section in both clips is selected for the transition (dissolve) from the source clip to the destination clip. Velocity differences between the source and destination clips are matched during the period of transition producing a seamless result. By default, Minimum Motion Loss is used to find likely start frames in the source and destination clips when clips are appended to a script. Optimized transitions can be computed by using Optimize Transition in the upper right-hand corner of the Transition Editor dialog. Optimized transitions use a minimum foot sliding method to compute transitions. Optimized transitions take longer to compute, but produces very smooth motions.
Although only one arrow is used to represent a transition between two clips in the Motion Flow Graph, any number of transitions can be named and stored in the Transition Editor representing that transition. If, for example, you create 5 different transitions between two clips for one script, all of these transitions are available in a new script that uses the same two clips. Think of Motion Flow Graph as a data storage area; if all of the scripts are deleted, the transitions are preserved and can be stored in an MFE file.
When you create a script, default transitions are used between the clips. Default transitions use minimum motion loss and are quick to compute. However, the best quality transitions are the optimized transitions. Once the Transition Editor is open, the first thing to try, before manual editing, are the optimized transitions (upper-right corner of the dialog).
Set the duration of a transition in the Length field. A value of 10, for example, creates a transition of 10 frames between the source and destination clips. During the period of transition, the velocity of the source clip is interpolated to the velocity of the destination clip. If the transition takes place at the last frame of the source clip and the first frame of the destination clip, and Length is set to 10, then the last frame of the source clip is interpolated with the first 10 frames of the destination clip.
Editing Transitions Manually (Ghosts)
Manually setting the Start Frame for the source and destination clips offers the most control. Unwanted motion in either clip can be avoided and judging the best Start Frames for both clips is left to you.
The Ghost area Frame spinners allow you to view and scrub the source and destination clips by displaying stick figures (ghosts); yellow and red stick figures represent the source and destination clips. When a suitable Start Frame is located for both clips, use Set Start Frame in the Ghost area to copy the Frame values to the Start Frame fields in the Source and Destination Clip areas.
Scrubbing the time slider over the transition period enables you to view the biped's transition from the yellow stick figure (source) to the red stick figure (destination).
Other Transition Editor Features
Rolling and Fixed specify whether a clip is rolling (in motion) or fixed (single frame) during the transition. Change the direction of the destination clip using the Angle field.
Other parameters in the Transition Editor allow you to create and name new transitions, scroll through the saved transitions, jump to the transition-starting frame, set automatic transition parameters, and go to the next transition in the script
You can save all transitions and their attributes in an MFE file.
See Customizing Transitions to manually and automatically customize transitions.
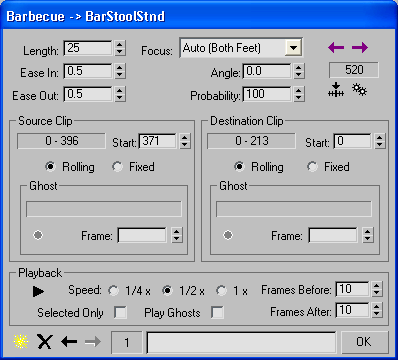
Lets you specify a focus point on the biped where the transition takes place. The Mixer will attempt to match movement based on this selection. For example, if Left Foot is selected, the transition will use the left foot as a focal point during the transition, aligning the motion of the left foot in both clips as much as possible during the transition. Default=Auto.
Previous/Next Transition buttons, Start Frame controls, and Optimize button

 Previous Transition
 Next Transition
 Go To Start Frame
 Optimize Transition
Displays the Transition Optimization dialog.
Options in the Transition Optimization dialog allow you to search for the range over which the optimizer searches for the transition.
Source Clip and Destination Cip groups

These choices control how the transition is interpolated.
Ghost subgroups (Source and Destination clips)
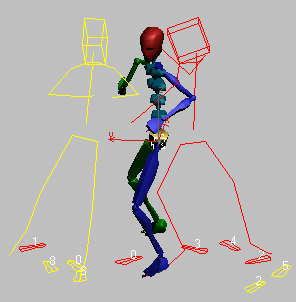
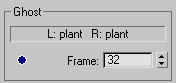
The Ghost group Frame spinners allow you to view and scrub the source and destination clips by displaying stick figures (ghosts); yellow and red stick figures represent the source and destination clips. The source and destination bipeds might not be near each other during this scrubbing process; the destination clip will be repositioned when you click Set Start Frame is clicked. When you locate a suitable start frame, click Set Start Frame to copy the values in the Frame field to the Start Frame field. Monitor foot position status in the field provided.
 Set Start Frame
Copy the value in the Frame field of the Ghost area to the Start Frame field in the Clip area. The position of the destination clip changes to match the biped body in the destination clip to the biped body in the source clip.
Locate an appropriate start frame for the source and destination clips by using the Frame spinner and viewing the positions of both stick figures, then click Set Start Frame.
The destination clip is rotated and positioned to match both bipeds. Use the Angle spinner to reorient the destination clip.


 Motion panel
  (Motion Flow Mode)
 Play Transition
 Create Transition
 Delete Transition
 Previous Transition
 Next Transition