


The Mixer Transition Editor controls transitions on transition tracks. You can use this dialog to change the start and end times of transitions, change the transition focus, and perform other functions. Mix transition blend objects are changeable from clip to clip, and any new transition that results from cloning or adding clips initially uses the blend options from the last clip in time.
The options on this dialog are much the same as for Bipeds, except that:
Consider a character walking around a corner. The trajectory of the character's root describes an arc, while the IK feet cycle along the ground. This clip contains a few footsteps, and is used to make a mixer cycle that should take the character around in a circle. If you set the root and the feet all to be velocity blends, the transition will result in the root continuing around the corner while the feet continue in whatever direction they were moving at transition time! That is, if the right foot was just about to hit the ground with its heel, thus pointing up a bit, it would transition upward into the next clip instead of blending in the direction that the root’s arc is taking. If you set the root to be a velocity blend and then set the feet to be sub-blends of the root, the transition results in the root continuing on its arc around the corner but with the feet blending in relation to it. That is, the upward-pointing right foot motion will blend with the foot motion in the new clip but in the direction of the arc, not in its own upward direction.
Source Clip and Destination Clip groups
The following options let you set different parameters proper to both source and destination clips involved in the transition.
Set the transition start frame for the source and destination clips in their respective fields. Duration for the source and destination clips displays above the Start Frame fields.
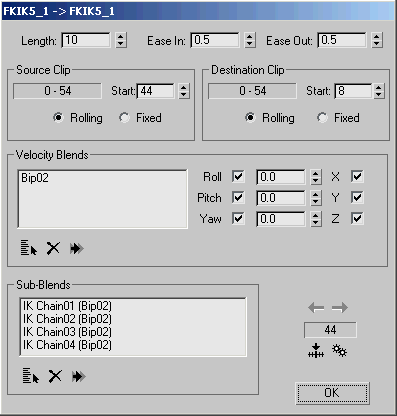
A Velocity Blend object is one that has its positions blended based on velocity (like a biped's COM). Objects used for Velocity Blending are most commonly the roots of the mix hierarchy. When you pick an object for velocity blending, its animation will accumulate based on its trajectory in the scene; for example, choosing the root of a character as the blend object will ensure that the character’s animation is transitioned relatively from clip to clip, so the character keeps moving through world space instead of repeating each clip as absolute. All children of the root will follow in the transition.
In some cases, you might want to use velocity blending for a child object.
By default, the Transition Editor uses no velocity blend objects.
 Select Velocity Nodes
Click to display a Pick Nodes dialog and choose the objects to velocity blend.
 Delete Velocity Nodes
 Set Other Transition Velocity Nodes
In order for other world-space objects to transition within the space of the velocity blend or a child of the velocity blend, you need to specify a sub-blend. For example, think of a rig that has a root moving through world space, and also has world-space IK foot controls. In this case, you would pick the root as the velocity blend, then select the root in the list and add the foot controls as its sub-blends. The result of this will be the that root makes a smooth transition and the feet make as smooth a transition as possible in the direction that the legs are going (within the root’s space) at transition time, not in the direction that the feet themselves are going at transition time.
Select Sub-blend NodesClick to display a Pick Nodes dialog and choose the objects to sub-blend.
Before you pick sub-blend nodes, you must first choose a velocity blend node in the upper list. Typically this is the parent of the nodes that will be sub-blends.
Delete Sub-blend Nodes Set Other Transition Sub-blend Nodes Previous Transition
 Next Transition
 Go To Start Frame
 Optimize Transition
Displays the Transition Optimization dialog.
Options in the Transition Optimization dialog allow you to search for the location for the transition.

