Like an audio mixer where you add music tracks and use fades and blends to transition between tracks, the Motion Mixer allows you to mix motion clips. The Motion Mixer toolbar offers commands that you use to add and delete biped and non-biped objects to and from the mixer, modify clips, and change the way tracks in the mixer are displayed.

 Add Max Objects
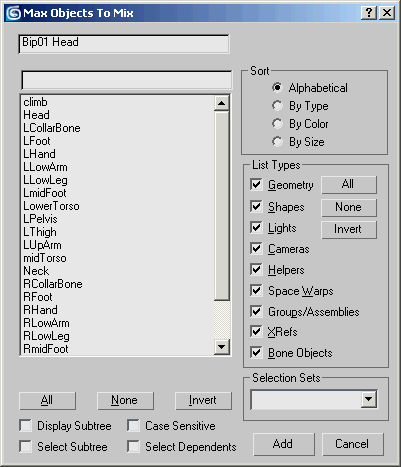
Opens the Max Objects To Mix dialog, which lists all non-biped objects in the scene. This dialog lets you add objects to be driven by your mixed animation, as well as name the mix in which they are contained.
This dialog is comparable to the Selection Floater.
 Add Bipeds
 Delete
 Select
 Move Clips
 Slide Clips
Allows horizontal movement of clips on the same track or vertical movement of clips from one biped's track to another biped's track. Sliding a clip to the right will move unselected clips which are situated to the right of the selected clip; sliding to the left will move unselected clips which sit to the left of the clip.
 Trim Clips
Clips can be trimmed from their original lengths interactively. When using this mode, you can grab the edge of a clip and drag it to a new frame within the clip’s original length. This mode will display all trimmed portions of clips in the Motion Mixer as gray. See Adjusting Clip Timing.
 Editable Time Warps
Clips can be interactively time warped, given that they have had a time warp applied. When in this mode, you can place seams in a clip and then drag them within the clip’s original length. See Adding Time Warps.
 Draggable Tracks
 Lock Transitions
When Lock Transitions is turned off (the default), moving a clip or changing its length on a transition track affect the lengths of transitions around the clip. When Lock Transitions is turned on, transition lengths do not change when you move a clip or drag clip edges not touching the transition. You can still change a transition's length by dragging the edges of the transition itself.
 Set Range
 Pan
Pan Zoom Extents
 Zoom
Zoom Zoom Region
 Snap Frames
 Snap Clips
An on/off toggle that causes clips residing on the same track to snap together. The end frame of one clip will match the start frame of the next clip. If the first clip ends at frame 100, the start frame of the next clip will snap to frame 100.
When Snap Clips is on, transition edges snap to clip edges when dragged.
 Preferences
Opens the Mixer Preferences dialog, where you can change display settings for clips, transitions, and frames.
 Reservoir
Opens the Reservoir dialog.
 Named selection
Lets you enter a name for the current selection. This field is similar to named selections for 3ds Max objects (on the main toolbar), but unlike named object selections, you can rename an existing set.
To create a named selection, select the clips for the set, enter a name in the named selectionfield, and then press Enter. You can reselect an existing selection set by choosing its name from the drop-down list.
Named sets of clips in the mixer are saved with the MAX file but not with MIX files.
 Horizontal
 Vertical
 Horizontal Vertical
 Weight Mode
An on/off toggle that allows you to work with weight curves. Weight curves are useful for making smooth blends between tracks. The Weight Mode button on the Motion Mixer toolbar acts as a global switch that toggles the Weight Mode buttons on every track in the Mixer. The Weight Mode button at the right end of each track toggles weighting only for that track. For more information on how weight curves work, see Motion Mixer Editor. To find out how to use weight curves, see Adjusting Track Weight.


 Motion panel