The Point-Of-View (POV) viewport label menu provides mainly options that change what is displayed in the viewport: the POV, and also graph editor windows you might choose to dock in a viewport. A few other options change the viewport display without changing the POV.
To change a viewport to Camera view:
This procedure requires at least one camera object in your scene. As an alternative, to create a camera and set it to a viewport at the same time, activate a Perspective viewport and then press Ctrl+C.
 camera name.
This assigns the camera to the viewport and changes the POV label to the camera name.
A camera viewport tracks the view through the POV of that camera. As you move the camera (or target) in another viewport, you see the view change accordingly. If you alter the camera's field of view, you see the changes as they are applied.
To change a viewport to a shape view:
This procedure requires at least one shape object in your scene. (If the shape is not selected, or if you select 3D geometry instead, the resulting view appears distorted.)
To display Schematic View in a viewport:
New, or choose the name of the Schematic View to display.
To display Track View in a viewport:
New, or choose the name of the Track View to display.
To display the MAXScript Listener in a viewport:
MAXScript Listener.
The MAXScript Listener is displayed in the viewport.
To return to a Geometry view, or change to another editor window, right-click the menu bar or toolbar and choose the POV.
To display the Biped Animation Workbench or the Motion Mixer in a viewport:
Biped AnimationWorkbench or Motion Mixer.
The window you chose is displayed in the viewport.
To return to a Geometry view, or change to another editor window, right-click the menu bar or toolbar and choose the POV.
To display the Material Explorer in a viewport:
Material Explorer.
The Material Explorer is displayed in the viewport.
To return to a Geometry view, or change to another editor window, right-click the menu bar or toolbar and choose the POV.
To turn on safe frame display, do one of the following:
Viewport Configuration Safe Frames panel, and turn on Show Safe Frames In Active View.
See Safe Frames.
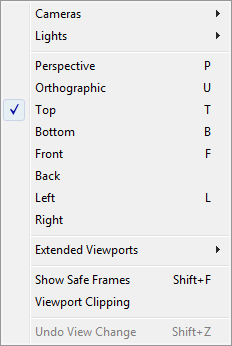
If the scene contains cameras, the menu lists these in a submenu. Choosing a camera name changes the viewport to the camera POV.
See also Camera Viewport Controls.
If the scene contains spotlights or directional lights, the menu lists these in a submenu. Choosing a light name changes the viewport to the light POV.
See also Light Viewport Controls.
Keyboard shortcut: Shift+F
Lets you set a near and far visibility range for the viewport interactively. Geometry within the viewport clipping range is displayed. Faces outside the range are not displayed. This is useful in complex scenes where you want to work on details that are obscured from view.
This option is a toggle: the first time you choose it, Viewport Clipping is turned on. Choosing the option a second time turns Viewport Clipping off, and so on.
When you turn on Viewport Clipping, the viewport displays two yellow slider arrows on the right side. Adjusting the lower arrow sets the near end of the range, and adjusting the upper arrow sets the far end. Tick marks on the range slider indicate the extents of the viewport.
You can also toggle Viewport Clipping on the Viewport Configuration dialog.
If the viewport is showing a Camera or a Light view (see Point-Of-View (POV) Viewport Label Menu), this option appears. It lets you select the Camera or Light object that displays the view.
If the viewport is showing a Camera or a Light view (see Point-Of-View (POV) Viewport Label Menu), and that Camera or Light has a target, this option appears. It lets you select the Camera Target or Light Target object associated with the Camera or Light that displays the view.
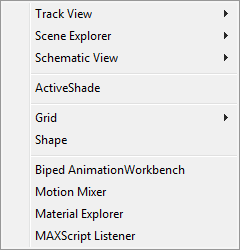
Displays a submenu that lists existing Track Views, if any. Choose a Track View to display it in the viewport.
The submenu also has a New option that lets you create a new Track View.
To change the viewport from a Track View back to another POV, right-click the menu bar and choose a different viewpoint.
 Scene Explorer
The submenu also has a New option that lets you create a new Scene Explorer.
To change the viewport from a Scene Explorer back to another POV, right-click the menu bar and choose a different viewpoint.
Displays a submenu that lists existing Schematic Views, if any. Choose a Schematic View to display it in the viewport.
The submenu also has a New option that lets you create a new Schematic View.
To change the viewport from a Schematic View to another POV, right-click the menu bar and choose a different viewpoint.
Changes the viewport to render with ActiveShade. This option does not change the viewport POV.
To exit ActiveShade, right-click the shaded viewport and choose Close from the View (upper-left) quadrant of the ActiveShade quad menu.
Displays a submenu that changes the POV based on the active grid. These options are meant mainly for use with Grid objects. If no Grid object is activated, they operate on the Home grid.
Changes the view to the active display plane for the grid. You set the active plane on the Modify panel Parameters rollout Display group XY Plane, YZ plane, or ZX plane.
See also Viewing Grid Objects.
Aligns the view to the extents of a selected Shape object and its local XY axes
If you have not selected a Shape object before you choose Shape, this option can have peculiar results.
If you haven’t selected a biped before you choose this option, the viewport displays a warning to that effect. Selecting a biped body part in another viewport updates the Workbench view.


