Command entry:
Activate a Camera viewport.

Viewport controls

(Field-of-View)
Command entry:Activate a Perspective viewport.
Viewport controls
(Field-of-View on the Field-of-View flyout)
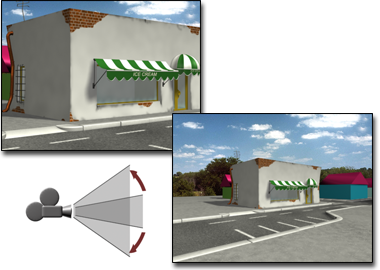
Field-of-View (FOV) adjusts the amount of the scene that is visible in a viewport and the amount of perspective flare. The
effect of changing FOV is similar to changing the lens on a camera.
- As the FOV gets larger, you see more of your scene and the perspective becomes distorted, similar to using a wide-angle lens.
- As the FOV gets smaller, you see less of your scene and the perspective flattens, similar to using a telephoto lens.
Although the effect of Field-of-View appears similar to a zoom, the perspective is actually changing, resulting in increased
or decreased distortion in the viewport.
In a Perspective viewport, Field-of-View defines the width of your view as an angle with its apex at your viewpoint and the
ends at the sides of the view.
In a Camera viewport, Field-of-View controls the width of the area a camera views, and represents the arc of the camera's
horizon in degrees. For a selected camera, you can adjust its FOV and Lens parameters directly to fine-tune the FOV you set in the viewport. See “To use FOV with Camera parameters” in the following procedures.
Procedures
To adjust the field of view in a viewport:
- Activate a Perspective or Camera viewport.
- Click Field-of-View.
The button highlights when it is on.
- Drag in the viewport to adjust the FOV angle.
- Dragging down widens (increases) the FOV angle, reduces lens length, displays more of your scene, and exaggerates perspective.
- Dragging up narrows (decreases) the FOV angle, increases lens length, displays less of your scene, and flattens perspective.
- To turn off the button, press Esc or right-click.
To enter an FOV value in a Perspective view:
- Activate a Perspective viewport.
- Right-click (Field-of-View) to display the Viewport Configuration dialog.
- Click the Rendering Method tab.
- In the Perspective User View group, enter an angle in the FOV field.
- Click OK to make the change.
To use FOV with Camera parameters:
- Activate a Camera viewport.
- Press H and select the viewport’s camera in the Select From Scene dialog.
- Go to the
 Modify panel to view the camera’s Parameters rollout.
- As you drag Field-of-View in the viewport, the FOV and Lens parameters update interactively.
- Set the FOV and Lens parameters directly, or click a button in the Stock Lenses group.
NoteOnly the FOV value is saved with the camera. The Lens value (focal length) is another way to express and select the FOV.
See Common Camera Parameters.
NoteUsing the
Perspective button in a Camera viewport also changes the FOV in concert with dollying the camera.