The Motion Mixer allows you to mix motion files (BIP files and XAF files) for any biped or non-biped objects. These motion files are also called clips.

The Motion Mixer is comparable to an audio mixer. Motion clips can be cross-faded, stretched, layered, and finally, mixed down to a single clip.
The Motion Mixer works by placing motion files on tracks. With the Motion Mixer, you can:
 To see a biped motion in the Mixer applied to the biped in the scene, you must turn on Mixer Mode from the Biped rollout.
In the Motion Mixer, motions are imported and mixed for any objects in the scene. Once motions are mixed, you can pass the mix on to other biped (if it contains BIP files) and non-biped objects (if it contains XAF files), or save the mix to a MIX file.
The Motion Mixer provides these types of motion blending.
Transitions Between Foot-Based Clips
The Motion Mixer excels in its ability to maintain smoothness of motion over transitions between foot-based clips. Foot-based clips use IK constraints to keep one or both feet locked down over the course of the motion.
For bipeds, the Mixer provides tools for maintaining foot positions during transitions:
For non-biped rigs and other 3ds Max objects, the Mixer provides velocity blends and sub-blends to maintain smooth and coordinated motion.
Comparing the Motion Mixer and Motion Flow
Both the Motion Mixer and Motion Flow can be used to create transitions between a consecutive series of BIP files. However, there are a few significant differences between the two features:
Use the Motion Mixer when you want to create a specific animation for an object from several clips, or you want to specify that some motions be applied only to specific body parts. If you want to work with biped crowds or create random motion, use Motion Flow.
If you're creating a straight series of transitions between motions, you can use either one. However, the Motion Mixer has additional tools for improving foot-based transitions.
You open the Mixer by either clicking the Mixer button on the  Motion panel
  Biped Apps rollout or choosing Motion Mixer from the Graph Editors menu.
When you open the Mixer while a biped is selected, a trackgroup, a clip track, and a balance track are assigned to that biped. If a non-biped object is selected, the Mixer opens empty.
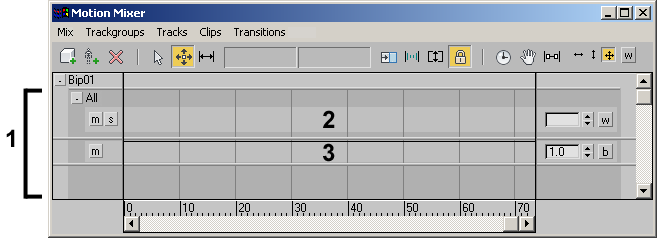
2. Clip track
3. Balance track
These items are discussed in detail in the sections that follow.
To access the Motion Mixer from the Motion panel:
 Select a biped.
Motion panel.
Select a biped.
Motion panel.
The Motion Mixer opens, and displays the selected biped and two tracks. To learn about these tracks, see Adding Tracks to the Mixer.
Accessing the Mixer also turns on Mixer mode for the biped. Mixer mode must be on for the biped in order to see the mixed
motion on the biped.
To display the Motion Mixer in a viewport:
Motion Mixer.
To remove the Motion Mixer from a viewport:
In the Motion Mixer, you begin the mixing process by opening the Mixer, then adding objects to mix, and then loading motion clips to clip tracks. One clip track is created automatically if a biped is selected while you open the Mixer, but you'll probably need more to hold all the motions you want to use with your mixed objects.
You can import motion clips (BIP and XAF files) into the mixer.
Once you have created tracks and imported clips to the Motion Mixer, you can adjust your animation mix by moving, cloning, and replacing clips.
Each track in the Motion Mixer is part of a trackgroup. Each trackgroup can be filtered so it uses motions from one set of body parts and not another. For example, you might want to use the arm motions from one motion file with the legs from another. For this purpose, you would need two separate trackgroups.
In the Motion Mixer, you can shorten clips or change their timing interactively within the track display.
When two or more clips are placed on a transition track, you can create transitions between any two clips. A transition creates a constant, gradual change from one clip to another.
Each track has one or more weight curves that you can use to mix motion from several tracks to varying degrees. The weight curve determines how much a specific track contributes to the motion within the trackgroup.
You can cause varying changes in speed throughout a clip with a time warp. Adding a time warp to a clip allows you visually to squash and stretch time over different parts of the clip.
When you use different motions on the upper and lower parts of the biped, you can create a situation where the balance in the two clips do not match one another. For example, if the arms are waving wildly in the motion used for the upper body, the hip motion should compensate to some degree to keep the biped in balance. A straight mix of this arm motion with another hip/leg motion will most likely not match up in terms of balance.
Once you've worked with the Motion Mixer to create an animated sequence for the biped, there are several ways to work with the finished mix.
The Reservoir serves as a storage facility for motion clips (BIP files and XAF files) that you use with the Motion Mixer. You can load clips directly into the Reservoir, and all clips that you load directly in the Motion Mixer also show up in the Reservoir.


