A shape is an object made from one or more curved or straight lines. 3ds Max includes the following shape types: splines and NURBS curves.
Shapes are 2D and 3D lines and groups of lines that you typically use as components of other objects. Most of the default shapes are made from splines. You use these spline shapes to do the following:
3ds Max supplies 11 basic spline shape objects, two types of NURBS curves, and five extended splines. You can create these shapes quickly with mouse or keyboard entry and combine them to form compound shapes. For specifics about creating the various shapes, see Splines and Extended Splines .
To access the shape-creation tools, go to the  Create panel and click
  (Shapes). You'll find the standard shapes under Splines in the category list, Point Curve and CV Curve under NURBS curves,
and WRectangle, Channel, Angle, Tee, and Wide Flange under Extended Splines.
(Shapes). You'll find the standard shapes under Splines in the category list, Point Curve and CV Curve under NURBS curves,
and WRectangle, Channel, Angle, Tee, and Wide Flange under Extended Splines.
As you add plug-ins, other shape categories might appear in this list.
The Object Type rollout contains the spline creation buttons. You can combine one or more of these spline types into a single shape.
You can create shapes from edge selections in mesh objects. In Edit/Editable Mesh objects, at the Edge selection level, in the Edit Geometry rollout, is a button called Create Shape from Edges that creates a spline shape based on selected edges. See Editable Mesh (Edge). Similarly, with Editable Poly objects, you can use the Create Shape button at the Edge selection level. See Editable Poly (Edge)
You can convert a basic spline to an editable spline object. The editable spline has a variety of controls that let you directly manipulate it and its sub-objects. For example, at the Vertex sub-object level you can move vertices or adjust their Bezier handles. Editable splines let you create shapes that are less regular, more free-form than the basic spline options.
When you convert a spline to an editable spline, you lose the ability to adjust or animate its creation parameters.
When you use a shape to create an object by lofting, extruding, or other means, the result is a renderable 3D object. However, you can render a shape without first making it into a 3D object. Follow these steps to render a shape:
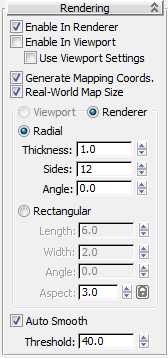
When Enable In Renderer is on, the shape is rendered using a circular or rectangular cross-section. Mapping coordinates are generated with U mapped once around the perimeter and V mapped once along the length.
3ds Max provides control over renderable shapes; viewports, including wireframe viewports, can display the geometry of renderable shapes. You can have different rendering settings for the viewport, or use the same as for the renderer.
The Steps settings affect the number of cross-sections in the renderable shape.
 Enable In Renderer switch must be on.
A straightforward usage for shapes is as 2D cutouts or planar objects. Examples include ground planes, text for signs, and cutout billboards. You create a planar object by converting a shape to an editable surface, either directly or with a modifier.

2D objects
You can also convert a 3D shape (for example, a shape whose vertices have been moved vertically away from the construction plane by different amounts) to create a curved surface. The resulting 3D surface often requires manual editing of faces and edges to smooth surface ridges.
You can apply modifiers to a shape to create a 3D object. Two of these modifiers are Extrude and Lathe. Extrude creates a 3D object by adding height to a shape. Lathe creates a 3D object by rotating a shape about an axis.
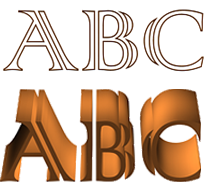
Initial text shape with extruded shape below
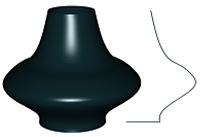
Lathed object with initial shape on right
You create Lofts by combining two or more splines in special ways. Shapes form the lofting path, loft cross-sections, and loft fit curves.
You can use shapes to define how the position of an animated object changes over time. You create a shape and use it to define a path that some other object follows.
Some possible ways for a shape to control animated position are:
Trajectories Convert From function (see Trajectories).
Splines include the following object types: Line, Rectangle, Circle, Ellipse, Arc, Donut. NGon, Star, Text, HelixSection. Extended Splines include the following object types: WRectangle. Channel. Angle. Tee, and Wide This topic covers general aspects of spline and extended spline creation, including the parameters available on rollouts common to all spline objects.
Extended splines are enhancements to the original spline set.
Editable Spline provides controls for manipulating an object as a spline object and at three sub-object levels: vertex, segment, and spline.
The Shape Check utility tests spline and NURBS-based shapes and curves for self-intersection and graphically displays any instances of intersecting segments. Self-intersecting shapes used to produce lathed, extruded, lofted, or other 3D objects can result in rendering errors.


