


The Animation Workbench is a tool for working with biped function curves. It is a customized version of Track View, with many of the same toolbars and buttons, plus some new ones.
In addition to the standard Track View features, the workbench has tools to help you select curves, analyze them for errors, and automatically fix those errors based on various settings. This is especially useful when working with motion-capture data, or other animation that has many keys.
Of course, you can also display and manipulate function curves for bipeds in the standard 3ds Max Track View and expanded track bar, as well. However, you have access to the automatic error-analysis tools only in the Workbench
The Animation Workbench displays rotation curves in local biped space for both quaternion and euler rotations. This improves the speed of curve manipulation since the whole biped doesn't need to be calculated in order to draw a single curve.
To display the local rotation curve of an animated spine link:
 select its upper spine link.
 Set a key at frame 0.
 rotate the spine link 30 degrees in the local Z axis, then set a key.
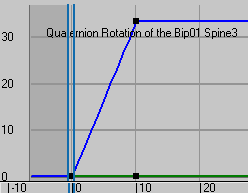
Only one curve is displayed because the upper spine rotates in local space by default.
Select the biped's head.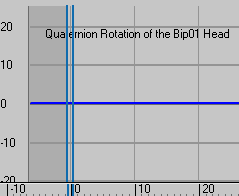
Notice how there are no curves in the workbench because the head doesn't inherit the spine link's rotation and doesn't have an internal rotation of its own.
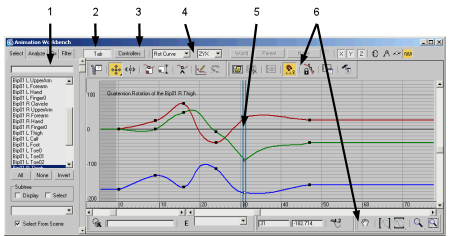
1. Tab panels (Select, Analyze, Fix, and Filter).
2. Display Tab panels
3. Display Controllers list
4. Workbench toolbar
5. Curve View
6. Curve View toolbars (same as Track View toolbars).
The Animation Workbench Tab panel consists of four panels:
Use the Tab button on the Workbench toolbar to display and hide the Tab panel.
To the right of the Tab area is the Curve View, where keys and curves for the selected biped parts are displayed. This is the same as the Track View Key window.
Directly above and below the Curve View are some of the standard 3ds Max Track View toolbars. They give access to tools used to navigate the view and manipulate the keys. The toolbars below the Curve View are used for selection and navigation; toolbars above the Curve View are used to move, slide, and scale keys; to scale values; and to add new keys.
The Workbench toolbar extends the toolset found in the 3ds Max Track View. The Workbench toolbar includes:
Rot Curve, Rot Speed, Rot Accel, and Rot Jerk curves represent rotation.
Pos Curve, Pos Speed, Pos Accel and Pos Jerk curves represent position.
Noise curves represent random position and rotation.
Each biped part can show any of these curves, except for the Horizontal and Vertical tracks, which show only positional curves, and the Turning track, which shows only angular curves.
 The Axis order drop-down lets you choose the order in which the rotation curves are calculated. The ordering follows the
same rules as the Euler Axis Order on the Quaternion/Euler rollout.
The Axis order drop-down lets you choose the order in which the rotation curves are calculated. The ordering follows the
same rules as the Euler Axis Order on the Quaternion/Euler rollout.
 When manipulating position curves, the Workbench allows the curves to be displayed relative to the World, the Biped Root,
or any object in the scene as picked via the arrow button.
When manipulating position curves, the Workbench allows the curves to be displayed relative to the World, the Biped Root,
or any object in the scene as picked via the arrow button.
Choose which curves of the selected object are displayed in the Workbench.
 The 180 limit
 Draw While Moving
 Show Layered Edit
 When on, displays a graphic tool for adjusting sets of keys along a curve within a range.
To set the range, click to highlight one of the square handles, and then drag it. As you drag, the handle follows the curve.
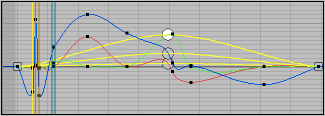
Handle follows curve.
To set a layered offset, click to highlight the circular handle, and then drag it to the desired position. The circular handle follows the curve unless you hold down the Esc key. If you drag while holding down Esc, you can move the handle off the curve, which scales the keys within the range.
 Enable Sub Anims
The Select panel of the Animation Workbench provides tools for selecting bipeds or biped components. You can manipulate the selected biped part's animation tracks via curves displayed in the Workbench, or by using the Analyze, Fix, and Filter panels to automatically identify errors and fix them.
The Analyze panel provides tools to evaluate the curves for the selected biped parts, and review them for certain error conditions. It can spot spikes and noise in the curves, and locate specific keyframes that are responsible for discontinuous motion.
The Fix panel provides access to the tools that can be used to automatically fix the errors found by the Analyze panel.
Filters are simply operations that can be performed to different biped body parts. They are similar to fixers, but they operate over an interval of time rather than on the results of the last analysis. Thus, you can use a filter without analyzing.


 Motion panel