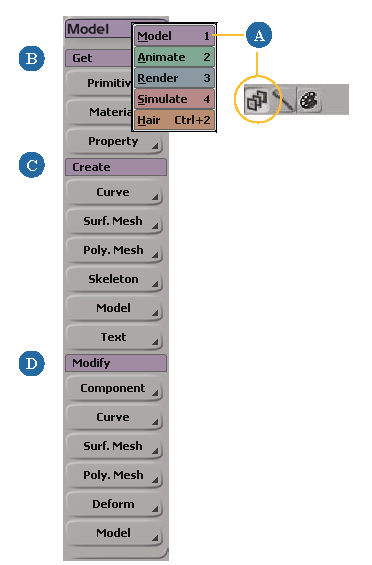
All the important modeling commands can be found on the Model toolbar. In addition, there are many other tools and features that you will find very useful while modeling.
You'll find the Model toolbar at the far left of the screen. These commands are also available from the main menu.

Many modeling commands are available from context menus. The context menu appears when you Alt+right-click in the 3D views (Ctrl+Alt+right-click on Linux).
If you click a selected object, the menu items apply to all selected objects. On Windows, you can also press the context-menu key (next to the right Ctrl key on some keyboards).
If you click an unselected object, the menu items apply only to that object.
When components are selected, you can right-click anywhere on the object that "owns" the selected components. The items on the context menu apply to the selected components.
If you click over an empty area of a 3D view, the menu items apply to the view itself.
Softimage includes several different views that can help you with your modeling tasks.
The explorer displays the contents of your scene in a hierarchical structure. When modeling, it is particularly useful for seeing an object's construction history, or geometry operator stack.
For more information about the explorer, see The Explorer [Windows and Views].
For more information about the operator stack, see Operator Stack.
The object viewer is a 3D view that displays only the selected scene elements. It is useful for isolating a specific object when modeling. For more information, see Object Views [Basics].
The schematic view presents the scene as connected nodes in a graph so you can analyze the way a scene is constructed. It can display graphical links that show the modeling relationships between objects. For more information, see The Schematic View [Windows and Views].
The XSI explorer is a view that combines an explorer tree for selecting objects and a viewing pane that can show other views, such as an object view or a schematic view. For more information, see The XSI Explorer [Windows and Views].
The spreadsheet lets you execute queries and displays scene information about elements and their parameters in a grid. For more information, see The Spreadsheet [Windows and Views].
Netview is an integrated Web browser within Softimage. You can use it to access sample content and resources available on the Internet. You can also create your own intranet for sharing resources across your workgroup.
For information about using Netview, see Netview [Windows and Views].
For information about building your own intranet for use in Softimage, see Intranets for Netview [Customizing Softimage].
You can quickly build objects with similar parts by duplicating and cloning objects. A duplicate is simply a copy of another object, while a clone is a "linked" copy — you can modify all instances by modifying the original object. For more information, see Duplicating and Cloning Objects [Scene Elements].
To make a symmetrical copy of an object or hierarchy, use Edit  Duplicate Symmetry. For more information about duplicating, see Duplicating and Cloning Objects [Scene Elements].
There are also other symmetry features in Softimage:
You can create symmetrical copies while drawing curves and chains (see Drawing Curves Symmetrically [Surface and Curve Modeling]).
You can maintain symmetry while manipulating points (see Manipulating Components Symmetrically).
You can paint weight maps symmetrically (see Weight Maps and Symmetry [Scene Elements]).
You can mirror envelope weights (see Mirroring Envelope Weights [Character Animation]).
You can also apply a symmetry constraint for transformations (see Symmetry Constraints [Animation]).
You can apply a symmetrize operator on a polygon mesh (see Symmetrizing Polygons [Modeling]).
As you model objects, you will be moving them around; that is, translating, rotating, and scaling them and their components. For more information about transformations in general, see Transformations [Working in 3D Space].
When you are working on complex models, you sometimes want to focus on a specific part. For example, you may want to hide the backside of an object while you are moving points on the front.
To do this, you can set a camera's clipping planes as described in Projection Plane.
You can use rotoscopy to display background plates in the 3D views. This lets you use images as guides when modeling. For more information about rotoscopy, see Rotoscopy [Basics].
Several display options are useful when modeling. For example:
The headlight is a virtual light shining into the scene from the position of the camera. It is useful when you want to see the shadowed parts of scene objects.
Wireframe opacity controls the intensity of the wireframe highlight in shaded views. It is useful for seeing the topology at the same time as the shading across edges.
To organize the objects of a scene into a hierarchy, you parent one element to another — this lets you propagate properties down the hierarchy from the root element.
You can select an entire hierarchy at once in tree mode by right-clicking on any member of the hierarchy or select an individual branch by middle-clicking on the top node of the branch you want. For example, when you select an object in branch mode and translate it, its children are translated with it.
You can create hierarchies using the Parent button or by dragging and dropping nodes in the explorer. For more information about hierarchies in general, see Creating Hierarchies [Scene Elements].
Layers are a useful tool for organizing your scene. You can divide your scene into layers and control the visibility, display, and selectability of all objects in a layer at once. For more information, see Scene Layers [Scene Elements].
 Except where otherwise noted, this work is licensed under a Creative Commons Attribution-NonCommercial-ShareAlike 3.0 Unported License