Creating Hierarchies


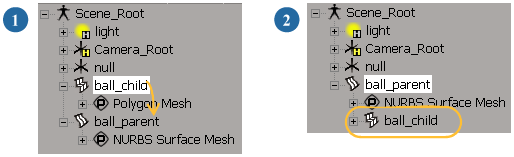
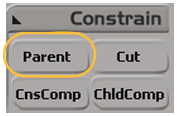
When creating a hierarchy, you should first analyze how you want the properties in the hierarchy arranged so that you can parent the objects appropriately. In a hierarchical structure, properties are propagated from a parent to a child.

To cut the links in a hierarchy, see Deleting Objects in a Hierarchy. To reorder the children of a parent, use the schematic view as described in Reordering Child Nodes in the Schematic [Windows and Views].

To create a hierarchy with the parent first

You can create a hierarchy by having either the proposed children or parent objects selected first, but sometimes it's easier to have the parent object selected first.

  1. Select the object you wish to be the parent.

  2. Click the Parent button in the Constrain panel or press the / key.

  3. Pick each of the children with the left mouse button.

  4. Right-click or press the Esc key to end the parenting mode.

To create a hierarchy with the children first

  1. Select the objects you wish to be the children.

  2. Click the Parent button in the Constrain panel or press the / key.

  3. Middle-click to pick the parent object.

  4. Right-click or press the Esc key to end the parenting mode.

To create a hierarchy in the explorer

  • Drag and drop the child node onto the node that you want to be the parent. If multiple nodes were selected first, they all become children of the new parent.

    1

    Make the ball_child a child of the ball_parent by dropping its node onto the ball_parent's node.

    2

    The ball_child is now under the ball_parent's node.

To create a hierarchy in the schematic view

  • Press Alt while dragging and dropping a node onto a new parent.

Creative Commons License Except where otherwise noted, this work is licensed under a Creative Commons Attribution-NonCommercial-ShareAlike 3.0 Unported License