You can edit the weights of points on an envelope in several ways:
By painting, as described in Painting Envelope Weights.
By setting numerical values, as described in Editing Envelope Weights Numerically. You can do this using either the Weight Editor or the Weight Paint Panel.
By smoothing, as described in Smoothing Envelope Weights.
By locking, as described in Locking Envelope Weights.
By mirroring symmetrically, as described in Mirroring Envelope Weights Symmetrically.
By limiting the number of deformers per point and enforcing that limit, as described in Limiting the Number of Deformers per Point.
When you have finished weighting, you can freeze the weights as described in Freezing Envelope Weights.
There are two main tools for modifying envelope weights:
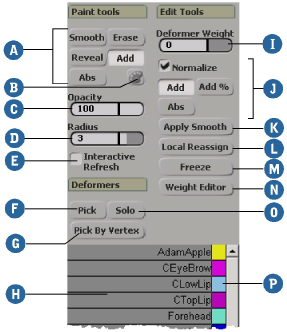
The weight paint panel is a tool that combines features from the weight editor, the brush properties, and the Animate toolbar into one convenient toolbar. You can use it either for painting weights or setting weight assignments numerically.
The weight editor is a view that can show the assignments of all the points and deformers at once or just the selected ones. It allows you to set the weight assignments numerically.
In addition, the Brush property editor contains various options for controlling how weights are painted.
The weight paint panel combines several features from the weight editor, brush properties, and the Animate toolbar. It is limited to displaying one envelope at a time.
The weight editor allows you to modify envelope weight assignments numerically. Unlike the weight paint panel, it can display the points and deformers of multiple envelopes at the same time.
The weight editor can be used for both weight maps and vertex colors as well as envelope weights. For those uses, see Weight Maps and Creating and Editing Color at Vertices (CAV) Maps
| A |
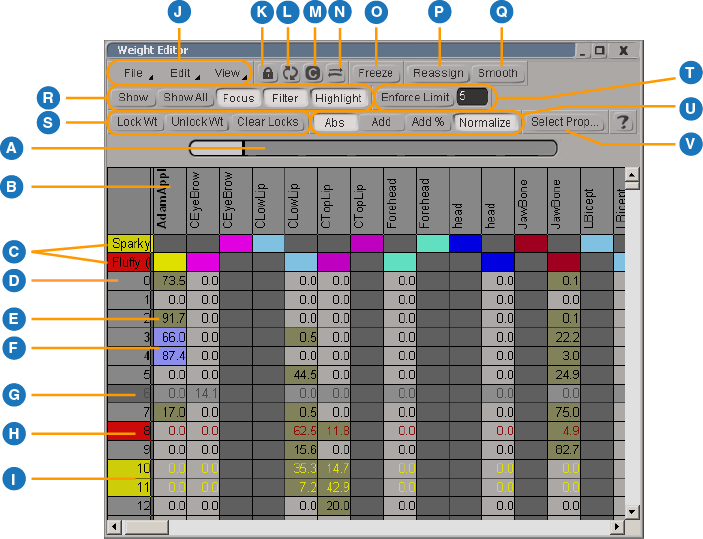
Sets the weight of selected cells. Values are affected by the weight edit mode (U). If multiple cells with different values are selected, the slider is blank but you can still use it to affect all values in the same way. Double-click the first horizontal splitter line to resize the first row to autofit the deformer names. |
| B |
Deformers are listed in columns with their corresponding color. Right-click to sort or access other options. Drag a column border to resize. Columns for deformers that are not part of the envelope are blank with a dark gray background. |
| C |
Multiple envelopes. Double-click to expand and collapse, or right-click for more options. If some points aren't fully weighted, the name is shown in red. If some points are weighted to more deformers than the value shown next to Enforce Limit, the envelope name is shown in yellow. Hover the mouse pointer over the name to see how many points are affected. Double-click the first vertical splitter line to resize the first column to autofit the envelope property names. |
| D |
Points are listed in rows. Click the row label to select, or right-click to sort or access other options. Drag a row border to resize. |
| E |
Each cell in the table represents how strongly the point (row) is weighted to the deformer (column). Non-zero weights are shaded brown. To set any cell's weight directly in the table, right-click in the cell and type a value. |
| F |
Selected cells are highlighted.
|
| G |
Locked points and weights are dimmed. |
| H |
Points that aren't fully weighted are shown in red. |
| I |
Points with more deformers than the limit are shown in yellow. |
| J |
Use the File menu to save or load presets. You can load a preset only if the number of points and deformers are the same as the current envelope. The options on the Edit and View menus are also available directly on the toolbar. |
| K |
Locks the view to the currently displayed elements. |
| L |
Forces the view to update when it is locked. Alternatively, you can press F6. |
| M |
Clears the view. |
| N |
Transfers the cell selection to 3D views. |
| O |
Freezes the envelope operator stack. |
| P |
Reassigns weights for the selected cells. Select the cells in the rows of the points that you want to reassign and the columns of the deformers that you want to reassign the points to, then click this button. |
| Q |
Smooths weights on the object or selected points. See Modifying Envelope Weights. |
| R |
Controls the display of points and deformers:
|
| S |
Lock or unlock the weights of selected cells or rows. |
| T |
Limit the number of deformers per point. See Modifying Envelope Weights |
| U |
|
| V |
Select an envelope weight property, weight map, or vertex color property to edit. |
You can use the Paint tool to adjust envelope weights. This lets you use a brush to apply and remove weights on points in the 3D views.
When you paint a stroke, a Weight Painter operator is applied to the envelope weights' stack. Successive paint strokes are combined into a single operator to minimize stored data and increase performance.
If a new paint stroke cannot be added to the previous operator (for example, if the previous operator is a Smooth Envelope Weight operator instead of a Weight Painter), then a new Weight Painter operator is applied on top of the stack.
This section provides a quick overview of painting envelopes weights. Each step is described in more detail in the sections that follow.
Activate the Paint tool by pressing W. For additional ways to activate the Paint tool, see Activating the Paint Tool [Commands and Tools].
Pick a deformer for which you want to paint weights. See Picking Deformers.
If desired, set the paint mode. See Setting Paint Modes.
If desired, adjust the brush properties:
Press R and drag the mouse to change the brush radius interactively. You can also set the radius on the weight paint panel. For additional ways to set the radius, see Changing the Brush Radius [Commands and Tools].
Press E and drag the mouse to change the opacity interactively. The opacity controls how much weight is added with each stamp of the brush. You can also set the opacity on the weight paint panel.
Set other options in the Brush Properties Property Editor [Properties Reference] (Ctrl+W).
Click and drag to paint. In normal (additive) paint mode:
Repeat steps 3 to 6 for other deformers and points until you are satisfied with the weighting.
When you paint weights on an envelope, you are modifying how points are weighted to the current deformer. Picking a different deformer allows you to change how points are weighted to the other deformers of the envelope. The active deformer is highlighted in the 3D views.
Click Pick on the weight paint panel and then pick a deformer in a 3D view.
Click a deformer's name in the list on the weight paint panel.
Click Pick By Vertex on the weight paint panel (or press and release Alt+D) and then pick a vertex on the envelope. The deformer with the most influence on that point becomes active for painting.
You can set paint modes from the weight paint panel or the Brush property editor. There are five modes:
Add (Normal) adds weight with the left mouse button.
Smooth blends the weights between deformers. As an alternative, you can apply a Smooth operator as described in Smoothing Envelope Weights.
Reveal scratches away the previous paint operator to reveal the weight "underneath" it.
Erase removes the influence of the deformer. It is equivalent to Abs mode with Opacity set to 0. This mode is available only on the weight paint panel.
Here are some quick tips to consider when painting weights:
To paint weights on a subdivision surface created with the geometry approximation method, click the eye icon on a viewport's menu bar and make sure that Polymesh Hulls is on. To see the weight maps on the hull, make sure that Subdivision Surfaces is off.

Use the Solo option on the weight paint panel to display the weight map for only the current deformer. This makes it easier to see which points the deformer influences and by how much.
If your envelope has multiple maps, for example, a weight map controlling a Push deformation in addition to an envelope weight map, then you may need to select the envelope weight map explicitly before you can paint on it. Softimage remembers the last map selected or applied on each object.
A quick way to select the envelope weight map is to select the enveloped geometry object, then choose Explore  Property Maps from the Select panel and select the map to paint on.
When painting on NURBS surfaces, you can increase performance by reducing the geometry approximation settings. The Paint tool uses the triangulation of the object to follow its surface. For more information, see Geometry Approximation on NURBS [Surface and Curve Modeling].
You can set envelope weights numerically using either the weight editor or the weight paint panel. The weight editor has a full set of controls, while the weight paint panel has a subset of these.
You can set a weight numerically by selecting a deformer and a point, then adjusting the Weight slider. You can turn the Normalize option off if desired.
This section gives a quick overview of the process of editing weights numerically. The sections that follow provide more details.
When you edit weights numerically, the weight options determine how the weights are affected by values you set:
The Normalize option automatically adjusts weight values so that they always add up to 100%. For example, suppose a point is weighted 50% to the shin and 50% to the femur. If you set the shin weight to 40%, the femur weight is automatically changed to 60% if Normalize is on.
There are two situations where you would want to turn Normalize off:
A point is weighted to three or more deformers, and you want to set numerically exact values. After you have set the weight for the first deformer, you do not want that value to change when you set the weight for the second deformer. (As an alternative in this case, you can lock weights instead of turning off Normalize — see Locking Envelope Weights.)
You want a "partial" envelope effect. If a point's weights do not add up to 100%, it behaves as if it is partly assigned to no deformer. Its position is a mix of the reference pose and the positions determined by its existing deformers.
When Normalize is on and you adjust a weight value, the other values are modified proportionally (that is, they are each multiplied by the same factor necessary to keep the total equal to 100). In particular, this means that if a point is already weighted 0 to a deformer, its weight will not change by being normalized.
Even when Normalize is off, a point's weight assignments cannot add up to more than 100.
In the weight editor, each cell shows the value by which the corresponding point (represented by the row) is weighted to the corresponding deformer (represented by the column). Selected cells are affected by the weight slider and are highlighted. Non-zero cells are shaded.
Do any or all of the following:
Right-click in the left-most column to sort the columns according to their values in that row, to hide points, or to expand or collapse envelopes.
Right-click in the top row to sort the rows according to the values in that column, or to hide deformers.
Use Show to display only those rows and columns containing the selected cells.
Use Lock to prevent the weight editor from automatically updating when you select a different deformer.
Use Update to show the currently selected envelopes if Lock is on.
The easiest way to select cells for editing is to use the 3D views. Depending on your viewing options, the weight editor updates automatically to show exactly what you are working on.
You can also select cells manually directly in the table. The corresponding points and deformers are highlighted in the 3D views.
To select a horizontal, vertical, or rectangular range of cells, you can drag across them from one end (or corner) to the other end (or diagonally opposite corner). Alternatively, you can select one end (or corner) and then Shift+click on the other end (or diagonally opposite corner).
To select all cells associated with a deformer, click the column header. You can drag, Shift+click, or Ctrl+click to select multiple columns.
To select all cells associated with a point, click the row header. You can drag, Shift+click, or Ctrl+click to select multiple rows.
If Highlight is on, the points corresponding to the selected cells are highlighted in the 3D views.
To select the points that correspond to the cells that are currently selected in the weight editor, click Sync.
You can set weights numerically in the weight editor for all highlighted cells or an individual cell. You can also set weights for the selected points and deformer using the weight paint panel.
No matter which method you use to set the weights, the values are adjusted according to the current options (Normalize, Abs, Add, Add%). Also, remember that the deformer weights for an individual point cannot add up to more than 100, so depending on the existing values you may notice that the new weights are not set to the exact value that you typed — instead, they are set to the highest possible value while keeping the total equal to 100.
There are several ways to smooth envelope weights:
By painting in Smooth mode as described in Painting Envelope Weights.
By applying a Smooth Envelope Weight Operator as described here.
By selecting cells in the weight editor and clicking Smooth. Note that this smooths all weights for the corresponding points (rows). If no cells are selected, then all weights for all points are smoothed.
You can lock or "hold" the values of envelope weights to prevent them from being changed. If you need to modify them later, you must first unlock them.
Locking prevents you from accidentally modifying points that you have carefully adjusted when you are working on other points. It is also useful for setting exact numeric values while keeping Normalize on so that points don't inadvertently become partially weighted to no deformer.
The weight editor gives you the most control, because you can lock a point's weight to some deformers while leaving that point's weight to other deformers unlocked. See Locking Envelope Weights in the Weight Editor.
The weight panel allows you to lock the weighting of all points to selected deformers. See Locking Envelope Weights on the Weight Panel.
The Envelope menu of the Animate toolbar allows you to lock selected points' weights to all deformers. See Locking Envelope Weights on the Envelope Menu.
Points that are locked for all deformers are drawn in black in the 3D views.
The weight editor allows you to lock specific cells as well as entire rows (all weights for the corresponding points) and entire columns (all weights for the corresponding deformers). Locked weight values appear dimmed (gray) in the weight editor.
Note that if you select an entire column by clicking in its header, then all weights associated with that deformer will be affected even if they are not currently listed in the table. Similarly, if you select a row by clicking in its header, then all of the corresponding point's weights will be affected. However, if you select all the cells in a row or column by clicking inside the table area, then only the weights actually listed in the table will be affected.
The weight panel allows you to lock all weights associated to specific deformers.
You can mirror the envelope weighting symmetrically. This lets you set up the weighting on one half or your character and then copy the weights to the corresponding points and deformers on the other half.
To mirror weights, your envelope must have:
A symmetry map to establish the correspondence between points.
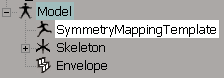
A symmetry mapping template to establish the correspondence between deformers.
A symmetry mapping template establishes the correspondence between deformers. At the same time that you create one, you can allow Softimage to automatically add mapping rules between deformers based on position and hierarchy structure, or you can create your own mapping rules later. You also have the option of creating a symmetry map for points at the same time as the mapping template.
Choose Deform Envelope Create Symmetry Mapping Template from the Animate toolbar.
In the Create Symmetry Map dialog box:
Deselect Fill Symmetry Template if you do not want Softimage to automatically create mapping rules between deformers. Either way, you can always add, change, and delete rules later.
Set Symmetry Axis to the desired plane of symmetry: YZ (X = 0), XZ (Y = 0), XY (Z = 0).
Deselect Create Symmetry Map if your envelope already has a symmetry map that you want to use for establishing the correspondence between points.
For more information about applying symmetry maps manually, see Manipulating Components Symmetrically [Data Exchange].
Click OK. The Symmetry Mapping Template property editor opens. You can use this property editor to add, change, and delete mapping rules as described in the next section, Editing Symmetry Mapping Templates.
Use the Symmetry Mapping Template property editor to add, change, and delete the mapping rules that establish correspondence between deformers when mirroring envelope weights. When you have finished editing, you can validate your changes to make sure that you have not entered a deformer's name incorrectly.
Note that the rules are bidirectional: for example, if you have a rule mapping LShin to RShin, then you do not need a second rule mapping RShin to LShin.
The Symmetry Mapping Template property editor opens automatically when you create a symmetry mapping template. You can also display it manually, for example, if you need to add or modify rules later.
Select the row above which you want to place the new rule by clicking its number in the first column.
Replace the default text <from> in the Map From column with the name of a deformer.
Replace the default text <to> in the Map To column with the name of the corresponding deformer on the other side of your character.
Click in the Map From or Map To column of the corresponding row to change the name of a deformer.
The drop-down list contains all deformers on the envelope; you can select one from this list or enter a name. Use the value <unmapped> if you do not want the weight assignments of a particular deformer to be mirrored.
Once your envelope has a symmetry map and a symmetry mapping template, you can mirror weights from selected points on one side of your character to the other side. The effect is not persistent — if you change the envelope weights later, you need to reapply this command.
Select the points whose weight you want to mirror to the other side.
Choose Deform Envelope Mirror Weights from the Animate toolbar.
If the envelope does not have a symmetry mapping template, you are prompted to create one now. Click Yes and refer to Creating a Symmetry Mapping Template for details.
The weights you defined for the selected points are transferred to the corresponding points and deformers on the other side of the envelope. A Weight painter operator is applied to the envelope weight map.
You can limit the number of deformers to which each point's weight is assigned. This can be especially important for game characters, because some game engines have a limit on the number of deformers.
Set the maximum number of deformers on the weight editor's command bar.

If a point's weight is assigned to more than this number of deformers, its row is shown in yellow in the weight editor. If an envelope has any such points, its row is shown in yellow, too.
To try to fix these points automatically, click Enforce Limit. A Limit Envelope Deformers operator is applied, and its property page is opened automatically. By default, the limit is the one you set on the command bar, but you can change it for individual operators.
If a point has more than the maximum number of deformers, the operator unassigns the deformers with the lowest weights and then normalizes the weight among the remainder. However, it will respect locked weights — locked weights are never changed, even if other deformers have greater weight. If there aren't enough unlocked weights to modify, then the total weight might not add up to 100%.
When you freeze envelope weights, the weight map's operator stack is collapsed, removing the original Automatic Envelope Assignment property along with any operators that have been applied. This reduces the amount of stored data and increases performance, but also has a number of other effects:
The initial envelope weights can no longer be recalculated — it's as if the envelope was imported as is.
Bounding volumes no longer have any effect. Adding new bounding volumes or moving existing bounding volumes does not change weight assignments.
If you change the reference pose, you can no longer change the initial envelope weights based on the new pose.
If you add a deformer to an envelope, you can no longer recalculate the weights automatically. The envelope points are all weighted 0 to the new deformer, and you must assign weights manually.
However, you can still add new paint strokes, smooth weights, and edit weights numerically after freezing. In addition, you can still reassign points locally to other deformers.
In an explorer, make sure that Clusters is checked on the Filters menu.
Locate the envelope weight operator stack. By default, it is under Clusters\EnvelopWeightCls, which is under the envelope's Polygon Mesh or NURBS Surface Mesh node.

Select Envelope_Weights if you want to freeze the entire stack, or an individual operator under it to freeze from that point down.
Softimage automatically assigns different colors to each deformer. This color is also used to display points that are assigned more than 50% to the deformer, and when painting weights for the deformer. You can change the colors, which may be useful if you find that the colors of two nearby deformers are difficult to distinguish.
You can use the commands on the File menu of the weight editor to save and load presets of envelope weights. This can be useful if you want to experiment with modifying weights — you can save the current weights and reload them later if you don't like the results.
To share presets between different envelopes, the envelopes must meet the following conditions:
They must have exactly the same topology. This includes both the number of points and their connections.
If you added points after you created a preset, and then reapply the preset to the modified geometry, the new points are not weighted to any deformer until you assign them manually.
The easiest way to meet these conditions is to simply duplicate a model containing an envelope and its deformers.
 Except where otherwise noted, this work is licensed under a Creative Commons Attribution-NonCommercial-ShareAlike 3.0 Unported License