Use the Biped rollout controls to place the biped in Figure, Footstep, Motion Flow, or Mixer mode, and to load and save BIP, STP, MFE, and FIG files. You'll find other controls on the Biped rollout, as well.
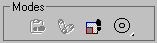
The Modes group on the Biped rollout lets you toggle Buffer, Bend Links, Rubber Band, Scale Stride, and In Place modes.
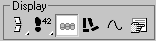
The Display group on the Biped rollout lets you adjust how the biped is displayed with controls to show or hide Objects, Bones, Footsteps, and Trajectories. It also provides access to a dialog for setting display preferences.
In addition, the Biped rollout provides controls for converting footsteps to freeform animation and vice-versa.

 Figure Mode
Use Figure mode to fit a biped to the mesh or mesh objects representing your character. Leave Figure mode on when you attach the mesh to the biped with Physique. Figure mode is also used to scale a biped with a mesh attached, to make biped "fit" adjustments after Physique is applied, and to correct posture in motion files that need a global posture change.
The Structure Rollout appears when Figure mode is active.
 Footstep Mode
Create and edit footsteps; generate a walk, run, or jump footstep pattern; edit selected footsteps in space; and append footsteps using parameters available in Footstep mode.
Two additional rollouts display on the Motion panel when Footstep mode is active:
 Motion Flow Mode
Create scripts and use editable transitions to combine BIP files together to create character animation in Motion Flow mode. After creating a script and editing transitions, use Save Segment on the Biped rollout to store a script as one long BIP file. Save an MFE file; this enables you to continue Motion Flow work in progress.
 Mixer Mode
Activates any current Mixer animation on the Biped and displays the Mixer rollout.
 Biped Playback
Plays the animation for all bipeds unless they are excluded on the Display Preferences dialog. This playback mode usually gives real-time playback, which you may not get if you use Play on the 3ds Max toolbar.
 Load File
The Open dialog lets you load .bip, .fig or .stp files.
 Save File
Opens the Save As dialog, where you can save Biped files (.bip), figure files (.fig), and step files (.stp) files.
 Convert
Convert a footstep animation to a freeform animation. This works in both directions. Displays the Convert to Freeform dialog or Convert to Footsteps dialog depending on the direction.
 Move All Mode
Allows the biped to be moved and rotated with its relative animation intact. You can transform the biped interactively in the viewport or with the dialog box that opens when the button is active.
When this button is active, the biped’s center of mass enlarges to be more easily selected for translation.
The Collapse button on the Move All dialog box allows you to reset the position and rotation values in the Move All dialog to zero, but does not change the position of the biped.
 Buffer Mode
Edit segments of an animation in Buffer mode. Copy footsteps and associated biped keys into the buffer using Copy Footsteps on the Footstep Operation rollout first, then turn on Buffer mode to view and edit the copied segment of your animation.
Edit footstep and biped animation that have been copied into the buffer using Copy Footsteps on the Footsteps Operation rollout. The changes can be pasted back by turning off Buffer Mode, turning on Paste Footsteps on the Footstep Operation rollout, and overlapping the buffered footsteps with the original footsteps. The buffered motion is spliced into the original animation.
 Rubber Band Mode
Use this to reposition the biped elbows and knees without moving the biped hands or feet in Figure mode. Reposition the biped center of mass to simulate the physics of wind or weight pushing against the biped. Figure mode must be turned on to enable Rubber Band Mode.
To reposition biped knees and elbows, turn on Figure mode and turn on Rubber Band mode. Select the Move transform tool, then select and drag a biped upperarm or thigh in the viewports. Use this as an aid to fitting a biped to a mesh.
To reposition the biped center of mass relative to the rest of the biped skeleton, turn on Figure mode and turn on Rubber Band mode. Select the Move transform tool, then select and drag the center of mass in the viewports. Use this to account for wind force or pushing against a heavy object. See Shifting the Biped's Balance.
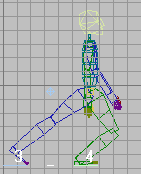
Moving the biped center of mass (blue diamond) behind the character, turns this default walk cycle into a struggle against a high wind.
 Scale Stride Mode
Footstep stride length and width are scaled to match the stride length and width of the biped figure. Scale Stride mode is on by default.
 Displays when Scale Stride mode is off.
Scale Stride mode is on by default, so scaling occurs automatically when you load a .bip, .stp, or .fig file. Scaling occurs when you paste footsteps and when you scale the biped’s legs or pelvis.
For example, if you load a .bip file that was saved from a larger biped, the footsteps come into your current scene scaled to match the selected smaller biped. If Scale Stride mode is off, the footsteps come into the current scene without being scaled down.
If you turn off Scale Stride mode and then go into Figure mode and scale the biped up or down, the footstep stride width and length remains the same when you exit Figure mode.
 In Place Mode
Use In Place mode to keep the biped visible in the viewports while the animation plays. Use this for biped key editing or adjusting envelopes with Physique. It prevents XY movement of the biped center of mass during animation playback; however, motion along the Z axis is preserved. This is a three-button fly-out. In Place mode is stored with the 3ds Max file.
 In Place Y Mode
Locks center of mass Y-axis motion. Use this for game export where the character stays in place but the swinging motion of the hips and upper body along the X-axis is preserved.
Biped keys for limbs, footsteps, and center of mass can be adjusted using In Place mode. When the center of mass is moved on the XY-axes in this mode, the footsteps move. View biped playback without requiring a follow camera. In this viewing mode, visible footsteps “slide” under the biped.
For export to games, this feature is valuable since many game engines intelligently move the character’s center of mass laterally according to game play. In Place mode makes it easy to view, tune, and export animation in a manner that is complimentary to game engine playback.
This flyout lets you display bones and objects, together or independently:
 ObjectsDisplays biped body objects; these will render if you do not turn them off before rendering. Hide the biped objects before
scene rendering. You can also hide individual body objects by using the standard 3ds Max Hide controls found in the Display panel and Display Floater.
ObjectsDisplays biped body objects; these will render if you do not turn them off before rendering. Hide the biped objects before
scene rendering. You can also hide individual body objects by using the standard 3ds Max Hide controls found in the Display panel and Display Floater.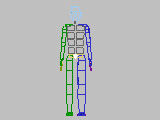
 BonesDisplays biped bones. Bones, which do not render, are represented as the color of the corresponding links. Displaying Bones
is useful for seeing exactly where the joints fall in relation to the biped objects.
BonesDisplays biped bones. Bones, which do not render, are represented as the color of the corresponding links. Displaying Bones
is useful for seeing exactly where the joints fall in relation to the biped objects.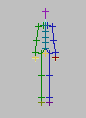
 Objects and BonesDisplays bones and objects simultaneously.
This flyout lets you display or hide footsteps and their numbers:
 Show Footsteps and NumbersDisplays biped footsteps and footstep numbers.
Footstep numbers specify the order in which the biped will move along the path created by the footsteps. Footstep numbers are displayed in white and do not render, but do appear in preview renderings.
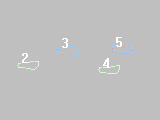
 Show FootstepsDisplays biped footsteps in the viewport, but no footstep numbers.
Footsteps are represented as green and blue foot-shaped outlines by default; these are also visible in preview renderings.
 Hide FootstepsTurns off footsteps and footstep numbers in the viewport.
 Twist Links
 Leg States
 Trajectories
Displays trajectories for selected biped limbs.
 Display Preferences
Displays the Display Preferences dialog which is used to change footstep colors, trajectory parameters, and to set the number of bipeds to be played back when you use Biped Playback on the Biped rollout. Footstep color preference is a good way to distinguish between the footsteps of two or more bipeds in a scene.
The Save As dialog lets you save biped (BIP), figure (FIG), and step (STP) files.
The Open dialog lets you load biped (BIP), figure (FIG), and step (STP) files.
Use the controls in the Display Preferences dialog to change footstep colors and trajectory parameters, and to set the number of bipeds to play back when you use Biped Playback on the Biped rollout.


 Motion panel