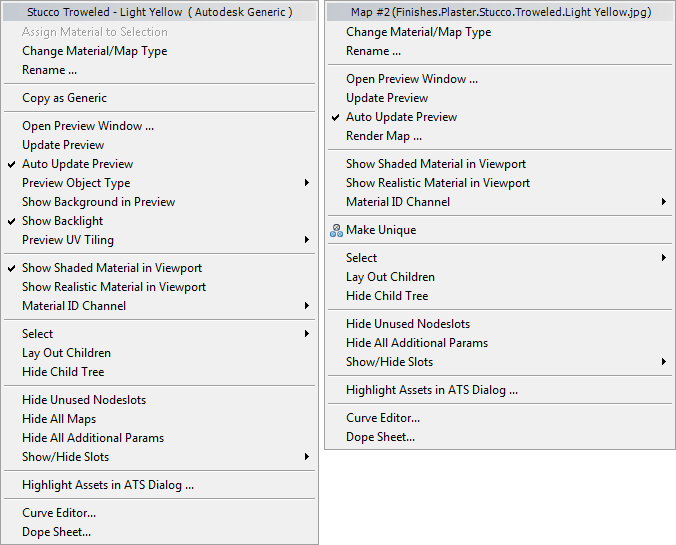
Right-clicking a material or map node displays a menu that has a variety of options for displaying and managing the material or map.
To assign a material ID channel to a material or a map:
 Change Material/Map Type
This choice appears only for map nodes that are Bitmaps.
If you have specified a bitmap editor such as Paint or Photoshop, choosing Edit Bitmap launches that editor and opens the current bitmap in the editor.
You can specify a bitmap editor in the Slate Material Editor Options dialog.
If you have not specified a bitmap editor before, 3ds Max opens a file dialog that lets you choose one. This program then becomes the default bitmap editor.
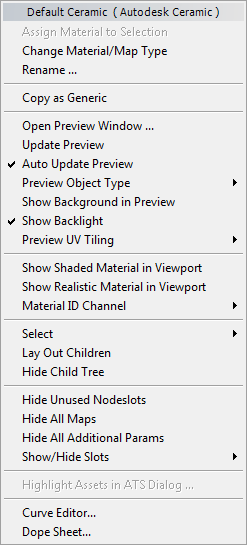
Right-click menu for an Autodesk Material node
Copy as GenericThis option can lose some type-specific information. For example, Autodesk Generic does not have a Flecks component such as Autodesk Metallic Paint does.
Opens a Preview window.
When on, changes to material settings automatically update the preview in the title bar of the node. Default=on.
When Auto Update Preview is turned off, a small “not” icon appears in the preview on the title bar of the node.

Preview icon when Auto Update is turned off
Render MapTo view a preview of an animated map, save the preview to a file, then use Rendering  View Image File.
This choice appears only for material nodes.
Lets you choose the sample object that appears in previews:
This choice appears only for material nodes.
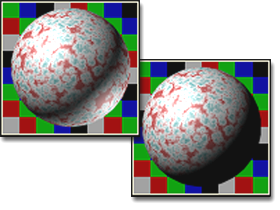
Turning on Show Background In Preview adds a multicolored checkered background to the Preview window for that material. The pattern background is helpful when you want to see effects of opacity and transparency. Default=off.
This choice appears only for material nodes.
When on, previews show a backlight. When off, the backlight is turned off. Default=on.
The effect is most easily seen with the sample spheres, where the backlight highlights the lower-right edge of the sphere.
Backlight is especially useful whenever you're creating metal and Strauss materials. Backlight lets you see and adjust the specular highlight created by glancing light, which is much brighter on metals.
This choice appears only for material nodes.
Adjusts the repetition of the map pattern on the sample object in previews.
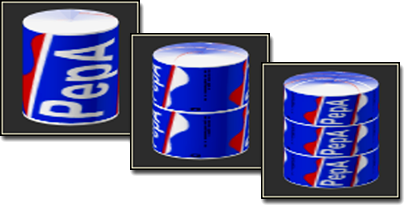
1x1, 2x2, and 3x3 sample tiling
The tiling pattern you set with this option affects only previews. It has no effect on the tiling on the geometry in the scene, which you control with parameters in the map's own coordinates rollout.
The choices specify the number of times the pattern repeats over the surface of the sample object. Because maps are mapped spherically around the sample sphere, the tiling repetition covers the entire surface of the sphere. The sample cylinder maps cylindrically. The sample box uses box mapping: The tiling appears on each side of the cube.
When on, 3ds Max displays the map in viewports. When off, viewports don’t show the map, and display only the material’s underlying color. Default=off.
For a legacy viewport driver (not Nitrous), if the map is assigned to more than one material (or more than one component of the same material), the Slate Material Editor opens a pop-up menu that lets you choose the material for which the map will be displayed or hidden in viewports. This also happens if the node is a material used as a sub-material by more than one material.
Uses the hardware display and enables viewport display of all maps for the active material. Default=off.
For a legacy viewport driver (not Nitrous), if the map is assigned to more than one material (or more than one component of the same material), the Slate Material Editor opens a pop-up menu that lets you choose the material for which the map will be displayed or hidden in viewports. This also happens if the node is a material used as a sub-material by more than one material.
The choices on this submenu tag a material as a target for a Video Post effect or a rendering effect, or for storing with a rendered image saved in RLA or RPF file format (so that the channel value can be used in a post-processing application). The material ID value is the counterpart of a G-buffer value for objects.
Zero (#0), the default, indicates that no material ID channel is assigned.
A value from #1 to #15 means to apply a Video Post or rendering effect that uses this channel ID to this material.
For example, you might want a material to glow wherever it appears in the scene. The material is in the Material Editor and the glow comes from a rendering effect. First, you add a Glow rendering effect and set it up so that it operates on ID #1. Use Material ID Channel to give the material an ID number of #1, then apply the material to objects in the scene in the usual way.
To save the channel data with the rendering, use the RLA or RPF format.
Make UniqueThis choice is equivalent to Make Branch Unique on the right-click menu for a wire: Children of the node you are duplicating are duplicated as well.
Select By Material allows you to select objects based on the active material in the Material Editor. Choosing this command opens the Select Objects dialog, which works like Select From Scene . All objects that have the selected material applied to them are highlighted in the list.
When on, the View hides children of the currently selected node. When off, child nodes are displayed. Default=off.
When child nodes are hidden, you can tell which slots have maps, because their sockets are displayed in green instead of blue.
Green-colored sockets indicate that even though child nodes are hidden, the first two slots of this material have a map.
Hides or shows the mr Connection section for this node.
Displays submenus that let you choose which material or map components to display as node slots.
When Additional Parameters or mr Connection settings are displayed, they have their own Open/Close (+/–) icon, like the node itself.

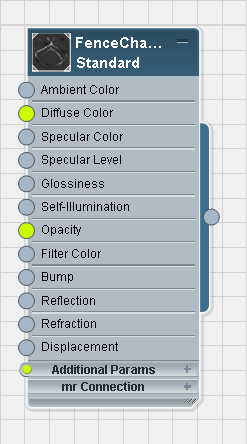
A node with the Additional Params displayed but closed
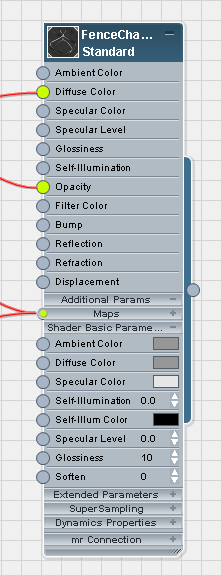
The same node with the list of Additional Params Shader Basic Params group opened
Both the Maps and Additional Params submenus have two choices that follow the individual component entries:
This section of the menu appears only if there are multiple views.
Highlight Assets in ATS DialogOpens Track View in the Editing Keys in Curve Editor mode. If the material or map has animation, the animated track is displayed. If the material or map has multiple animated tracks, only the first is displayed, and you must navigate in the Controller window to find the others.
Opens Track View in the Dope Sheet Introduction mode. If the material or map has animation, the animated track is displayed. If the material or map has multiple animated tracks, only the first is displayed, and you must navigate in the Controller window to find the others.


 (Assign Material to Selection)

 (Show Background in Preview)
 (Show Shaded Map in Viewport)
 (Show Realistic Map in Viewport)
 (Select by Material)
 (Lay Out Children)
 (Hide Unused Nodeslots)