 Command entry:Main toolbar
 (Curve Editor (Open)) Highlight animated tracks. Curves are displayed in Key Window.
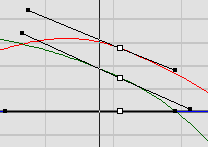
The Curve Editor displays animation as function curves, charting the controllers' changes of value over time.
Highlighting a controller label displays keys for that item as vertices on the function curve. You can then highlight keys and change their values.
You can add keys to function curves for tracks that are not yet animated. The curves appear as straight lines. When you add a key to a function curve, a controller is created for that track.
Not all controller types display function curves. For example, a TCB Rotation controller doesn't display a function curve, while an Euler XYZ rotation controller shows individual curves for X, Y and Z. Some controllers display individual tracks for each axis, while other controllers combine the three axis values into a single curve.

Spline tangents
You can use Bezier handles in the Curve Editor to change the shape of the trajectory through a key. To display handles on a key, right-click a key in the Track View Key Window and choose the Spline Tangents option. You can assign the Spline Tangent type only to keys on tracks that use a Bezier controller. This places tangent handles on the keys that you can manipulate horizontally and vertically.
 Select an animated object.
The function curves for the object's animation are displayed in the Key window of the Function Curve Editor.
Manual Navigation.
The curves for all highlighted tracks are displayed together in the Key window.
The Region tool makes it easy to move and scale groups of keys in Curve Editor. To use it, first highlight tracks to edit, then drag out a region in the Key window: This selects all keys of highlighted tracks within the width of the drag. Then, to move the keys, drag inside the region, or to scale them, drag a handle on the region border.
Scale Values is used to proportionally increase or decrease the vertical distance between selected keys on the function curves in Curve Editor. It uses the Scale Origin Line as a movable reference point for the scale operation. Practically speaking, scaling values always creates spatial adjustments, rather than temporal. To scale in time, use Scale Time instead.
Use this tool to draw new curves, or revise existing ones by sketching directly on the function curve in the Curve Editor Key window.
By default, all key tangents are set to Auto and Show Tangents is on, so the tangents are drawn as blue dashed handles emanating from highlighted keys in the Key window of Track View. If the Move tool is active, you can adjust the shape of a function curve near the key by dragging the handle endpoints. For more information about tangents, see Tangent Types.
Lock Tangents lets you manipulate handles of multiple vertices simultaneously. When Lock Tangents is active, dragging a tangent handle affects the handles of all highlighted keys. When Lock Tangents is inactive, dragging a tangent handle affects only that handle's key.
The Parameter Curve Out-of-Range Types feature lets you specify how an animated object behaves outside the range of the keys you've defined.
Apply - Ease Curve and Apply - Multiplier Curve (available from the Curves menu in the Curve Editor) create an ease curve or multiplier curve track. These tracks let you modify or intensify an existing animation track without changing the original track.
Remove (Ease/Multiplier Curve) lets you delete an ease or multiplier curve at any time.
Use On/Off when you want to work with the original function curve rather than a curve altered by ease and multiplier curves. A disabled curve has no effect on its assigned track, but can be enabled to restore the effect.
Ease Curve Out-of-Range Types displays a dialog that lets you assign out-of-range types for the current ease curve.
Multiplier Curve Out-of-Range Types displays a dialog that lets you assign out-of-range types for the current multiplier curve.
Freeze Non-Selected Curves is a selection modifier that makes all non-highlighted curves uneditable. Default=On.


