The mental ray ® renderer from mental images ® is a general-purpose renderer that can generate physically correct simulations of lighting effects, including ray-traced reflections and refractions, caustics, and global illumination.
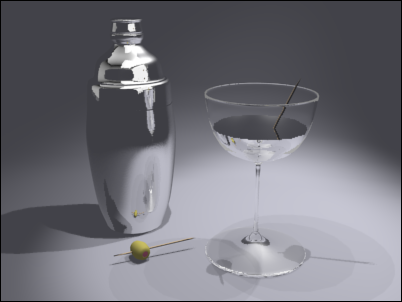
Scene rendered with the default 3ds Max scanline renderer
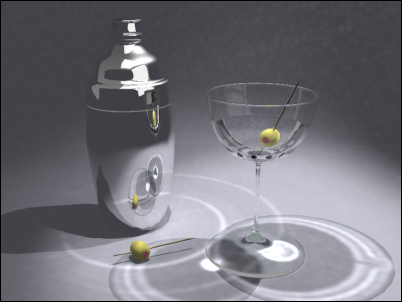
Same scene rendered with the mental ray renderer
The second rendering, done with the mental ray renderer, shows caustics cast by refraction through the martini glass. Caustics are also visible in the reflection on the cocktail shaker.
The mental ray renderer in 3ds Max supports the mental ray version 2 (mi2) and version 3 (mi3) formats. It does not support the mental ray version 1 (mi1) format.
Differences Between the mental ray Renderer and the Default Scanline Renderer
Compared to the default 3ds Max scanline renderer, the mental ray renderer relieves you of the need to simulate complex lighting effects "by hand" or by generating a radiosity solution. The mental ray renderer is optimized to use multiple processors and to take advantage of incremental changes for efficient rendering of animations.
Unlike the default 3ds Max renderer, which renders scanlines from the top of the image downward, the mental ray renderer renders rectangular blocks
called buckets. The order in which the buckets are rendered can vary, depending on the method you choose. By default, mental ray uses the
Hilbert method, which picks the next bucket to render based on the cost of switching to the next one. Because objects can
be discarded from the memory to render other objects, it’s important to avoid having to reload the same object multiple times.
This is especially important when you have enabled placeholder objects (see the Processing panel  Translator Options rollout).
If you use distributed rendering to render a scene, it might be hard to understand the logic behind the rendering order. In
this case, the order has been optimized to avoid sending lots of data over the network. Each CPU is assigned a bucket as the
bucket becomes available, so different buckets can appear in the rendered image at different times. See the Renderer panel
Sampling Quality rollout.
To use the mental ray renderer:
Render Setup. The Render Setup dialog opens.
Now the Render Setup dialog contains the mental ray controls. You can choose to render the scene with the built-in mental ray renderer, or simply to translate the scene and save it in an MI file that you can render later, perhaps on a different system. Controls for choosing whether to render, save to an MI file, or both, are on the Translator Options rollout.
To use the mental ray translator and renderer, you must first choose mental ray as the production renderer, as described the "Procedures" section below. Once you have chosen mental ray rendering, the Render Setup dialog displays panels and rollouts that control the mental ray renderer.
Although the mental ray renderer is relatively easy to use once you’ve set it up correctly, there are several "gotchas" that you might encounter immediately, especially if you’re primarily accustomed to the 3ds Max scanline renderer and its workflow. For example, see 3ds Max Materials in mental ray Renderings. Following are some basic rules of thumb for using mental ray in 3ds Max:
For the most part, the mental ray renderer treats 3ds Max maps and materials the same way the default scanline renderer does. The exceptions are listed below. In general, if the mental ray renderer does not recognize a map or material, it renders it as opaque black.
The primary interface to the mental ray renderer consists of rollouts on the Render Setup dialog. To choose the mental ray renderer, use the Assign Renderer rollout, as described in this procedure.
The mental ray renderer uses several file formats to save information.
These topics describe what the mental ray renderer can do, and explain how it accomplishes these effects. For more technical detail about mental ray capabilities, see the mental ray Reference, available from Help menu Additional Help, and the books Programming mental ray and Rendering with mental ray, both by Thomas Driemeyer.
Topics in this section cover the Render Setup dialog panels that are specific to mental ray rendering.


