A bitmap is an image produced by a fixed matrix of colored pixels, like a mosaic. Bitmaps are useful for creating many kinds of materials, from wood grains and wall surfaces to skin and feathers. You can also use an animation or video file instead of a bitmap to create an animated material.
Bitmaps shown in Material Editor sample slots
When you assign the Bitmap map, the Select Bitmap Image File dialog opens automatically. Use this dialog to specify a file or sequence as the bitmap image. See Image File Formats for a list of the supported bitmap types and their controls.
You can create a Bitmap by dragging a supported bitmap file from Windows Explorer into the Slate Material Editor. 3ds Max creates a Bitmap node with the file loaded into it.
The Bitmap map can synchronize the frames of a bitmap sequence to the age of particles to which the map is applied. With this effect, each particle displays the complete sequence when it is born, starting at the first frame, rather than being assigned whichever frame is current. You accomplish this by doing the following:
For more details and a procedure, see Material Dynamic Operator.
A frame window appears, displaying the image surrounded by a region outline (a dashed line at the outer edges of the image, with handles on the sides and corners).
A frame window appears, displaying the image surrounded by a region outline (a dashed line at the outer edges of the image, with handles on the sides and corners).
The reduced image becomes a "decal": The Diffuse color is visible around the image.
To use the alpha channel that is part of the bitmap:
(You can assign a copy or instance of this map to other components, such as Diffuse, as well.)
 Alpha Source group, choose Image Alpha.
This option is not available if the bitmap does not have an alpha channel.
Mono Channel Output group, choose Alpha.
This option is not available if the bitmap does not have an alpha channel.
Now the bitmapped material will have the transparency specified by the alpha channel. This will appear in production renderings. Transparency does not appear in viewports or ActiveShade renderings.
To create an alpha channel based on intensity:
Alpha Source group, turn on RGB Intensity.
3ds Max creates an alpha channel. Full-intensity areas of the image are opaque, zero-intensity areas are transparent, and intermediate colors become partially transparent.
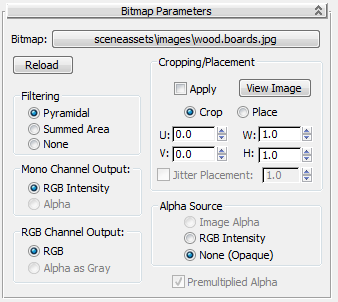
Some parameters, such as opacity or specular level, are a single value as opposed to a material's three-value color components. Controls in this group determine the source of the Output mono channel in terms of the input bitmap.
Uses the intensity of the alpha channel as the map.
The RGB Channel Output determines where the output RGB part comes from. The controls in this group affect only maps for material components that display color: Ambient, Diffuse, Specular, Filter Color, Reflection, and Refraction.
The controls in this group let you crop the bitmap or reduce its size for custom placement. Cropping a bitmap means to reduce it to a smaller rectangular area than it originally had. Cropping doesn't change the scale of the bitmap.
Placing a bitmap lets you scale the map and place it anywhere within its tile. Placing can change the bitmap's scale, but shows the entire bitmap. The four values that specify the placement and size of the cropping or placement region are all animatable.
Cropping and placement settings affect the bitmap only as it's used for this map and any instances of the map. They have no effect on the bitmap file itself.
Opens a window that shows the bitmap surrounded by a region outline with handles at its sides and corners. To change the size of the crop area, drag the handles. To move the region, position the mouse cursor inside it and drag.
To see the results of editing the region, turn on Apply (see preceding). This shows changes in the region as you make them.
The bitmap window has U/V and W/H (width/height) controls on its toolbar. Use these to adjust the location and size the image or crop area.
When Place is chosen, dragging the region area handles changes the scale of the bitmap (hold down Ctrl to preserve the bitmap's aspect ratio), and dragging the image changes its location within the tile area.
The UV/XY button at the right of the window toolbar lets you switch between using UV or XY coordinates in the toolbar spinners (Default=UV). .
Controls in this group determine the source of the Output alpha channel in terms of the input bitmap.
Determines how alpha is treated in the bitmap. When turned on, the default, premultiplied alpha is expected in the file. When turned off, the alpha is treated as non-premultiplied, and any RGB values are ignored.
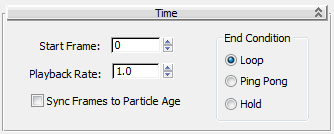
These controls let you change the start time and speed of animation (AVI or MOV) files used as animated texture maps. They make it easier to use sequences of images as maps in scenes, because you can control the timing very precisely
When on, 3ds Max synchronizes the frames of a bitmap sequence to the age of particles to which the map is applied. With this effect, each particle displays the sequence from the start when it is born, rather than being assigned whichever frame is current. Default=off.
When using Particle Flow, assign the material containing the Bitmap map to a Material Dynamic operator. For more details and a procedure, see Material Dynamic Operator.
The Select Bitmap Image dialog allows you to choose a file or sequence of files for a map. If a sequence of files is selected by turning on Sequence, the Image File List Control dialog is opened when you click Setup or Open.


 Material Editor