| So you’ve drawn your sketch,
and at this point it’s probably looking a lot like you’ve drawn
it on a napkin. How do we get it to be the right size and shape?
To make sure your sketch has the right size we’ll add dimensions,
and to ensure the sketch maintains the right shape, we’ll add geometric
constraints. We’re used to working with dimensions in AutoCAD—but
what exactly are constraints?
Rules to Live By
Think of constraints as geometric rules by which your sketch must
abide. You can place a vertical constraint on a line that forces
that line to be vertical regardless of what you do to the sketch.
You may tell two circles that they are always to be concentric.
You might force a line and an arc always to be tangent to one another.
You’re essentially setting up a relationship between the various
objects in your sketch. Constraints don’t stop with sketching—you’ll
find that you can also place constraints in assemblies to control
placement of components, direction of movement, and so on.
After drawing your sketch, you can easily add constraints by selecting
them from the Sketch panel bar or by selecting Add Constraints from
the right-click shortcut menu.

(A) You can see
all existing constraints by selecting the Show Constraints tool
from the panel bar. Rows of constraint glyphs (I just love that
word!) appear. To delete a constraint, simply select the constraint,
right-click to display the shortcut menu, and select the Delete
option.
A fully constrained sketch is one that can't move at all (which
means that at least one fixed constraint was added). You'll find
that a fully constrained sketch turns a darker color. Some people
insist on fully constraining their base sketch, some do not-the
choice is yours.

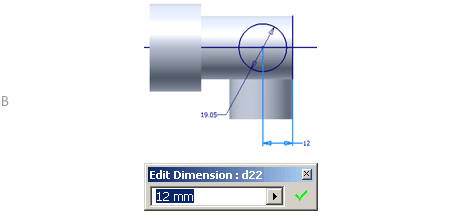
Dimensioning (B)
Dimensioning, technically another form of a constraint, is used
to control the size of your sketch. The dimensioning feature in
Autodesk Inventor is one of my favorites because it’s so easy—you
need to use only one dimensioning tool for all your dimensions (imagine
that!). Autodesk Inventor is intelligent enough to choose the proper
dimension type depending on what you select. Pick General Dimension
from the panel bar and select the desired geometry. If for some
reason the dimension that appears is not what you were after (for
example, Diameter rather than Radius), simply right-click and switch
to the desired type. After you place the dimension, the Edit Dimension
dialog box appears and you can input the desired value. If the Edit
Dimension dialog box doesn’t appear, simply double-click on the
value to edit it.This is where the real power of Autodesk Inventor
begins—you’ll find that you can change the size of your sketch at
any time just by changing the dimensions.
Objects: A Smart Collection of Sketch Entities
A funny thing happens when you add dimensions to a fully constrained
sketch. The addition of the dimensions and constraints turns the
lines and arcs in the sketch into a smart object.Now when you make
changes to any one entity in the sketch, all of the remaining entities
know “exactly” how to update to maintain the implied shape and size.
Autodesk Inventor technology is based on dynamic and associative
relationships. A good understanding of constraints is definitely
key to your success in Autodesk Inventor!
< back next
>
|


