


Correct the Walk and Add
Secondary Motion
Although the walk cycle is now complete, you can make the biped’s motion more realistic by adding secondary motion such as swinging the arms, as this lesson shows. This lesson also shows a way to correct biped motion by examining the biped’s trajectory.
Biped has its own trajectory display. You can use it to observe the movement of the center of mass in the walk cycle. You can also edit the keys on the trajectory directly in the viewport.
 (Body Horizontal).
 Trajectories.
A line appears on the viewports showing the COM's trajectory: the path it moves along during the animation.
 (Select And Move) toolbar.
At the top of the
(Select And Move) toolbar.
At the top of the  Motion panel, turn on Sub-Object, and
then click any key on the trajectory.
Motion panel, turn on Sub-Object, and
then click any key on the trajectory.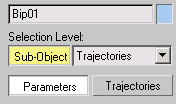
 move the keys to correct
the trajectory.
move the keys to correct
the trajectory.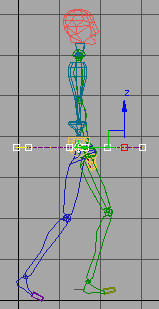
Edit keys in biped trajectory.

 (Trajectories).
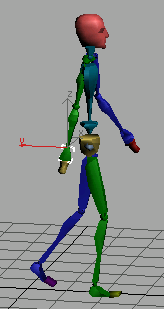
The character is starting to look like it’s walking, but it’s still quite stiff. Adding arm swings will put some life in the animation.
The arms swing opposite to the legs. When the right leg is forward, the left arm is forward. Arms bend at the elbow on the forward swing, and stretch out straight on the backward swing.
The right leg stretches out at frame 27, and you’ll keyframe the left arm to swing there.
 (Auto Key).
move the left hand slightly,
to set a key.
move the right hand slightly,
to set a key.
move the left hand so it
swings forward.
(Auto Key).
move the left hand slightly,
to set a key.
move the right hand slightly,
to set a key.
move the left hand so it
swings forward.
Position the arm so there is a slight bend at the elbow. Since Auto Key is on, you have keyframed the arm by moving it.
 (Opposite).
Move the right hand back
slightly, so the arm is stretched out.
(Opposite).
Move the right hand back
slightly, so the arm is stretched out.
Now the left arm is forward and bent a little, while the right arm is back and straight.
The entire right arm is selected.
Motion panel, open the Copy/Paste
rollout and click  (Copy Posture).
 (Create Collection). Name
the Collection walkcycle1.
(Create Collection). Name
the Collection walkcycle1.
(Copy Posture). Name the
Copied Posture RArm back.
 (Paste Posture Opposite).
(Copy Posture) again. Name
the posture LArm forward.
(Paste Posture Opposite).
(Copy Posture) again. Name
the posture LArm forward.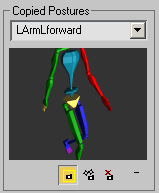
(Paste Posture Opposite).
 (Auto Key).
Add sway to the shoulders and hips:
You’ve animated the character by moving its hands and feet and center of mass. But the spine, hips, and head are still stationary. You’ll add some rotations to the shoulders and hips to complete the walk cycle.
 Select Bip01 Pelvis and drag
the time slider to frame 15.
Select Bip01 Pelvis and drag
the time slider to frame 15.
The left foot is locked at this frame with a planted key.
Be careful where you add the hip rotations. Don’t inadvertently disturb the work you’ve done on the feet so far.
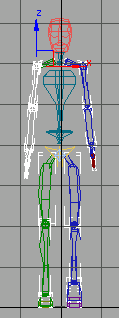
As the legs extend and swing forward, the hips rotate slightly in the direction of the movement.
 Rotate the pelvis about
the Y-axis approximately –2 degrees, and
Rotate the pelvis about
the Y-axis approximately –2 degrees, and  set a key.
The pelvis will not accept too much rotation. When you set the key, the pelvis corrects itself to account for the locked foot.
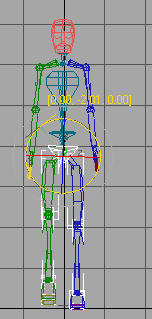
Rotation added to the hips from the Front view.
Rotate the pelvis back 2
degrees about the Y axis, and set a key.
Rotate the pelvis back about
–3 degrees about the X axis, and set a key.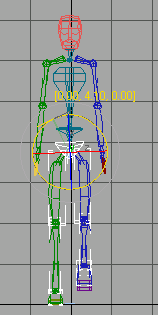
Rotate the pelvis about
4 degrees around the Y axis, then set a key. Repeat for the
X axis, and set another key
rotate the pelvis –2 degrees around
the Y axis again, then set a key.
The procedure is the same for the spine. At frame 27, the arms swing out in one direction. At frame 37, they swing in the opposite direction.
Select the biped spine object, Bip01 Spine.
rotate the spine in the
direction of the arm swing (about –6 degrees around the X axis),
then set a key.
rotate the spine approximately
12 degrees about the X axis, and set a key.
The spine can freely rotate about all three axes. You can make adjustments on each one. Rotate about the Z axis for a more stooped walk. Increase rotation about the X axis to make the walk loose and floppy.
The Bend Links rollout includes tools you can use for animation. You can use either the Bend Links or the Twist Links to animate the bending and/or twisting of the spine.
 (Figure Mode).
In the Structure Rollout, change Spine Links to 5.
You can have up to 10 spine links, but five is enough to observe the Twist Links effect.
 (Figure Mode).
(Auto Key).
(Figure Mode).
(Auto Key).

Select the Bip01
Spine object. This is the lowest spine object in the
biped.
rotate the object slightly
about the X axis to add a key. Do the same about the Y axis.
rotate approximately 10
degrees about the X axis so the spine rotates following the swing
of the arms. The blue arm is swinging forward, so rotate the spine to
match.
rotate –1 degree about the
Y axis.
The slight rotation of the first spine object results in a larger effect further up the hierarchy.
You have animated a simple walk cycle using freeform animation and IK constraints.
You can use the footstep method of animation to create a walk cycle automatically. To learn about this technique, see Creating a Distinctive Walk.
 Save the scene as walkcycle_fullmotion.max.