Transformations include three basic types of operations that manipulate an element in 3D space: scaling affects an element's size, rotation affects an element's orientation, and translation affects an element's position. Transformations are sometimes called SRTs.
There are two types of transformation values: local and global. Local transformations are stored relative to an object's parent, while global ones are stored relative to the origin of the scene's global coordinate system. The global transformation values are the final result of all the local transformations that are propagated down the object hierarchy from parent to child.
For more information in general about animation and transformations, see Animating Transformations.
When you transform interactively, you always do so using one of several modes. The mode determines which coordinate system is used for manipulation.
It is important to realize that the manipulation mode affects the interaction only. For example, if you translate an object along only the X axis in Ref mode, the object may be moving along the X, Y, and Z axes in both the local and global reference frames. In particular, Local and Global manipulation modes control which axes are used for mouse movement and not whether the animated values are local or global.
The Translate, Rotate, and Scale tools each have different manipulation modes. See Translation Modes, Rotation Modes, and Scaling Modes.
There are two main ways to transform objects interactively when a transformation tool is active in the 3D views:
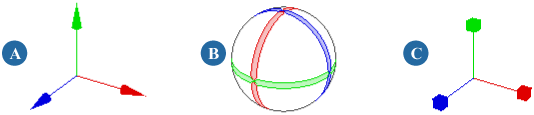
Transformation manipulators: Translate (A), Rotate (B), and Scale (C).
If you are using the SRT manipulators, click and drag on different parts of the displayed transformation axes to transform an object in different ways. For more information about the SRT manipulators, see Transforming Interactively with the SRT Manipulators.
If you are not using the SRT manipulators, click and drag anywhere in the 3D views. Use the different mouse buttons to transform an object in different ways. The specific effect of each mouse button depends on the manipulation mode — check the mouse/status line at the bottom of the Softimage window for details.
Using the SRT manipulators or not is a matter of personal preference. You can turn them on or off using Transform  Enable Transform Manipulators.
A third way to transform objects interactively is to use the bounding-box manipulator — see Transforming with the Bounding-Box Manipulator.
You can also transform objects non-interactively by setting numerical values — see Setting Values Numerically.
Transformations are propagated down hierarchies from parent to child. Objects in hierarchies behave differently when they transformed, depending on whether the objects are node-selected or branch-selected. See Transformations and Hierarchies.
All geometric objects have a center. The center defines the object's position in space. The object's points are stored as offsets from the center, and the local transformations of a child are relative to the parent's center.
You can display centers in a specific 3D view, or in all open 3D views at once. In addition, centers are automatically displayed when you transform centers as described in Center Manipulation. Centers are displayed as a set of axis indicators with a white circle at the origin.
Click the eye icon (Show menu) on a 3D view and turn Centers on or off.

For other ways of setting this and other display options, see Displaying Types of Elements and Other Data.
The pivot is the location around which objects are scaled and rotated. It is also the location which snaps to the target when translating.
There are two types of pivot in Softimage:
The object's pivot is stored in the scene and used for playing back animation. The default object pivot is the same as the center but it can be changed and even be animated, for example, to create a rolling cube. See Working with Object Pivots.
The temporary tool pivot is used for interactive manipulation only, not for playing back animation. The default is the same as the object pivot but you can change it as you work. This is useful for moving and aligning an object into position.
To set either pivot, see Setting the Pivot.
Useful tools for transformations in Softimage include the Transform panel, the Kinematics property editor, and the snapping feature.
The Transform panel is located in the middle of the main command area on the right of the main window.
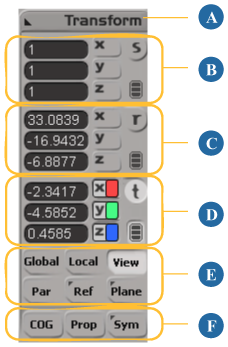
Most of these options are described in this chapter, with a couple of exceptions:
The Prop option at the bottom of the panel activates proportional modeling for components and is discussed in more detail in Using Proportional Modeling.
The Sym option activates symmetrical manipulation for several different features. See Weight Maps and Symmetry, Manipulating Components Symmetrically, Drawing Curves Symmetrically, and Creating Chains.
The mini transform panel is available at the top of the KP/L panel. It makes it easier to access transformation values when working with the keying panel and animation layers.
The mini transform panel contains similar controls to the transform panel, but in a different layout.

Each object has a set of transformation controls found in its Kinematics property editor. The Kinematics property editor shows both the Local and Global Transform properties, and can be used to modify an object's scaling, rotation, and translation in X, Y, and Z, as well as other options. You can also quickly open an object's Local Transform property editor by itself.
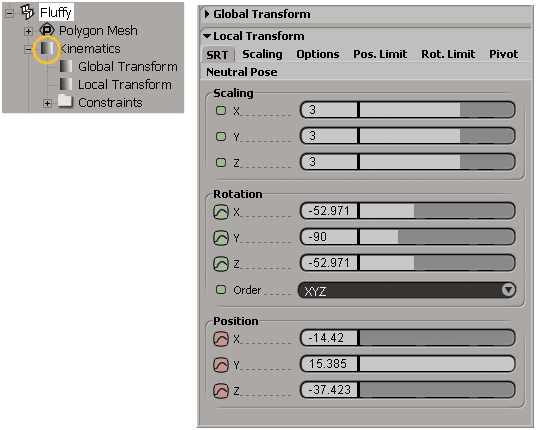
Clicking an object's Kinematics icon in an explorer displays transformation controls in the Kinematics property editor.
Select an object, then right-click on the Selection button on the Select panel and choose Kinematics.
Select an object and then choose Edit Properties Kinematics.
Right-click on any object in the explorer or schematic view and choose Kinematics.
Alt+right-click on any object in a 3D view (Ctrl+Alt+right-click on Linux) and choose Kinematics.
Snapping lets you position objects interactively with precision. The snapping feature of Softimage is described in Snapping.
There are several preferences that affect the display, interaction, and other options of the transformation tools.
Choose Transform Transform Preferences from the Transform panel.
For information about all the available options, see Transform Preferences.
 Except where otherwise noted, this work is licensed under a Creative Commons Attribution-NonCommercial-ShareAlike 3.0 Unported License


