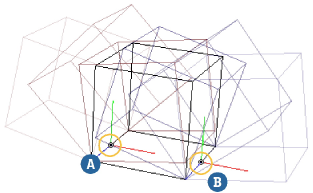
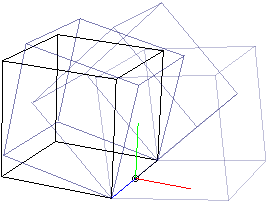
The object pivot is the position about which objects are scaled and rotated when playing back animation. You can change and even animate the object pivot — for example, this lets you create a rolling cube.

| A |
For the first set of frames, the cube rotates about the first keyframed position of the pivot. |
| B |
For the second set of frames, the cube rotates about the second keyframed position of the pivot. |
By default, the object pivot is the same as the object's center. You change the pivot by setting an offset from the object's center.
The object pivot is also the default pivot used for manipulation. However, it can be overridden by setting the temporary tool pivot, by transforming in Ref mode, or by activating COG. The axes used for manipulation are determined by the manipulation mode (for example, Local, View, Par, etc.) and are not affected by the pivot's scale and orientation.
Unlike the tool pivot, the object pivot is not used when transforming components.
You can set the object pivot's location interactively as described in Setting the Pivot.
The pivot's position, rotation, and scaling values are also available on the Pivot tab of an object's Local Transform property editor. This property editor also allows you to reset or deactivate the pivot. You can open the selected object's Local Transform property editor quickly by pressing Ctrl+K. However, you should not modify the Compensation values directly — for more information, see A Word About Pivot Compensation.
When you change the pivot's pose using any method, any pre-existing animation of the local scaling or rotation values is interpreted around the new pose. This may give unexpected results when you play back the animation. You should set the pivot pose before setting keys on the scaling or rotation values at any given frame.
On the Pivot tab of an object's Local Transform property editor, toggle Active on or off.
When the pivot is active, the local scaling and rotation values are interpreted about the pivot's pose. When it is not active, they are interpreted about the object's center.
When you select or deselect Active, the object does not immediately jump to a new pose because the local transformation values are automatically adjusted to keep the object in place. However, if the transformations have been keyed, you will notice that the keyframe icon of the local transformations turn yellow to indicate that the current values are different from the keyed values. The transformations will return to the fcurve values if you change frames without setting new keys.
The Compensation values on the Pivot tab of an object's Local Transform property editor are calculated automatically. They ensure that the object does not move in global space if you change the pivot pose more than once. For this reason, you should not modify these parameters directly.
If you are absolutely certain that you will not change the pivot pose more than once, you can unset Compensate Pivot in the Pivot Control area. This simplifies the transformation calculations. However, it is safe to leave Compensate Pivot on.
If you set keys on the pivot's transformations, you must also set keys on the corresponding Compensation values. For example, if you set keys on any of the Pivot Rotation parameters, you must also set keys on all three of the Compensation Rotation parameters, and so on.
Most of the time, you will want to use constant interpolation for the pivot and compensation fcurves, as in the example of the rolling cube where the pivot suddenly jumps from one edge to another. Spline interpolation does not give mathematically correct results because the interpolated values do not compensate properly.
The Pivot Keying buttons in the Local Transform property editor are a convenient way to set keys on all the required parameters with a single click. These buttons use constant interpolation.
You can display pivots in the geometry views. The pivot appears as a set of axis indicators with a white circle. The black bull's-eye in the middle of the circle distinguishes the pivot from the center. When the pivot has been deactivated, the colors of the axis indicators are less saturated.

Open the Camera Visibility property editor for a particular view by doing one of the following:
On the Transforms tab of the of the Camera Visibility property editor, turn the Object Pivots options on or off.
For other ways of setting this and other display options, see Displaying Types of Elements and Other Data [Basics].
 Except where otherwise noted, this work is licensed under a Creative Commons Attribution-NonCommercial-ShareAlike 3.0 Unported License