You can choose which types of things to display in each view. You can hide or display different types of objects, components, attributes, and other information. Be aware that the more things that are displayed, the slower the scene will update. None of these options affect what is rendered.
In addition to what's described here, you can hide or display specific objects as described in Showing and Hiding Specific Objects.
You can show and hide elements and components by type in the geometry views. For example, you can display only geometric objects and hide the controllers of your rig, or vice versa.
Besides showing and hiding objects and components, you can also choose to display or hide object attributes such as centers, points, and normals. Object attributes are useful visual cues when performing certain tasks. For example, to verify in Wireframe whether a surface is correctly oriented for rendering purposes, you would display the object's normals.
You can set these options for a specific view, or you can set them for all open views at once. You can set the most common options directly from menus, or access all possible options in the Camera Visibility property editor. The Camera Visibility property editor also lets you display certain information for selected and unselected objects independently.

The different kinds of information that you can display are described in the contexts where they are useful throughout this guide. For a quick summary of every one, see Objects [Properties Reference].
You can display the values of attributes of objects and their components in the 3D views. This includes intrinsic attributes like area, volume, and point positions, as well as attributes controlled by ICE trees (see ICE Guide for more about ICE trees).
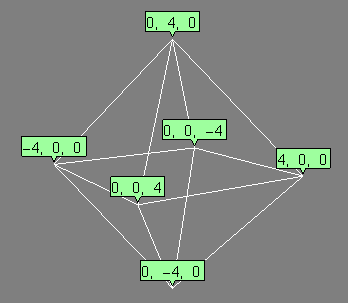
The formats that are available depend on the data type. For example, you can display some data types such as 3D vectors representing [X, Y, Z] data in a variety of ways.
It's important to remember that Softimage does not understand what the data means. It's up to you to determine what format makes the most sense for a particular attribute.

PointPosition displayed as numeric data.
You can create multiple display attributes and display any number of them in the viewport at the same time. You can offset the data labels so that it's easier to see when there are multiple attributes displayed. You can also display attributes for only a percentage or specific range of elements to reduce the clutter in the view.
Select one or more geometric objects.
Note that non-geometric objects like nulls are not supported.
Set Display As and other parameters as desired. See AttributeDisplay Property Editor [Properties Reference].
You can hide attribute values without removing the AttributeDisplay property, allowing you to easily unhide them later.
Click on a view's Show menu (eye icon) and choose Display/ICE Attributes.
For other ways of setting this and other display options, see Displaying Types of Elements and Other Data.
Note that this affects both AttributeDisplay properties on objects as well as port value displays in ICE trees.
You can display a view grid for reference when working in the 3D views. The grid helps you position and orient the objects in your scene, but the grid itself is not rendered.
Press G while the mouse pointer is over the view.
For other ways of setting this and other display options, see Displaying Types of Elements and Other Data.
On the Visual Cues tab, set Floor/Grid and Plane in the Show group as well as the options in the Floor/Grid Setup group as desired. For a description of all available options, see Objects [Properties Reference].
Although not discussed here, you can choose to display custom information in 3D views.
For example, you can specify preset tokens and text strings (called templates) to create a "viewport slate". A viewport slate can be defined for a specific camera view, or for all cameras views at once. The Viewport Slate options are set on the Stats tab of the Objects. When enabled, the template information is shown in any viewport set to a Camera or Render Pass view.
Alternatively, you can create a "heads-up display" (HUD) to show and edit the values of whatever parameters you want — see Displaying Custom and Proxy Parameters in 3D Views [Customizing Softimage].
 Except where otherwise noted, this work is licensed under a Creative Commons Attribution-NonCommercial-ShareAlike 3.0 Unported License