While the process of creating a chain is very simple, here are some important points that may have a big impact on the resulting chains.
Make sure to draw bones as close to their "natural" angles as possible — which are their preferred angles. Drawing bones in a straight line can result in unpredictable bending: preferred angles help you predict how a chain will bend. For more information, see Basic Concepts for Inverse Kinematics.
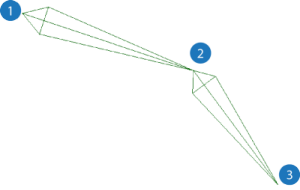
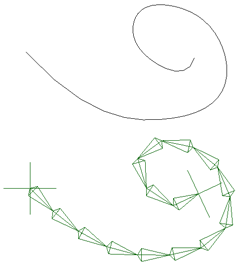
Chain drawn with slight bend to determine its direction of movement when using IK. This state shows the preferred rotation angle for each bone's joint.
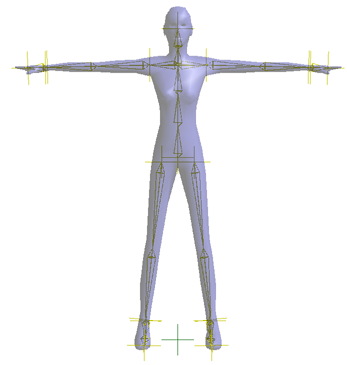
Draw the skeleton chains in relation to the default pose of the envelope in which you're going to use them. This means you don't have to spend as much time resizing each bone later.
Size does matter, to a certain extent. While you can usually model regardless of scale, don't make chains too small (such as a 2- or 3-jointed chain in less than 1 Softimage unit). This is because a small scale limits the amount of precision available for further calculations, such as rotation.
You can use snapping when drawing 2D or 3D chains — see Snapping for more information.
You can draw chains in symmetry — see Drawing Chains Symmetrically.
The orientation of a chain root depends on the view in which you're drawing the chain. For example, in the Front view the orientation is 0,0,0, but in the Right view it's 0,90,0.
Make sure that Create  Skeleton Align Root to First Bone When Drawing is active if you want to change the root's orientation to match the first bone's when you draw a chain. See Aligning the Root's Orientation to Match the First Bone for more information.
Choose Create Skeleton Draw 2D Chain or Draw 3D Chain from either the Model or Animate toolbar.
Click again to create first bone and second joint.
Before release the mouse button, you can hold it down and drag to set the bone's length and joint position. The bone and joint are not created until you release the mouse button.
Click once more to create another bone and joint. Continue clicking to create as many bones as you like.
A 2D chain is created in the local XY plane of the root and its joints rotate about their local Z axes.
A bone's local X axis always points along the bone — that is, in the direction of the next joint (or if it is the last bone, the effector). To change the axis to a different one, see Changing the Bone's Axis Alignment for Mocap Data.
Skeleton SI|3D Skeleton Drawing command. With this type of chain, the position and orientation inheritance is turned off, the same as when you import chains
into Softimage from SOFTIMAGE|3D. Make sure this command is active, then draw a chain as usual.
Implicit bone chains have only bones: unlike the standard IK chains, they don't have a root, joints, or an IK effector (solver). This makes them useful for runtime rigs in games where IK is not needed and can slow down the playback performance. As well, skeletons that are non-IK are more efficient to use with ICE Kinematics.
You can import implicit bone chains as FBX files into Autodesk Maya or Autodesk MotionBuilder, which both support skeletons without roots, joints, and effectors.
The hierarchy of the bone chain is different from an IK chain because the first bone in the chain is the parent instead of the root. There are no IK restrictions on the bones, so they become disconnected from the other bones in the chain when you translate them; however, you can use the Move Joint tool to move the bones while keeping them "connected" to the other bones.
To draw an implicit bone chain:
Choose the Create Skeleton Draw Bones command from either the Model or Animate toolbar.
Click once to start the first bone of the chain. A temporary root null is created while drawing, but does not remain.
Click again to create first bone.
Before release the mouse button, you can hold it down and drag to set the bone's length and end position. The bone is not created until you release the mouse button.
Click once more to create another bone. Continue clicking to create as many bones as you like.
You can edit the bone's properties in the Chain Bone or Bone Property Editor.
To get an implicit bone primitive, choose the Get Primitive Implicit Bone command from any toolbar and then modify its parameters in the Bone property editor.
In addition to drawing a chain bone by bone, you can create a 3D chain based on a curve. If you're creating a skeleton with a multi-boned chain, such as an octopus' tentacles or a dog's tail, it might be easier to draw and position the curve first and then convert it to a chain.
In the dialog box that opens, specify the number of bones in the 3D chain to be created. The more bones, the more accurately it will reflect the shape of the curve.
Although the slider only lets you specify up to 20 bones, you can type any value you like in the slider's text box.
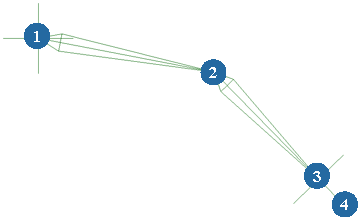
The chain's root is created at the curve's first point; that is, the first point that was created when the curve was drawn.
Select the Constrain Chain to Curve option to keep a constraint between the chain and its curve so that whatever you do to the curve is reflected in the chain, such as animating it. This option makes it easier to animate the curve instead of setting up an IK rig to do this.
If you deactivate this option, you can move the chain independently of the curve.
If you want to draw two chains that need to be mirrored, such as a character's arms or legs, you can draw one and have the other one created at the same time in symmetry mode.
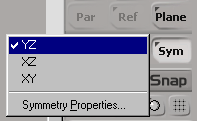
Click the Sym button in the Transform panel in the main command panel to activate symmetry.
Right-click on the Sym button to select a symmetry plane. A thick line appears down the middle in the viewport indicating the mirroring point.
Draw a chain as usual (see Creating Chains) and see its mirror image being drawn at the same time across the plane.
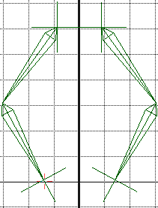
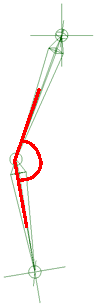
Chain is drawn in the Front view using YZ as the symmetry plane.
You can reset a bone's rotation to the value of its preferred angle of rotation. This effectively resets the chain to its "shape" or position when you created it.For more information on preferred rotation angles, see Changing the Joint's Preferred Angle.
 Except where otherwise noted, this work is licensed under a Creative Commons Attribution-NonCommercial-ShareAlike 3.0 Unported License