Acting is the process of bringing the face to life! Using the tools on the Act panel, you can animate the face by either moving the animation controls and keying their positions, or by applying motion capture data to the animation controls. As well, there are tools to help you specifically with eye blink animation.
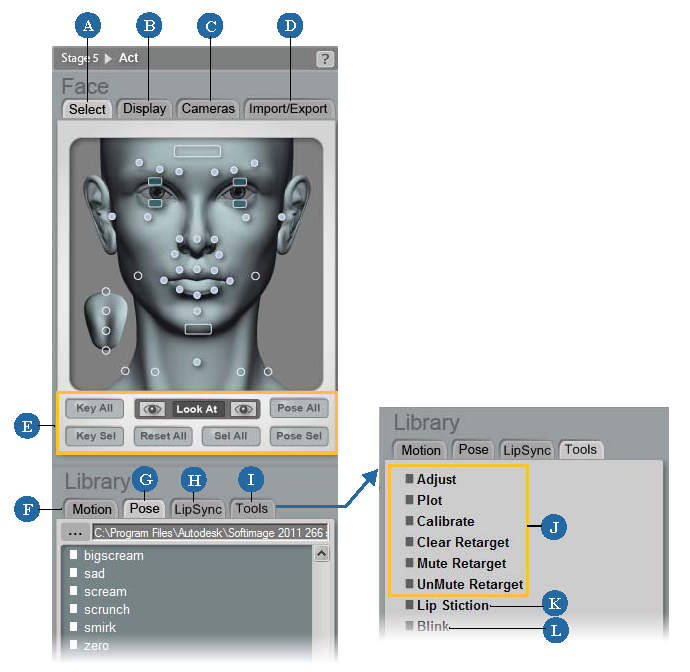
The Act panel is divided up into two main sections: the Face panel on top and the Library panel below it. See the following image and table to find where all of the options on the Act panel are discussed:

| A |
The Select tab contains the animation controls and their key buttons — see Animation Control Set. |
| B |
The Display tab contains options for toggling the display of certain elements in the scene — Displaying and Hiding Elements. |
| C |
The Cameras tab contains buttons to let you quickly change the camera view — Switching Cameras. |
| D |
The Import/Export tab contains commands for exporting the Face Robot head in different ways, as well as caching the animation — see Exporting from Face Robot. |
| E |
The key buttons for animating the animation controls — see Keyframing the Animation Controls. |
| F |
The Motion tab contains all animation clips you have loaded — see Applying Motion Capture Data. |
| G |
The Pose tab contains all animation pose clips you have loaded — see Applying and Creating Poses. |
| H |
The LipSync tab contains commands for creating lip-sync animation — see Lip-Synchronization Animation. |
| I |
The Tools tab contains commands for several different animation issues — see I, J, and K. |
| J |
These commands on the Tools tab help you work with motion capture animation data — see The Motion Capture Process. |
| K |
The Lip Stiction command on the Tools tab controls "sticky lips" — see Solving the Sticky Lips Problem |
| L |
The Blink command on the Tools tab lets you quickly animate eye blinking — see Animating Eye Blinking. |
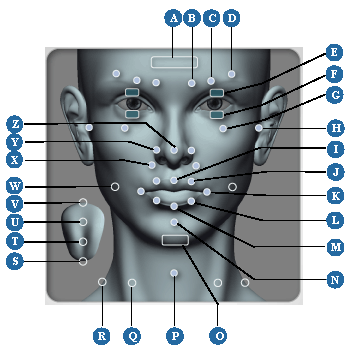
Face Robot provides you with a standardized set of animation controls that can be used to pose a human face into any expression. Together with the soft tissue parameters, the animation control set drives the animation of the face, either with keys or motion capture data.

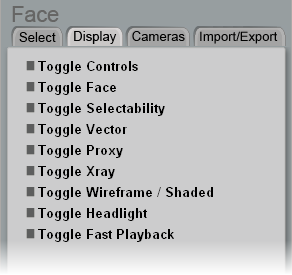
On the Act panel, click the Face  Display tab to select the elements you want to see or hide in the viewport, as well as change the display mode.

| Toggle Controls |
Toggles the visibility of the animation controls. |
| Toggle Face |
Toggles the visibility of the face mesh. |
| Toggle Selectability |
Toggles whether or not scene elements can be selected. |
| Toggle Vector |
Toggles the visibility of red curves around the mouth area so that you can quickly check the lip animation. The face is hidden when you select this option, but the teeth, eyeballs, and animation controls remain visible. |
| Toggle Proxy |
Toggles the visibility of a proxy mouth mesh so that you can quickly check the mouth's animation. The face is hidden when you select this option, but the teeth, eyeballs, and animation controls remain visible. |
| Toggle Xray |
Toggles the Xray (see-through) display setting on and off. |
| Toggle Wireframe / Shaded |
Toggles between wireframe and shaded display mode for the meshes. |
| Toggle Headlight |
Toggles the head light on and off, making the difference between a matte (on) and shiny surface (off). |
| Toggle Fast Playback |
Toggles the Fast Playback option on and off. See Saving and Loading a Fast Playback Cache File for more information. |
As a workaround, you can select the Toggle Face and/or Toggle Controls on the Display tab to return the face and/or animation controls to their hidden status.
Switching to different cameras helps you quickly see different parts of the head.
 Except where otherwise noted, this work is licensed under a Creative Commons Attribution-NonCommercial-ShareAlike 3.0 Unported License