The human face has a finite number of useful landmarks to capture. The areas between these landmarks are only reacting to the movement of these points, albeit in a very complex manner. Face Robot is particularly useful for motion capture animation because it requires only a small number of facial capture markers (~32) to achieve high quality results.
When you're doing the motion capture session, you simply place markers on the critical areas of the actor's face. Then in Face Robot, you tune the soft tissue to accurately move the face in response to the captured motion. The results are more subtle movements and believable animation, all facets of which are controllable by you after the capture session has ended.
Here's a basic overview for working with motion capture in Face Robot, from capturing the mocap data to working with it in Face Robot.
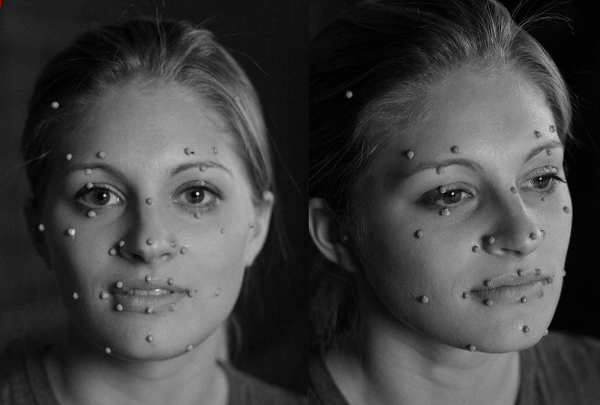
Place the mocap markers on the face of the actor.
Face Robot is driven by 32 control points called the Animation Control Set. These control points can be driven directly by motion capture data, so the motion capture marker placement is related closely to the positions of animation control set.
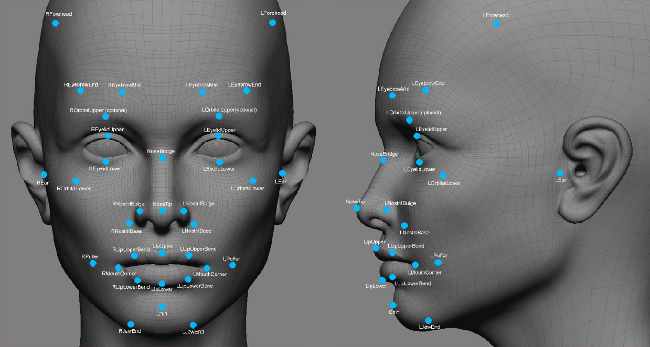
If you place the markers on the actor's face as shown in the following image, the mocap data that you capture will match perfectly with the animation controls on the head in Face Robot.
Make sure to name the markers with an appropriate naming convention that maps to Face Robot (see Animation Control Set).
Record the desired facial mocap expressions.
Make sure to take the important poses: base, key, extreme expressions, range of movement, standard expressions, and lip-sync visemes (visual phonemes).
The expressions you need to capture obviously depend on the performance that is required for the project. However, experience has shown that at least the following captures should be made to facilitate tuning of the head in Face Robot:
Base or zero pose: There should be a capture of a facial expression that corresponds to the rest pose 3D scan. The actor's face should be in a pose with eyes open, mouth closed, and expressionless. This simplifies the retargeting in the same way a T-pose is used for a default body pose in character animation.
Range of motion: The range of motion should exercise the widest possible range of facial deformations, from smiles to screams to frowns and sneers.
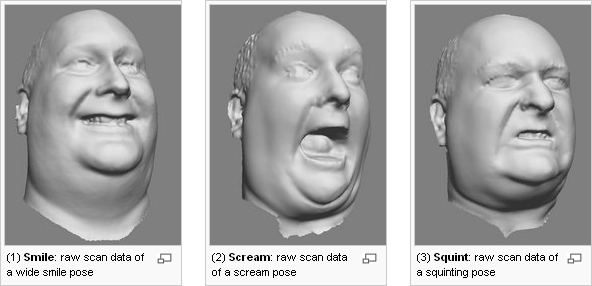
Key poses: In particular for 3D scanned heads, it is also useful to capture additional key poses because they make it easier to align the motion capture data with the facial model. This can be done either as part of the range of motion or in separate takes.
Clean up and filter the data, saving it as C3D data. This format is a standard optical marker-based file format used predominantly for facial capture.
Organize the mocap data into separate folders for each capture session.
In Face Robot, prepare the mocap data from each mocap session for the face in Face Robot. This involves loading the zero (base) pose C3D file into Face Robot and creating name and face map files. See Preparing Motion Capture Data for Retargeting for more information.
Once you've done this, the mocap data is ready to be used at any time and on any character in Face Robot.
Apply the mocap data to the animation controls on the face in Face Robot, including static poses (see Applying Motion Capture Data).
Retarget the mocap data to the face in Face Robot by adjusting and calibrating it. You can also set offsets on the animation controls on top of the mocap data and then bake the results into plotted fcurves.
See Calibrating the Mocap Data, Adjusting the Retargeted Mocap Data, Adding Offsets to the Mocap Data, and Plotting (Baking) the Mocap and Keyframe Data.
The placement of the stabilization markers is important. The nose bridge marker must be placed such that its movement relative to facial expressions like "scrunching" the nose is minimal. Likewise, the left and right forehead markers must be placed in such a way that their movement relative to eyebrow motions is minimal.
Keep the shoulders steady: The two motion capture markers driving the neck tendons in the animation controls are also influenced by movements in the shoulders, such as when the actor's arms are raised above the head. In an ideal scenario, the actor will sit in a chair with a relatively motionless body posture and emotional acting focused on head movement and facial expressions.
One actor, one set of markers: Save all C3D files in one session with the same actor and markers. Then when you're retargeting the data, you only need to create one name map and one face map to apply to all C3D files taken in that session.
Facial scans with mocap markers: To help you figure out which marker is which when you load the C3D file into Face Robot to create a name map, you should take a scan of the actor with the markers to act as a reference.
To speed up interaction, press F6 and select Toggle Face. You can quickly scrub to the frame of the reference video that you want to work on and then click Toggle Face again.
To make a preview, click on the camera icon at the top of the viewport and choose Start Capture. This creates a flipbook (playblast) using whatever view mode is shown in that viewport.
You can control the amount of motion coming from each mocap marker by choosing Adjust from the Tools tab on the Act panel.
Make sure that the Head Controls  Enable Rotation option is not selected for stabilized motion.
See Adjusting the Retargeted Mocap Data for information.
If the head isn't moving but should be, it's probably because the head translation and rotation are disabled in the Adjust property page by default. Simply activate them and set the translation scale to 1 to get the full head translation. See Adjusting the Retargeted Mocap Data for information.
If the head still doesn't move, it could be that the mocap data you are using is stabilized, meaning that the head translation and rotation have been filtered out of the mocap clip. Use the unstabilized version if you want head motion.
The last possibility is the mocap take has very little head motion: check your original mocap clip to confirm this.
You will notice that there are no visible keys or fcurves for the mocap. This is because mocap is in a live retargeting mode until you bake it (plot it) into fcurves. This lets you first make the adjustments to the mocap data before you make it final.
When you plot the motion capture data, the fcurves often have many keys, usually one per frame. A high-density fcurve is difficult to edit because if you change even a few keys, you have to adjust many other keys to retain the overall shape of the curve.
See Plotting (Baking) the Mocap and Keyframe Data for information.
Because there is no good way to capture the jaw motion with the skin sliding around and affecting the markers, you may need to make adjustments to the jaw control in order to compensate and keep the teeth the proper distance apart. You can do this simply by keying the translation of the jaw control. Remember to key back to a neutral pose at some point. Use a video reference and check the extreme poses and anywhere that the teeth are supposed to be touching.
The most important parts of lip sync can't really be captured, so most of your time will be spent addressing this. The interior shape of the lips, the way the fat bunches up in the corners, the way the skin sticks together ... this stuff makes or breaks realistic lip sync. The best way to get it right is to model the fixes with localized shape animation.
 Except where otherwise noted, this work is licensed under a Creative Commons Attribution-NonCommercial-ShareAlike 3.0 Unported License


