After you load and adjust the biped guide to match your character, you can create a rig based on these new proportions. The rig is a skeleton that includes control objects that you can position and orient to animate the various parts of the character body.
The rig provides a foundation of rigging components, allowing you to define as much detail as you need. You can get very specific results by setting roll divisions, volume controls, shadow rigs, and more.

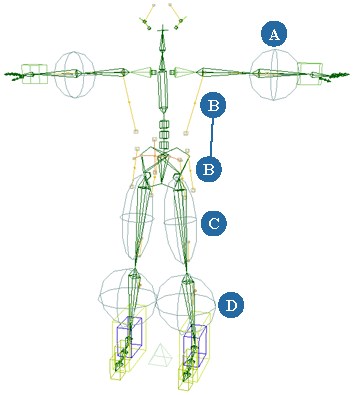
Biped rig created based on the character's body as defined by the biped proportional guide.
Although there are a great deal of styles available from generating a rig this way, it is simple to do further modifications. The rig is composed of standard Softimage components that you can delete, constrain, or connect to new objects.
Modify the proportioning guide to match your character's proportions (see Setting Up the Biped Guides).
If you have more than one guide in the scene, select the biped or biped dog leg guide for which you want to create a rig.
Choose Create  Character Rig from Biped Guide or Create Character Rig from Biped Dog Leg Guide from the Animate toolbar.
In the Make Biped or Make Biped Dog Leg dialog box that appears, set up the rig elements as you need. The sections following this procedure provide a summary of the options on each property page in the dialog box.
Click OK and a new skeleton rig based on the guide's proportions and the options you selected is created.
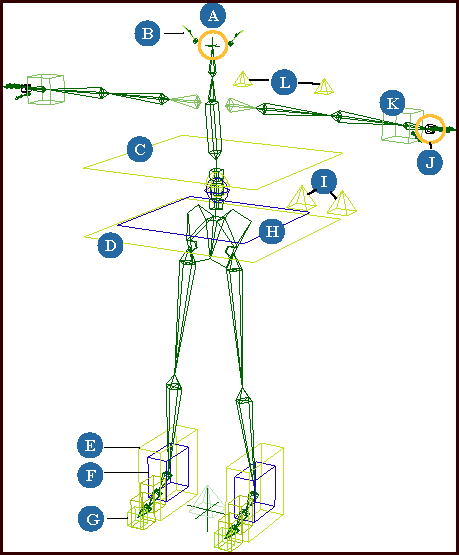
| A |
Head (null): controls rotation and translation of head. See Setting Up the Head, Neck, and Ears for more information. |
| B |
Ears: curves are chains driven by springs. Cubes control ears' rotation. See Spring Operators for Tail, Ear, and Belly Rig Controls for more information. |
| C |
Chest: controls rotation and translation of spine. |
| D |
Upper body (outer square): controls rotation and translation of upper body. |
| E |
Foot (outer cube): controls rotation and translation of foot. |
| F |
Foot roll (inner cube): controls rotation angle for step and heel roll. See Using the Biped or Biped Dog Leg Controls for more information. |
| G |
Toe (cube at tip): controls offset from the foot in rotation. |
| H |
Hips (inner square): controls rotation and translation of hips. |
| I |
Leg up-vectors (pyramids): control resolution plane of legs for IK. |
| J |
Hand Grab (small cube): controls rotation of fingers and thumb for making fists and claws. See Animating the Fingers and Hands for more information. |
| K |
Hand (cube): controls rotation and translation of hand. |
| L |
Arm up-vectors (pyramids): control resolution plane of arms for IK. |
The biped dog leg foot controls are the same as for the quadruped rig — see Creating the Rig.
The Toe (tip) control allows the foot to point in a particular direction or rotate without the toes going below this control object. Select the Toe control and rotate it or translate it to control the foot placement. Unlike manipulating the Foot control, the third bone won't go under the Toe control object.
You can also create a separate tail element that you can then use with any rig that you create, such as to create some fantastical creature using a biped dog leg rig. See Creating a Tail for more information.
You can hide the proportional guide after you've created the rig so that it's easier to see the rig.
It's a good idea to save a copy of the character's proportional guide in case you want to change the rigging options later.
After the rig is created, the Biped or Biped Dog Leg Controls appear. These let you scale the spine and upper body volume, as well as set the foot roll angle (and leg extension for the biped dog leg rig).
See Using the Biped or Biped Dog Leg Controls for more information.
Envelope the body geometry to the rig.
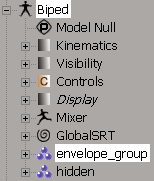
To envelope this character, weight it to the envelope_group group found in the rig's model. The contents change based on the rigging options.
If you have multiple envelope objects, weight all of them to the full envelope group. This makes it easier to paint weights across the multiple surfaces.
Translate and rotate the appropriate rig controls and key them to animate the parts of the skeleton.
See Tips for Using the Rigs for more information on using the rigs.
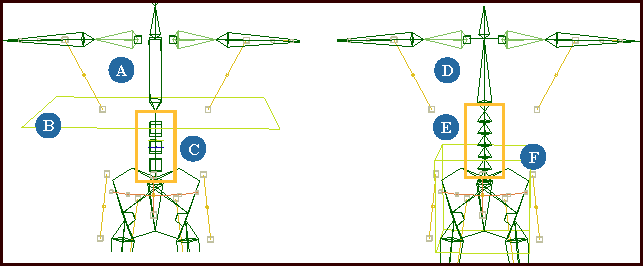
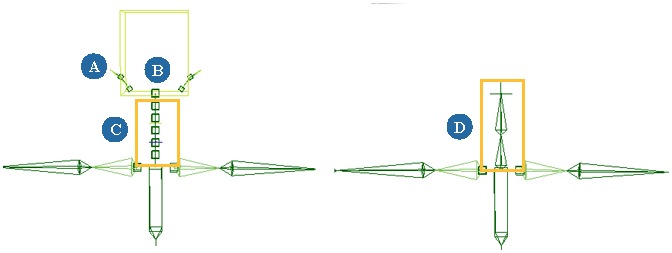
The options on the Chest page in the Make Biped/Biped Dog Leg dialog box let you select the way you want the spine to be set up in the torso area.
The Torso spine type can be either quaternion or regular skeleton. Both the spine types are compatible in all combinations of rigs and with the shadow rigs.
You can also choose what type of control icons you want for the chest or upper body: squares or cubes.
For details on each parameter, see Chest [Properties Reference].
Here are two examples of some possible combinations:
The options on the Belly page in the Make Biped/Biped Dog Leg dialog box let you create a belly control and set the weighting for it. This control may be useful for animating a character that has a large belly or paunch.
For details on each parameter, see Belly.

The options on the Head page in the Make Biped/Biped Dog Leg dialog box let you select the way you want the head and neck to be set up, including the creation of ear spring controls, which are useful for making humanoid creatures. The neck can be either a regular skeleton or a quaternion spine.
For details on each parameter, see Head.
Here are two examples of some possible combinations:
The options on the Limbs page in the Make Biped/Biped Dog Leg dialog box let you select the way the arms, fingers, and toes are created and animated. You can choose the type of arm rotation order (YZX or XYZ), whether or not the arms are manipulated symmetrically, and whether the arms are children of the shoulders or the hips.
You can also choose whether to use 2D or 3D chains for the fingers, and whether to create 2- or 3-bone toes.
For details on each parameter, see Limbs.
In the biped guide, there are small yellow triangles on the fingers called FingerBlades that let you set the angle of each finger that will be created in this rig. If you want to do this, first rotate them in the biped guide to get the desired angle for each finger before you create the rig.
To manipulate the fingers, see Animating the Fingers and Hands.
The options on the Roll Division page in the in the Make Biped/Biped Dog Leg dialog box allow you to choose how you want the skeleton's envelope to be weighted at a more refined level when the bone is rotated (rolled). You can set the roll divisions for the forearms, upper-arms (biceps), and thighs.
For details on each parameter, see Roll Division.
The roll division reduces the pinching that occurs when appendages with simple bone structure roll. These quaternion-based options create a set of nulls, based on the number of subdivisions that you specify, to distribute the weighting along the bone.
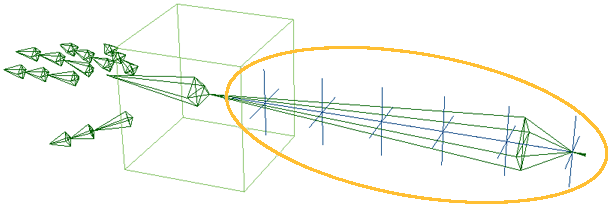
Six roll-division nulls created for refined envelope weighting on the forearm. The forearm roll division allows for more rotation at the wrist than the elbow.
When you're animating a rig, you need to take the final body envelope into consideration. This helps you animate appropriately, especially when the body is very large or unusually shaped.
To help you visualize and estimate the body's volume with the rig, you can select the options on the Skin page in the Make Biped/Biped Dog Leg dialog box. Based on the yellow splines you set up with the proportional guide (see Setting Up the Biped Guides), these options create a series of controls and nulls that approximate the body sliding and compressing over the skeleton.
For details on each parameter, see Skin.
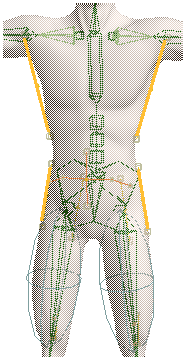
Volume controls are created based on the yellow splines in the guide that you adjusted to match the body's geometry
Using these controls, you can allow a character to reach extreme poses more easily than by weighting alone.
After you adjust the volume controls' position, rotation, and scale to get them into the poses that work optimally for your character, you should key these values. If you need to return to the original position where the control splines were generated (such as to modify or reapply the envelope), you can apply an action source to the rig called DefaultPose (see Action Sources).
Shadow rigs, sometimes referred to as export skeletons, are simpler rigs that are constrained to the more complex main rig that is used for animating the character. When you generate the main rig, you can create a shadow rig at the same time.
Shadow rigs are usually used for exporting animation, such as to a game or crowd engine or other 3D software programs. To transfer the animation from the complex rig to the shadow rig, plot the animation while the shadow rig is still constrained in place to the complex rig. Then you can export the shadow rig or just its animation.
On the Shadow Rigs page in the Make Biped/Biped Dog Leg dialog box, you can select the Type of shadow rig to create.
If you created a stretchy quaternion spine in the main rig (see Setting Up the Torso Spine), a stretchy quaternion spine is also created on the shadow rig.
If you chose to create roll divisions on the arms and/or legs in the main rig (see Setting the Roll Division), these roll divisions are also created on the shadow rig.
For details on each parameter, see Shadow Rigs.
Here are two examples of some possible options:
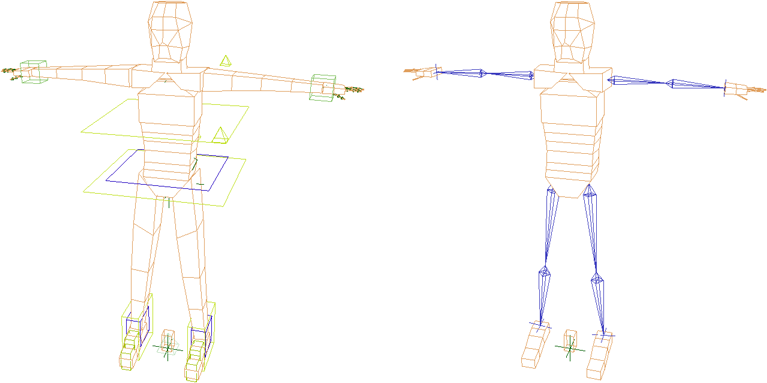
On the left, a box shadow rig on top of the main rig.
On the right, a box shadow rig with IK arms and legs.
When you animate the rig, the shadow rig follows along. You can then plot the animation on to the shadow rig, remove the constraints between the rigs, and the shadow rig is ready to be exported.
For information on plotting, see Plotting (Baking) Animation.
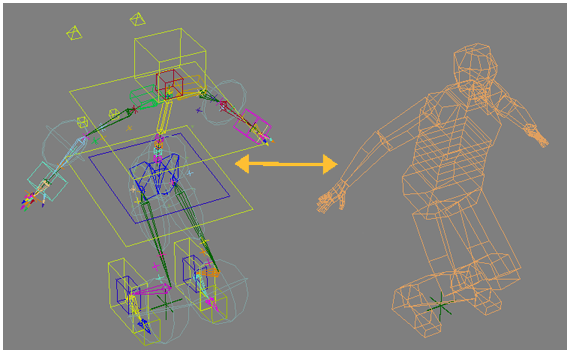
On the left, the rig is animated. Because the shadow rig on the right is constrained to it, the shadow rig is also animated.
If the animation is plotted to the shadow rig, the constraints between the two rigs can be removed. The shadow rig can then be exported.
After the rig is created, the Biped or Biped Dog Leg Controls are displayed. You can use these to adjust the scale of the spine, neck, and upper body volume, as well as set the foot roll angle.
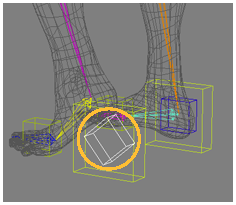
Foot roll angle control is rotated to lift the heel when it's at a certain angle.
With the biped dog leg rig, there are extra sliders that control the locking of the leg extension control (the middle box in the three foot controls) for the foot roll.
For details on each parameter of these controls, see Biped Controls or Biped Dog Leg Controls.
Apply the envelope to the character using the envelope_group group found in the rig's model. The contents change based on the rigging options you have selected. If you have multiple envelope objects, weight all of them to the full envelope group. This makes it easier to paint weights across the multiple surfaces.
To animate the rig, translate and rotate the appropriate rig controls and key them to animate the parts of the skeleton.
However, make sure to turn off both constraint and child transform compensations! You can deactivate the CnsComp and ChldComp buttons on the Constrain panel. Otherwise, you end up repositioning the constraints on the rig.
Many of the rig controls use scripted operators to control their movement. As a result, you should not use the Remove Animation from All Parameters, Any Animation Type or any of the Remove Animation from Transforms commands from the Animation panel when deleting animation from the controls because these commands also remove the scripted
operators on the controls' parameters.
Under each hand's root node, you can find a custom parameter set that contains sliders for rotating each finger bone in the hand. This set is also available by clicking the Sliders button on the Hands page in the synoptic view (select an element and press F3).
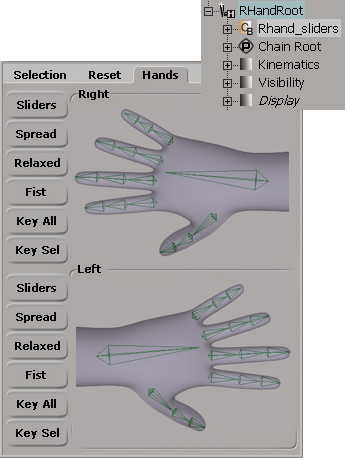
You can also use the buttons on the Hands page to easily select and pose the hands. As well, you can apply action sources that can relax, make a fist, or spread the fingers on each hand.
There is a small cube control (called RHand_Grab or LHand_Grab) created at the base of the fingers on each hand. When you rotate it on Z, the fingers are formed into a clenching or grabbing fist. This makes it easy to quickly animate a grabbing hand or a claw.
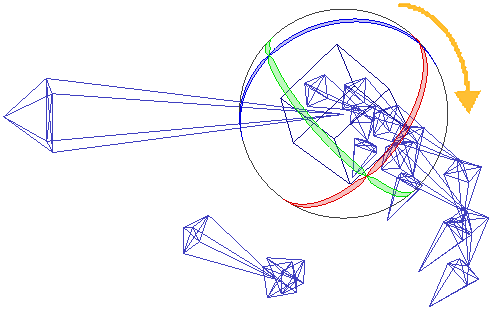
Rotate (in Z) the cube (Hand Grab control) at the base of the fingers to make the fingers and thumb curl into a claw or fist formation.
In the biped guide (see Setting Up the Biped Guides), there are small yellow triangles on the fingers and the thumb called FingerBlades that let you set the angle of each finger that will be created in this rig. If you want to do this, first rotate them in the biped guide to get the desired angle for each finger before you create the rig.
There are a number of features in the rig that can help you use it.
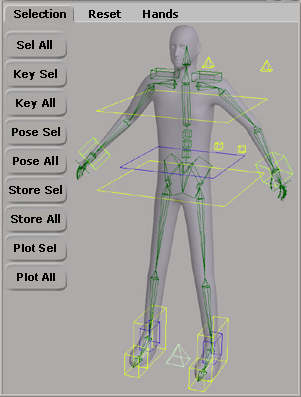
There is a synoptic view available to control the rig, which you can open by selecting any part of the rig and pressing F3. This lets you easily select and key the rig, reset it, and have detailed control over the hands.
When you scale the rig, the synoptic's control systems adapt to the new proportions, so you can still select items.
Each rig control element has several character key sets to define which parts of the character are keyed, plotted, and posed by the synoptic view. These character key sets can help you quickly key the different controls in a rig.
For more information, see Keying with Character Key Sets.
The biped rigs contain various action sources to help pose the hands or return to the default pose. For example, if you need to return to the rig's original position (such as to modify or reapply the envelope), you can apply the action source called DefaultPose to the rig.
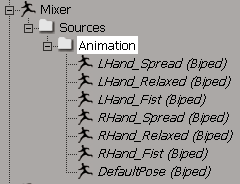
To apply an action, select it from the rig's Mixer > Sources > Actions folder and choose Actions Apply Action (see Restoring (Applying) the Animation in Action Sources to an Object for more information).
The following tips provide information about how to set up and use the rig.
The rig's default position has translation and rotation values of zero so that you're always working from a known base line.
This makes it easier to transfer and keep track of the animation. You can get back this position easily by choosing Transform Reset All Transforms (press Ctrl+Shift+R), as with any other skeleton.
As well, the default scale of all the components is 1, again making it easy to return to this base. You can scale the rig proportions without adding scale by using the bone length sliders and the spine Scale slider (in the Control set).
The control objects are all curve-based wireframes and have no geometry. This makes it easy to keep the rig and body geometry (envelope) on the same layer because you can turn off the 3D Geometry option in a viewport's visibility menu (click the eye icon) to have only the rig displayed.
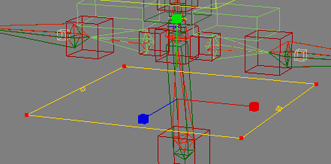
If you need to resize the control icons (such as the foot and hip controls), follow these steps:
This way you don't introduce scaling into your rig, which could create problems transferring animation later in a project.
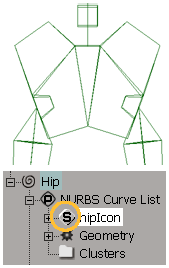
You can use the same process to reposition and change the shape of the controls without affecting their centers.
If you need to change the shape of the hip control object, you can find a parameter set with sliders that control many facets of its size and shape, such as the hip sockets' depth or width.
If you want to animate the resolution plane for the biped legs as you animate them in IK, here's a good trick!
In an explorer, select the hidden group and press H to unhide the controls. Many nulls appear — do not be alarmed.
Select middle green null behind the knee called lastboneUpV/UpV1.
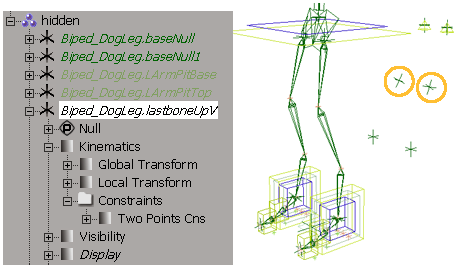
In the explorer, press F to find the null's node and expand its Kinematics Constraints folder.
Click the Two Point Cns icon to open the constraint's property editor.
Set the Distance Percentage value (50% default) to change the position of the control null between the up vector control (100%) and the null below it (0%). Key this value at animate the plane.
 Except where otherwise noted, this work is licensed under a Creative Commons Attribution-NonCommercial-ShareAlike 3.0 Unported License