To help you make the skeleton's rig proportional to your setup, you can load a rig-building guide. After you set up the quadruped guide as you like it, you can generate a quadruped rig based on this guide.
The guide can also be used as a starting point for different rigging styles, and technical directors can write their own proportioning script to attach their rig to the guide.
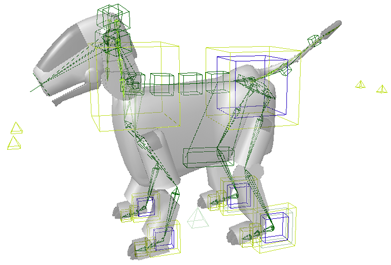
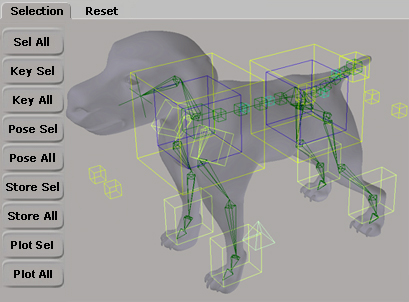
Quadruped rig created based on the animal's body as defined by the quadruped proportional guide.
Choose Create  Character Quadruped Guide from the Animate toolbar.
Translate the red manipulator cubes on the guide to proportion the limbs so that it fits within the final envelope to be used.
When you manipulate any cube, the corresponding cube on the opposite side of the body is manipulated in the same way. This makes it quick and easy to set up matching proportions for both sides of the body at once.
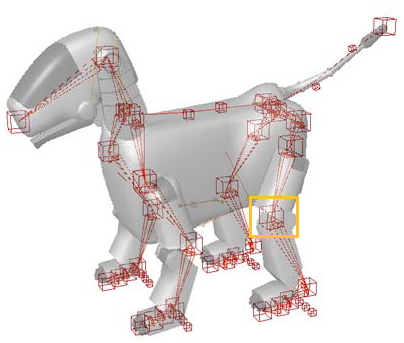
Drag any of the red cubes to fit in the different parts of the body's envelope.
The limbs are resized symmetrically so that both sides of the body at done in the same way at one time.
After you've set up the proportions of the guide to match your character, you can create a rig from it, as described in the following section.
The rig is a skeleton that includes control objects that you can position and orient to animate the various parts of the character body (see the illustration on the next page).
The rig provides a foundation of rigging components, allowing you to define as much detail as you need. Although there are a great deal of styles available from generating a rig this way, it is simple to do further modifications. The rig is composed of standard Softimage components that you can delete, constrain, or connect to new objects.
Unlike the biped rig, the preference angles are aligned for a proper quadruped with the legs pointing inward. You should always make sure that the rig is aligned correctly with the corresponding anatomical locations of the animal character's bones. It's worth the time to do research on the animal's skeletal structures and motion when starting a project. This is good practice for successful animal creation and animation.
Primitive Model Quadruped - Rig from any toolbar.
Modify the proportioning guide to match your character's proportions (see Setting Up the Quadruped Guide).
Choose Create Character Rig from Quadruped Guide from the Animate toolbar.
In the Make Quadruped dialog box that appears, set up the elements of the rig as you need.
The sections following this procedure provide a summary of the options on each property page, starting on Setting Up the Chest, Belly, and Head.
Click OK and a new skeleton rig based on the guide's proportions and the options you selected is created.
| A |
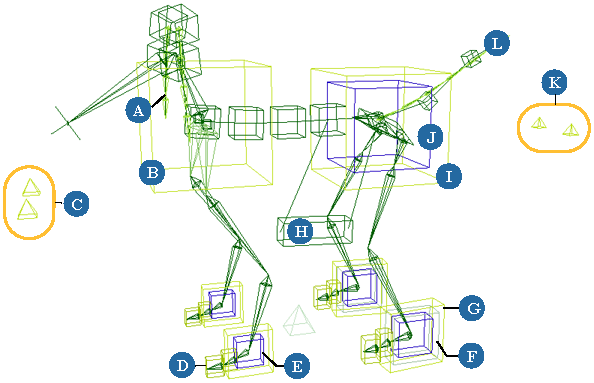
Ears: curves are chains driven by springs. Cubes control ears' rotation. See Spring Operators for Tail, Ear, and Belly Rig Controls for more information. |
| B |
Chest (large cube): controls rotation and translation of the chest/spine. |
| C |
Front Leg up-vectors (pyramids): control resolution plane of front legs for IK. |
| D |
Toe (cube at tip): controls offset from the foot in rotation. |
| E |
Foot roll (inner cube): controls rotation angle for step and heel roll. See Quadruped Controls [Properties Reference] for more information. |
| F |
Extension (middle cube): controls distribution of rotation among the 3 bones of the hind leg. See Quadruped Controls [Properties Reference] for more information. |
| G |
Foot (outer cube): controls rotation and translation of foot. |
| H |
Belly: box controls rotation and translation of the belly area. The curves connecting the box to the rig are chains driven by springs. See Spring Operators for Tail, Ear, and Belly Rig Controls for more information. |
| I |
Lower body (outer cube): controls rotation and translation of the hips. |
| J |
Hips (inner cube): a secondary offset animation layer for the hips. |
| K |
Hind Leg up-vectors (pyramids): control resolution plane of hind legs for IK. |
| L |
Tail: curve is a chain driven by springs. Cubes control tail's rotation and translation. See Spring Operators for Tail, Ear, and Belly Rig Controls for more information. |
After the rig is created, the Quadruped Controls appear. These let you scale the spine and tail, as well as set the foot roll angle.
See Using the Quadruped Controls for more information.
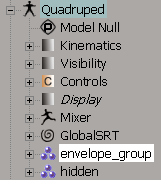
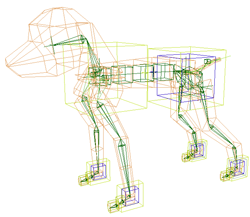
Envelope the body geometry to the rig.
To envelope this character, weight it to the envelope_group group found in the rig's model, as shown on the left. The contents change based on the rigging options. If you have multiple envelope objects, weight all of them to the full envelope group. This makes it easier to paint weights across the multiple surfaces.
Translate and rotate the appropriate rig controls and key them to animate the parts of the skeleton.
There is a synoptic view available to control the rig, which you can open by selecting any part of the rig and pressing F3. This lets you easily select and key the rig and reset it. When you scale the rig, the synoptic's control systems adapt to the new proportions so you can still select items.
The options on the Chest, Belly, and Head pages in the Make Quadruped dialog box let you select the way you want the spine, shoulders, belly, and head (neck) to be set up. These options are the same as available for the biped rigs:
For options on the Chest page, see Setting Up the Torso Spine.
For options on the Belly page, see Creating a Belly Control.
For options on the Head page, see Setting Up the Head, Neck, and Ears.
On the Tail page in the Make Quadruped dialog box, you can choose whether or not to create a tail for the rig. A tail is basically a chain where each bone is controlled by a spring that reacts to the rig's animation (secondary animation). You can also animate the cube controls on the curve in FK to give precise control and posing when required.
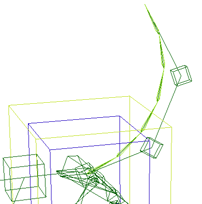
Tail is made of six divisions (bones). The chains are driven by springs.
You can also animate the cube controls on the curve in FK to give precise control and posing when required.
If you select Make Tail, you can then specify the number of vertebrae Divisions. The more divisions, the more chain elements that will trace the inner curve of the tail. The outer cage driven by the spring stays the same. If you need greater control over the tail where it is in a specific pose, like a curl, you can set the FK/IK Blend on this chain and control it in FK, ignoring the outer cage.
To modify the tail's spring, see Spring Operators for Tail, Ear, and Belly Rig Controls.
You can also create a separate tail element. You can then use this tail with any other rig that you create. See Creating a Tail for more information.
The options on the Shadow Rigs page in the Make Quadruped dialog box let you create a secondary rig at the same time you're creating the main rig. The types of shadow rigs you can create are the same as available for the biped rigs.
For options on the Shadow Rigs page, see Creating Shadow Rigs.
The options on the Roll Division page in the Make Quadruped dialog box allow you to choose how you want the skeleton's envelope to be weighted at a more refined level when the bone is rotated (rolled). These options create a set of nulls based on the number of subdivisions that you specify, to distribute the weighting along the humerus (upper front leg) and femur (upper hind leg) bones. These options are quaternion-based.
For details on each parameter, see Roll Division [Properties Reference].
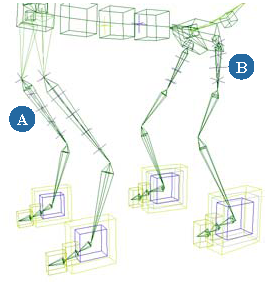
| A |
Five roll divisions set on the two humerus bones. |
| B |
Four roll divisions set on the two femur bones. |
After the rig is created, the Quadruped Controls are displayed. You can use these to adjust the rig's spine scale and volume, as well as the front and back leg foot rolls.
For details on each parameter, see Quadruped Controls [Properties Reference].
 Except where otherwise noted, this work is licensed under a Creative Commons Attribution-NonCommercial-ShareAlike 3.0 Unported License


