When you're creating a skeleton, it's a good idea to save it in a default position (pose) before it's animated or enveloped. This way you have a solid reference point to revert to when enveloping and animating the skeleton. This pose is known as the neutral pose, reference pose, or base pose, and is often the character with outstretched arms and legs, making it easy to weight the envelope and adjust its textures.

Character with rig in his default T-pose.
A neutral pose that's useful for envelope weighting and texturing doesn't always give the best values for animating the skeleton's position and rotation. To set the neutral pose for optimum animation, see the section below, Creating a Neutral Pose for Animation.
As well, you can store the skeleton's neutral pose in an action source (Store Skeleton Pose) so that you can easily reapply it to your character any time you want — see Storing a Skeleton Pose in an Action Source for information.
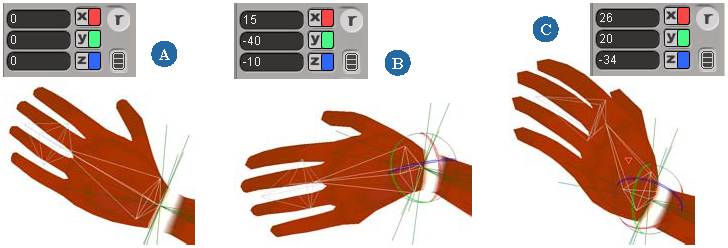
When you're animating the character, this default pose does not always give you local transformation values that are easy to key. For example, let's say that you load the default skeleton and want to rotate the finger bones from their outstretched position into a clenched fist. If you look at their local rotation values, you'll see that they are difficult numbers to use.
To overcome this problem, you can create a neutral pose which uses zero for its local transformation values (0 for rotation and translation, 1 for scaling). When you set a neutral pose, the object's actual local transformation values are not changed: the neutral pose simply adds a transformation layer that lets you specify certain conditions for keying. Basically, the neutral pose acts as an offset for the object's local transformation values, as if there was an intermediate null between the object and its parent in the hierarchy.
When you key the character's values, they reflect the relative difference from zero, and not a value that's difficult to use. For example, when you key a hand bone at coordinates (0, 3, 0), you know that it's 3 units in the Y axis above the neutral pose, so that pose becomes a local reference point for the fcurve values of the bone.

Branch-selected hand bone in neutral pose.
On the top are the original local rotation values of the hand bone before setting a neutral pose. Notice that they're difficult values to use.
On the bottom, setting a neutral pose sets the local rotation values to 0,0,0, which makes for an easier base for keying.
With a neutral pose set, you can select a chain element and enter zero for its local rotation, for example (often referred to as "zeroing out"), and it returns to this neutral pose.
Not only do neutral poses make keying easier, you can also reduce the number of extra nodes in a rig because you don't need any "spacer" or "parent" nodes that helped you set zero as the value for the bones' neutral pose.
You can create neutral poses for any type of object, not just chain elements in a skeleton. This means that you can zero out control objects in a rig.
When you remove the neutral pose, the object's transformation values return to what they were before creating the neutral pose. The neutral pose values are added to the local transformation before being reset to the defaults. As a result, the object does not move in global space.
For information on how to set and remove neutral poses, see Setting Neutral Poses [Working in 3D Space].
 Except where otherwise noted, this work is licensed under a Creative Commons Attribution-NonCommercial-ShareAlike 3.0 Unported License


