Several different controls in the character rigs are driven by spring operators. These include the tail, ear, and belly controls in any of the rigs, as well as the tail that you can create independently and parent to your rig (see Creating a Tail).
You can modify the spring operator's parameters to control various aspects of the simulation, as well as spring's dynamic properties (mass, stiffness, and damping) and initial and rest states.
For the tail and ear controls, you can modify the simulation further, including editing the profile curves for the spring's dynamic properties and caching the simulation to an action source.
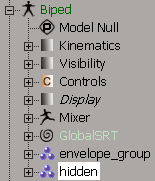
The Spring operator is found under the Kinematics  Global Transform node of the appropriate control object's effectors, which are hidden. To make it easier to work, you can "unhide" the effectors,
then use an explorer to find their Spring operator (see next page). In the Spring Operator property editor, you can mute and
reset the spring's simulation, as well as set the spring's type (linear or angular), dynamic properties (mass, stiffness,
and damping), and initial and rest states.
Global Transform node of the appropriate control object's effectors, which are hidden. To make it easier to work, you can "unhide" the effectors,
then use an explorer to find their Spring operator (see next page). In the Spring Operator property editor, you can mute and
reset the spring's simulation, as well as set the spring's type (linear or angular), dynamic properties (mass, stiffness,
and damping), and initial and rest states.
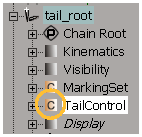
For the tail and ear controls, you can modify the simulation using the parameters in the Tail Control custom parameter set, which is found directly under the control object's root node. This custom parameter set includes a profile curve editor for editing the spring's dynamic properties, as well as parameters for blending the simulation with animation, determining the spring's response speed, muting and resetting the simulation, and caching the simulation to an action source.
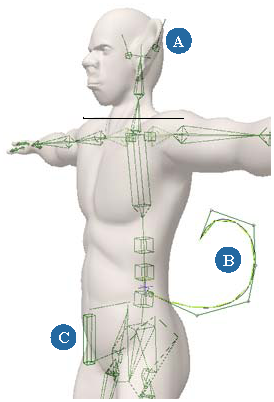
Select a tail, ear, or belly control object in a biped, dog leg biped, or quadruped rig.
In an explorer, select the hidden group under the rig's model and press H to unhide the controls. Many nulls appear — do not be alarmed! You can find the spring operator under each rig control's "hidden" effector.
Select the appropriate effector for the ear, belly, or tail.
In the explorer, press F to find the effector and expand its Kinematics Global Transform node.
Click the Spring icon to open the Spring Operator property editor.

To determine how the spring moves, you can set the spring's type to be either linear or angular. You can also set how quickly the spring responds to movement, as well as the accuracy of its simulation.
In the Spring Operator property editor, select a Type: Linear or Angular
Linear springs apply a linear force to the simulated object. This type of spring is what you usually think of as a spring: a bouncy coil between two objects that can expand and contract.
Angular springs apply a twisting force or torque. They behave like swinging galley or saloon doors: you push the door open and the door swings back and forth until it returns to its resting position. There's no expansion or contraction with angular springs: the object is at a fixed radius and swings around the other object.
In the Tail Control custom parameter set, set the Response Speed.
This is the amount of time the control object takes to respond to movement. The higher the value, the more quickly the control object responds to movement. For example, doubling the speed makes the control object react twice as quickly to movement.
This parameter controls the Step Size parameter in the Spring operator, so a larger value here increases the speed as more time elapses between each update.
In the Spring Operator property editor, set the Step Size and Sub Steps:
Step Size is the size of each evaluation step of the simulation. Be careful about using too large a step size because it may make the simulation unstable.
Sub Steps is the number of times that the spring simulation is evaluated at each frame. For example, at 30 frames per second, setting this value to 4 would mean that the simulation is updated 120 times a second.
Increasing this value can make the simulations more accurate, especially with fast-moving objects. Of course, increasing this value also increases the calculation time of the simulation. You should start with a low level and gradually work up in small increments. You shouldn't usually need more than a value of 100 or less than a value of 4.
When you're animating rigs, you often need to have the rig element be in a certain state at the first frame of the simulation. The initial state is a combination of the position and velocity of a rig element's spring at the first frame of the simulation.
With springs, you also need to set their rest state, which is the position that the spring tries to return to during the simulation.
In the Spring Operator property editor, set the values for the Initial State - Position X/Y/Z and Velocity X/Y/Z sliders. These set the spring's position and velocity at the start of the simulation (initial pose).
Transform the object as you like in a view. Then click either the Initial State button in the Spring Operator property editor or the Set as Initial State button in the Tail Control custom parameter set to use the spring's current state to be its initial state.
In the Spring Operator property editor, set the values for the Rest State - Position X/Y/Z sliders. This sets the spring's resting state, which is the pose unaffected by simulation.
Transform the object as you like in a view. Then click the Set as Rest Pos button in the Spring Operator property editor to use the spring's current state to be its resting state.
In the Spring Operator property editor, you can set the spring's physical properties (mass, stiffness, and damping) to determine how it moves and reacts during the simulation.
For the tail and ear controls, you can further modify these parameters using the profile curve editor in the Tail Control custom parameter set. This lets you control each parameter's influence at each of the control points along the tail's or ear's curve. For example, you can edit the Dampness values for the tail so that there's less damping at the tail's tip than there is closer to the body.
In the Spring Operator property editor, set values for each of these parameters:
Scale is the size of the control object's spring relative to the distance unit used by the simulator. The simulator uses meters for distance while Softimage uses grid units, so this value is the number of grid units per meter. A scale value of 2 means that if the simulation moves an object 1 meter, the object will move 2 grid units in Softimage.
You should set this value to keep the spring's behavior the same when scaling rigs: if the rig is doubled in size, the spring's scale needs to be doubled as well to maintain the same effect.
Mass is the weight in kilograms (kg) of the tail or ear. The more mass, the more force it takes to change the tail's or ear's direction.
Stiffness sets the rigidity of the spring. Higher values cause the spring to be stiffer.
Damping is the resistance of the tail or ear to velocity and affects how quickly it responds to movement or animation.
Low damping values make the control object respond quickly to animation, but it can be bouncy and may oscillate before reaching its animated (rest) state. High damping values make the control object respond more slowly to animation and move smoothly to its animated (rest) state.
If you're using the tail or ear controls, you can also edit the profile curves for the Mass, Stiffness, and Damping parameters. By editing curves that relate to the spring's physical properties, you can more accurately control the behavior of the tail or ears at each of the control points along the length of their curves.

Open the tail or ear's Tail Control custom parameter set and click the Profile Curves tab.
Select a physical property parameter from the Distribution list: Mass, Stiffness, or Damping.
Edit the selected Distribution parameter's curve in the Profile Curve editor below it.
The parameter's values are shown on the graph's Y axis; the control points (tail division) along the tail's or ear's curve are shown on the graph's X axis, with 0 being the tail's or ear's root.
Select and move a point on the curve, or right-click a curve to open a menu of commands. You can edit the curves here as you do in the fcurve editor — see Editing Function Curves.
The values for the Distribution parameter curves are displayed in the Spring Parameters table beneath the curve editor. As you edit the curves, you'll see the values change in the Spring Parameters table.
Each Spring number (Spring0, Spring1, Spring2, etc.) represents a control point on the control object's curve, with Spring0 being the root.
You can edit the values for each control point by double-clicking in the appropriate cell in the table and entering a new value. This may be useful for entering more exact values than you can set interactively in the curve editor.
You can blend the animation and simulation on the control object's movement. For example, if you have animated a dog's tail so that it wags back and forth, you can combine this animation with the tail's simulation (secondary animation) resulting from the dog running and jumping.
You can temporarily disable a spring's simulation by muting it. This is useful if you want to test out just the animation on the tail, ear, or belly control object, or you have other simulations in a scene but you don't want to play this spring's simulation at the same time.
In the Tail Control custom parameter set, select Mute Simulation.
This option has an expression on it that controls the state of the Mute parameter in the Spring Operator. For example, selecting this option in the Tail Control custom parameter set automatically selects the same option in the Spring Operator property editor.
If you're using the belly control, you can select Mute Simulation in the Spring Operator property editor because the belly control doesn't have a Tail Control custom parameter set.
Caching the simulation to a source allows you to scrub the cursor back and forth in the timeline and get the correct state, and to play the simulation backwards. Caching is also useful for making sure that the rig object's movement doesn't change at render time.
When the simulation is cached, each frame that is played is evaluated and stored. The animation is stored as global transformation function curves that you can edit in the animation editor. The fcurves are raw curves, meaning that there is a key at every frame. You can also activate or deactivate individual fcurves (items) within the source.
When you cache to a source, the sources are stored in the model's Mixer Sources Animation folder. To make sure that the spring's cached sources are kept intact when copying or importing/exporting the tail, put the
tail curve in the desired model before you create the tail and cache the simulation — see Creating a Tail for more information.
The process for caching is a little different depending on whether you're caching the simulation of a tail/ear control object or a belly object.
Make sure that the tail is in the desired model; that is, put it in the model that you will be exporting or copying, not the scene root. You cannot export or copy the scene root's model or mixer.
In the control object's Tail Control custom parameter set, select the Caching On/Off option — the Regenerate Cache options appear.
Activating the caching here automatically activates the Caching option in the Simulation Time Control property editor.
Select one of the Regenerate Cache options to decide how to regenerate the cache action source:
Play the whole simulation or click the Regenerate Cache button.
When you first play the simulation, the source file is being cached so it takes a bit of time. However, once the source is cached, the playback is usually faster than if no source was cached.
Open the belly control object's Spring Operator property editor.
Click the Simulation Time Control tab and select the Caching option.
When you first play the simulation, the source file is being cached so it takes a bit of time. However, once the source is cached, the playback is usually faster than if no source was cached.
 Except where otherwise noted, this work is licensed under a Creative Commons Attribution-NonCommercial-ShareAlike 3.0 Unported License