To help you make the skeleton's rig proportional to your setup, you can load a rig-building guide. After you set up the guide as you like it, you can create a biped rig based on this guide, as described in Creating Biped Rigs.
You can create either a regular human biped guide or a biped dog leg guide, which is the same as the biped except that it has 3-bone legs that are angled like an animal's — good for fantastical humanoid creatures!
The guides can also be used as a starting point for different rigging styles, and technical directors can write their own proportioning script to attach their rig to the guide.
In the Biped or Biped Dog Leg Guide dialog box that appears, select the Guide Style and the type of Symmetry, as described here.
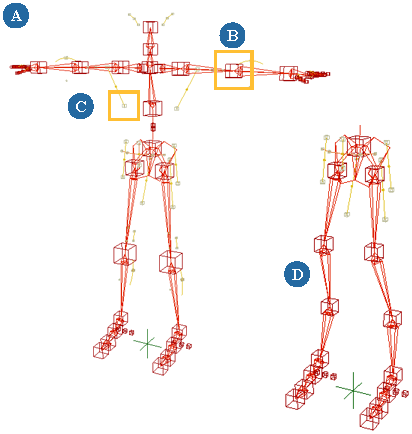
Select Skeleton Structure and Volume to create a complete guide that includes volume controls (displayed as yellow splines with small manipulator cubes) which you can use to define the body's volume.
When you later create the rig from this guide, you use these controls to define the volume as set on the Skin page of the Make Biped or Make Biped Dog Leg dialog box (see Selecting Volume Controls for the Skin (Envelope)).
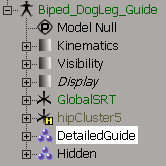
Select Volume Controls Hidden to hide these yellow deform splines, but still have them available in the guide's structure. In the explorer, you can find them in a group called DetailedGuide, under the biped guide model.
Select Full Symmetry so that when you manipulate any cube, the corresponding cube on the opposite side of the body is manipulated in the same way. This makes it quick and easy to set up matching proportions for both sides of the body at once.
No Symmetry means that there are no constraints between the cube controls on the opposing sides of the body, allowing you to manipulate each part of the body independently.
You can also have just the Upper Body or Lower Body be asymmetrical, meaning that you can manipulate the cube controls on those portions of the body independently.
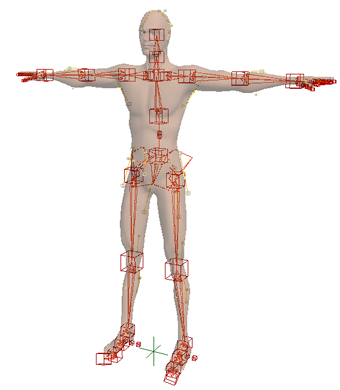
Move the red manipulator cubes to proportion the limbs to match the character's envelope.
If you created volume controls, translate the cubes on the yellow splines to match the volume of the character's envelope. These proportions are used when you create the Skin controls for the rig, as described in Selecting Volume Controls for the Skin (Envelope).
Biped guide is resized using the envelope geometry as a reference point.
Drag the red cubes on the guide to the same proportions as the limbs, spine, and head of the envelope.
Drag the small cubes on the yellow splines to define the volume of the envelope.
There are also small yellow triangles on the fingers and the thumb called FingerBlades. Rotate the triangle on each finger and the thumb to set the plane of the fingers that will be created in the rig.

After you've set up the proportions of the guide for the character, you can create a rig from it, as described in Creating Biped Rigs.
To customize your rig, you can duplicate or delete some of the red placement cubes in the guide and the resulting rig will have only the elements you want. For example, if you have a character that needs a three-bone neck instead of a two-bone version, you can select the tip of the head, duplicate it, and move it upwards. Or if your character doesn't need all its fingers, you can delete the appropriate finger control cubes in the guide.
These are the control cubes that you can duplicate:
Head control cube can be duplicated n times for more head length.
Neck control cube can be duplicated n times to create a jaw or snout.
SpineBase control cubes can be duplicated 3 or more times to create a tail.
FingerTip control cubes can duplicated to create more finger joints.
These are the control cubes that you can delete:
 Except where otherwise noted, this work is licensed under a Creative Commons Attribution-NonCommercial-ShareAlike 3.0 Unported License


 Character