


This General Parameters rollout is displayed for standard lights. These controls turn a light on and off, and exclude or include objects in the scene.
On the Modify panel, the General Parameters rollout also lets you control the light’s target object and change the light from one type to another.
The General Parameters rollout also lets you turn shadow-casting on or off for the light, and choose which type of shadow the light uses. See Shadow Types and Shadow Controls and Shadow Parameters.
 Shadows group, make sure On is selected.
The light will now cast shadows when you render the scene.
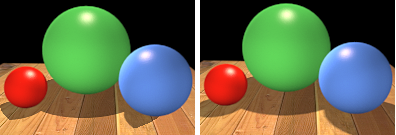
Left: A spotlight's projection cone truncates shadows.
Right: An omni light casts complete shadows.
To have a light use the global settings for shadows:
When Use Global Settings is on, the other shadow controls are set to the values used by all other shadow-casting lights in the scene that have Use Global Settings set.
Changing the affected parameters for one light with Use Global Settings set, changes them for all lights with Use Global Settings set.
To set a light's shadow parameters individually:
The settings revert to the individual settings for the light.
By default, Shadow Map is the active shadow type. In the Shadow Map Params rollout, the default settings are: Map Bias=1; Size=512; Sample Range=4.0; Absolute Map Bias=Off.
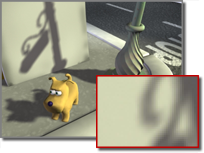
Scene with shadow-mapped shadows
Shadows rendered using default parameter settings
Use controls on the Area Shadows rollout to adjust the shadow properties.
To cast advanced ray-traced shadows:
Advanced ray-traced shadows are similar to ray-traced shadows, however they provide control over antialiasing, letting you fine-tune how shadows are generated.
Use controls on the Advanced Ray-traced Params rollout to adjust the shadow properties.
To cast shadow-mapped shadows:
Ray-traced shadows are generated by tracing the path of rays sampled from a light source. Ray-traced shadows are more accurate than shadow-mapped shadows.
To keep an object from casting shadows:
 Select the object.
3ds Max opens the Object Properties dialog.
To make an object not receive shadows:
Select the object.
3ds Max opens the Object Properties dialog.
Now when you render the scene, the object receives no shadows.

Light Type group (Modify panel)
(Both Create panel and Modify panel) Turns the light on and off. When On is on, shading and rendering use the light to illuminate the scene. When On is off, the light is not used in shading or rendering. Default=on.
In viewports, the interactive renderer shows the effect of turning lights on or off.
Changes the type of the light. If you have selected a standard light type, the light can be changed to an omni, spot, or directional light. If you have selected a photometric light type, you can change the light to a point, linear, or area light.
Determines whether the renderer uses shadow maps, ray-traced shadows, advanced ray-traced shadows, or area shadows, to generate shadows for this light.
The “mental ray Shadow Map” type is provided for use with the mental ray renderer. When you choose this shadow type and enable shadow maps (on the Shadows & Displacement rollout of the Render Setup dialog), shadows use the mental ray shadow-map algorithm. If this type is chosen but you render with the default scanline renderer, no shadows appear in the rendering.
Each shadow type has its particular controls:
Turn on to use global settings for shadows cast by this light. Turn off to enable individual control of the shadows. If you choose not to use the global settings, you must choose which method the renderer will use to generate shadows for this particular light.
When Use Global Settings is on, the shadow parameters switch over to show you what the global settings are. This data is shared by every other light of this class. When Use Global Settings is off, the shadow parameters are specific to that particular light.
Excludes selected objects from the effects of the light. Click this button to display the Exclude/Include dialog.
Excluded objects still appear lit in shaded viewports. Exclusion takes effect only when you render the scene.
To change the roll angle of a target light, you can use a manipulator. This can be useful if the light does not cast a round beam, or if it is a projector light (see Advanced Effects Rollout). To display the manipulator, select the light, right-click it, and then click Roll Angle Manipulator Toggle on the Tools 2 (lower left) quadrant of the quad menu.
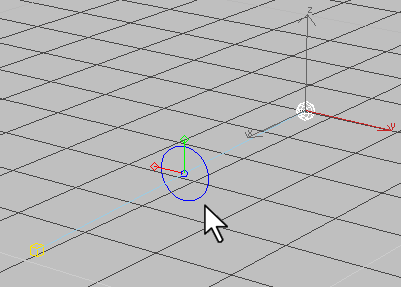
Roll angle manipulator on a target light
Drag the circular portion of the manipulator to rotate the light by an arbitrary number of degrees. Click one of the red or green “clock hands” of the manipulator to rotate the light in 90-degree increments.
 You can also access the roll angle manipulator by selecting the light object and then turning on Select And Manipulate on the main toolbar.

 Create panel
  (Lights)