


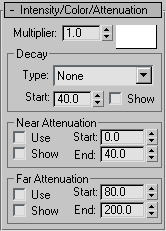
The Intensity/Color/Attenuation rollout allows you to set the color and intensity of your light. You can also define the attenuation of your light.
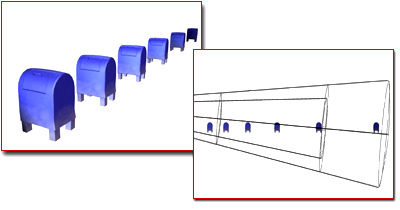
Attenuation settings cause distant objects to be dimmer.
Attenuation is the effect of light diminishing over distance. In 3ds Max, you can set attenuation values explicitly. The effects can vary from real-world lights, giving you more direct control over how lights fade in or fade out.
Two sets of values control attenuation for objects. The Far attenuation value sets the distance at which the light drops off to zero. The Near attenuation value sets the distance at which the light "fades in." Both these controls are turned on and off by a toggle called Use.
When Use is set for far attenuation, the light at its source uses the value specified by its color and multiplier controls. It remains at this value from the source to the distance specified by Start, then its value drops off to zero at the distance specified by End.
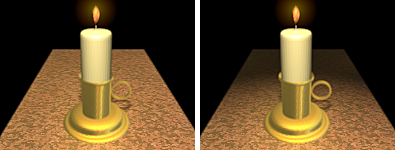
Adding attenuation to a scene
When Use is set for Near attenuation, the light value remains at zero up to the distance specified by Start. From Start to the distance specified by End, its value increases. Beyond End, the light remains at the value specified by the color and multiplier controls, unless far attenuation is also active.
You can't set the Near and Far attenuation distances so they overlap.
The Decay controls are an additional way to make a light fade out.
To choose the color of a light using the color selector:
A modal Color Selector is displayed.
Shaded viewports update to show the new light color, which also appears in renderings.
To change a light's intensity:
Attenuation is now in effect for this light when the scene is shaded or rendered.
To see the attenuation range in viewports:
You can preview the effect of attenuation in shaded viewports only if you turn this on as an option in viewport preferences.
Amplifies the power of the light by a positive or negative amount. For example, if you set the multiplier to 2, the light will be twice as bright. A negative value subtracts light and thus is useful for selectively placing dark areas in the scene. Default=1.0.
Using this parameter to increase intensity can cause colors to appear "burned out." It can also generate colors not usable in videos. In general, leave Multiplier set to its default of 1.0 except for special effects and special cases.
High Multiplier values wash out colors. For example, if you set a spotlight to be red but then increase its Multiplier to 10, the light is white in the hotspot and red only in the falloff area, where the Multiplier isn't applied.
Negative Multiplier values result in "dark light." That is, the light darkens objects instead of illuminating them.
Shows the color of the light. Clicking the color swatch displays the Color Selector so you can choose a color for the light.
Decay is an additional way to make a light's intensity reduce over distance.
Sets the type of decay to use. There are three types to choose from.
This is the decay formula used by photometric lights.
The point at which decay begins depends on whether or not you use attenuation:
Once the beginning point is established, the decay follows its formula to infinity, or until the light itself is cut off by the Far End distance. In other words, the distance between Near End and Far End does not scale, or otherwise affect, the apparent ramp of decaying light.
Displays the near attenuation range settings in viewports. For spotlights, attenuation ranges appear as lens-shaped sections of the cone. For directional lights, the ranges appear as circular sections of the cone. For omni lights and spot or directional lights with Overshoot turned on, the ranges appear as spheres. By default, Near Start is dark blue and Near End is light blue.
Setting a Far Attenuation range can help improve rendering time dramatically.
Displays the far attenuation range settings in viewports. For spotlights, attenuation ranges appear as lens-shaped sections of the cone. For directional lights, the ranges appear as circular sections of the cone. For omni lights and spot or directional lights with Overshoot turned on, the ranges appear as spheres. By default, Far Start is light brown and Far End is dark brown.

 Create panel
 (Lights)