The Hair And Fur modifier is the heart of the Hair And Fur feature. You apply it to any object that you want to grow hair from: either a mesh object or a spline object. If object is a mesh, the hair grows from the entire surface unless you make a sub-object selection. If the object is a spline, hair grows between the splines.
When you select an object modified by Hair And Fur, hair is displayed in viewports. The hair itself as displayed in the viewports is not selectable, though hair guides are selectable when you work at the Guides sub-object level or style hair (see below).
Hair And Fur renders by “tiles,” which are 2D projections of the 3D space that the hair or fur occupies. Each tile is displayed in the rendered frame window as soon as it is generated. Also, you can set the maximum memory that a tile uses at render time; see Hair And Fur Render Effect.
Hair And Fur can take advantage of multiple processors, improving rendering time on multiprocessor systems.
Components of the Hair And Fur Feature
Hair And Fur in 3ds Max comprises several components:
A Hair And Fur render effect is automatically added to your scene when you apply the Hair And Fur modifier.
The following light types are not supported when rendering hair with the “buffer” method (see “Lighting Considerations,” below): Skylight, mr Area Omni, mr Area Spot, IES Sun, IES Sky, mr Sky and mr Sun. However, mr Area Omni, mr Area Spot, mr Sky, and mr Sun are supported for hair when you set the Hairs rendering option to “mr prim” and render with mental ray.
You can grow Hair either from a surface or from splines.
To grow hair from a surface, select the object and then apply the Hair And Fur modifier. You can use either geometric primitives or an editable surface type such as Polymesh.
To grow hair from splines, you can draw several splines and combine them into a single object (or turn off Start New Shape during creation), and then apply the Hair And Fur modifier. You will see some preview interpolated hairs appear in viewports. The order of the spline sub-objects is important because Hair uses this order to interpolate hair in between the splines. If the interpolation seems incoherent, you might need to physically rearrange the splines.
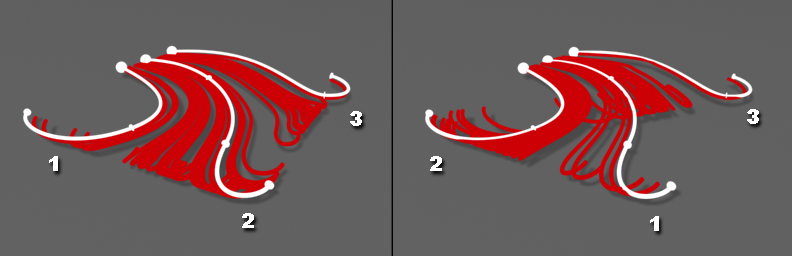
Using a spline emitter, Hair interpolates hair growth between pairs of splines in logical, numerical order.
Left: Splines in sequential order result in predictable hair growth.
Right: Splines in nonsequential order can produce undesirable results.
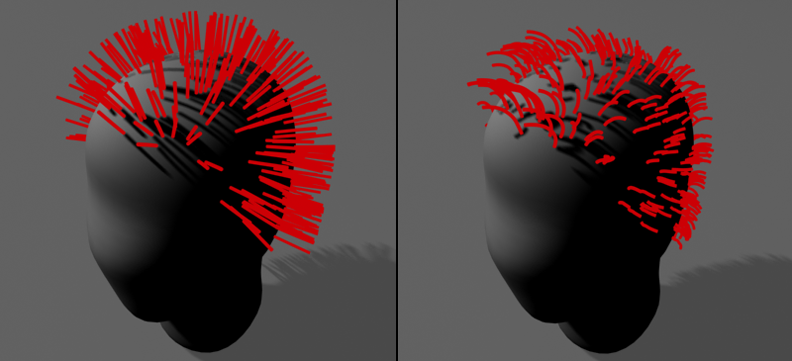
Storing and manipulating millions of dynamic, simulated hairs is demanding on today’s technology. Therefore, just as standard 3D graphics technology uses boundaries such as surfaces to describe solid objects, Hair uses hair “guides” to describe basic hair shape and behavior.
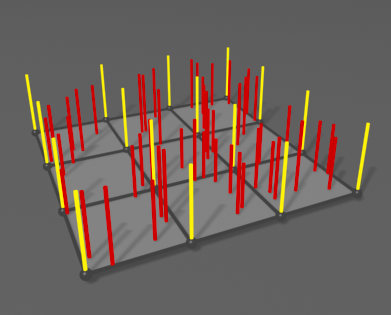
Guides (yellow) occur at each polygon corner.
Hairs (red) are interpolated between guides.
When the growth object is a surface, Hair And Fur generates guide hairs at the corners of polygons. When the growth object is a spline, the spline sub-objects are themselves the guides.
For surface-grown hair, you can manipulate the guides with styling tools to form a “control volume” that gets populated by interpolated hairs. The hairs can then be further manipulated with distorting controls such as Kink and Frizz, which can be driven by maps or solid textures.
Frizz settings affect the hairs but not the guides.
By default, a percentage of hairs are displayed in the viewports, but surface-grown guides do not appear except when you are working at the Guides sub-object level. You can adjust the viewport display of guides and hairs with settings on the Display rollout.
Guides are also used to calculate dynamics. After this calculation, hair interpolation takes place when you render. This is when parameters such as Frizz, as well as displacement and coloration, are calculated. You don't have control of every single hair, but this two-phase process makes the creation of realistic hair computationally feasible on a typical computer.
The Hair And Fur modifier's growth settings have a great effect on the hair’s appearance and behavior, but you can also manipulate the guides directly (or in other words, style the hair).
For surface-grown hair, use the tools on the Styling rollout. First, select the surface whose hair you want to edit, and then on the Modify panel, either click the Style Hair button on the Styling rollout or choose the Guides sub-object level from the Selection rollout or the modifier stack display.
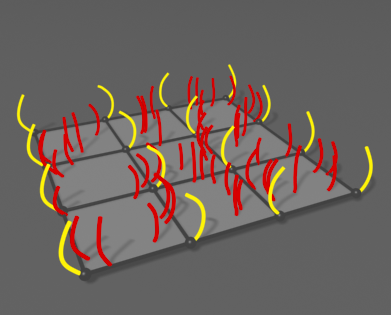
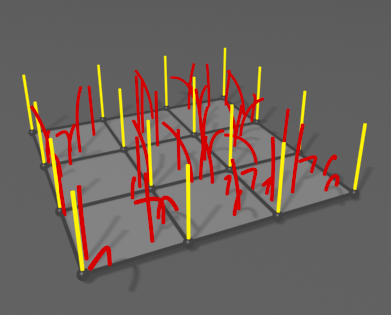
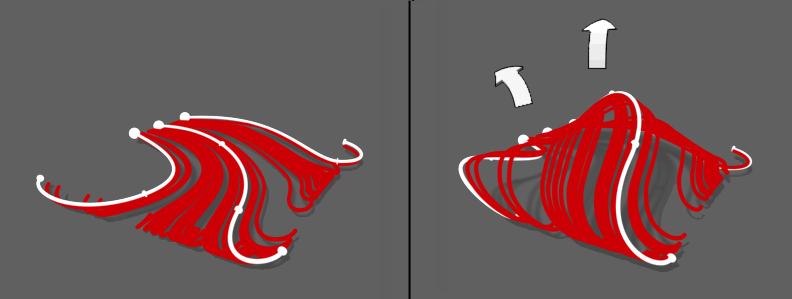
After guides have been styled, hair is interpolated between neighboring guide pairs.
Mesh-based hair guides before and after styling.
With spline growth, you style the hair by editing the growth splines in the viewports.
Style spline-based hair by manipulating the splines.
You can copy and paste a Hair And Fur modifier from one stack to another, but you need to line up the objects as closely as possible, because Hair uses proximity to determine how to position copied guides. If the objects have significantly different geometry, the transfer of guides can be inaccurate.
Copying and pasting the Hair And Fur modifier automatically adjusts the hair scaling. Copying from a large object to a small object, for instance, results in a smaller default size in the copied modifier.
If you copy an object that has Hair And Fur in its modifier stack, Hair will also copy the modifier’s data to a new modifier that will track the new object.
Textures, Vertex Maps, and Shaders
You can control many Hair And Fur modifier parameters with maps. If you apply a map to a parameter that is not a color, such as Density, Hair uses the texture as a grayscale map that is multiplied by the parameter value (0.0 to 100.0) .
You apply a map by clicking the square button to the right of the parameter. After applying a map, the letter “M” appears on the button. To place this map in the first slot in the Material Editor, Shift+click the button. To disable the map temporarily, Ctrl+click the button. A disabled map is indicated by a lower-case “m”.
When you render using the default “buffer” method, Hair And Fur provides its own default lighting (a single omni light), unless you have one or more supported lights in the scene.
Supported lights for the scanline renderer and “buffer” method include spotlights, omni lights, direct lights (which are treated as omni lights for hair purposes), and photometric lights except for IES Sun and IES Sky. Supported lights for the mental ray renderer and “mr prim” method include the lights supported by the scanline renderer, and these mental ray light types: mr Area Omni Light, mr Area Spotlight, mr Sky, and mr Sun.
If supported lights exist in the scene, by default they are used to light the hair, and the internal default omni light is not used. This is because in the Hair And Fur render effect, the Use All Lights At Render Time option is on by default. Also, any supported lights set to cast shadow-mapped shadows will cast shadows from rendered hair.
For Hair’s “buffer” render to consider only certain lights, select the lights you’d like Hair to use, go to the Hair And Fur render effect, turn off Use All Lights At Render Time, and then click Add Hair Properties. This causes only the designated lights to illuminate the hair. It also adds a Hair Light Attr rollout to each of the designated lights. This lets you fine-tune the light's shadow settings for Hair.
With the “buffer” method, you can also raytrace your scene.
Hair And Fur data in your scene is automatically saved when you save your MAX scene file. The state data for the hair can consume quite a bit of space, so your scene file will probably be significantly larger than it was before you applied hair.
You cannot keyframe hair styling. You can keyframe Modify panel parameters to create special effects such as hair growing. But to animate hair motion, you can use the Frizz Animation parameters or use dynamics.
To animate frizz, use the Frizz Anim., Anim. Speed, and Frizz Anim. Dir. parameters. It's not necessary to keyframe these to create animation; just set them to values other than the defaults.
To animate with dynamics, use the Dynamics rollout. See To generate a precomputed dynamics simulation with Hair. A gravity force is built in to Hair And Fur. You can add space warps to act as external forces (for example, Wind).
To use the Hair And Fur modifier:
This procedure lists the essential steps for growing hair on an object. For more information, see other Hair And Fur topics
in this help, and the tutorials in the Autodesk 3ds Max Tutorials, available from Help menu  Tutorials.
To apply hair to a limited area of a high-resolution object:
An efficient working method for applying hair to part of a high-poly-count object is to use a low-poly proxy object.
The Selection rollout provides tools for accessing different sub-object levels and display settings and for creating and modifying selections, and displays information about selected entities.
This rollout provides tools for accomplishing a variety of tasks with Hair, including creating a hairstyle from an existing spline object, resetting the hair, and loading and saving general presets for the modifier as well as specific hairdos. Here you can also specify an object from the current scene to be used as hair, such as a flower or group of flowers for creating a garden.
The Guides sub-object level of the Hair And Fur modifier lets you style hair interactively in viewports. Interactive styling controls are on the Styling rollout, which has a Style Hair button that you can also click to begin styling.
While you are styling hair at the Guides sub-object level, right-clicking a viewport displays a quad menu that contains shortcuts to many styling controls that are also found on the Styling rollout.
This rollout lets you set the hair count and density, the length, thickness at the root and tip, and various other comprehensive parameters.
The parameters on this rollout apply to buffer-rendered hair generated by Hair. In the case of geometry-rendered hair, the hair coloring is derived from the growth object. In the case of hair rendered by “mr prim”, all parameters apply except Self Shadow and Geom. Shadow. With instanced hair, Hair uses the material from the instanced object.
Lets you assign a mental ray shader to generate hair. 3ds Max passes the object's UV coordinate data, including map channels, to the mental ray shader; strictly speaking, the shader generates hair from this UV and mapping data, not from the object geometry itself. (Multiple map channels are supported.)
Frizz displacement is accomplished by doing a Perlin noise lookup at the hair's rest position root, and then displacing the hair much the way bump mapping displaces a surface normal. The frequency of the noise function is set by the Frizz X/Y/Z Frequency parameters. The magnitude of the displacement is controlled with Frizz Root and Frizz Tip. If you set dynamics mode to Live, the viewports show the effects of changing these settings in real time.
Kink displacement works similarly to Frizz, but evaluates noise lookups along the whole length of the guide. The result is a noise pattern that works on a larger scale than the Frizz noise. The effect is similar to crimped hair.
Some degree of clumping gets naturally created when you use Frizz at low frequencies, but you can go a bit further here with the Multi Strand parameters. For each hair that is normally rendered, Multi Strand renders a clump of additional hairs scattered around the original hair. The Splay settings control the degree of scattering at the roots and tips, and Multi Strand Count controls the number of hairs to create for the clump. You can use Splay to shape the clump by spreading or compressing the roots and tips.
For hair to seem natural in an animation, it must respond to the motion of the body it's attached to and to external influences such as wind and gravity. Hair's Dynamics functions let the hair behave like real-world hair, in interactive (Live) or Precomputed mode.
These settings let you control how hairs and guides display in the viewports. By default, Hair displays a small percentage of the hairs as lines. Alternatively, you can display the hairs as geometry, and you can also choose to display the guides.


 Modify panel