Command entry:
Rendering menu

Effects
Environment And Effects dialog
Effects panel
Add
Add Effect dialog
Hair And Fur
Command entry:Hair And Fur modifier
Tools rollout
Render Settings button
To render hair, the scene must contain a Hair And Fur render effect. The render effect is automatically added to the scene
the first time you apply the Hair And Fur modifier to an object, or 3ds Max adds one (with default values) at render time if an active Hair And Fur modifier is applied to an object.
If for some reason the render effect doesn't exist in the scene, you can add one by clicking the Render Settings button. This
opens the Environment And Effects dialog and adds a Hair And Fur render effect. You can change the settings, or simply accept
the default settings by closing the dialog after it opens.
Interface
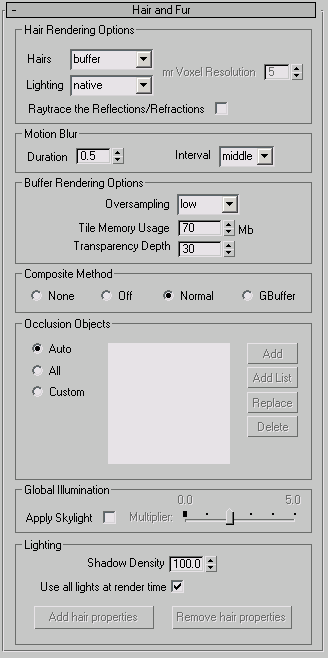
Hair Rendering Options group
- Hairs
-
Sets the method to be used for rendering hair:
- mr Voxel Resolution
-
Available only for the “geometry” and “mr prim” Hairs options. At render time, hair boundaries are subdivided into volume
cubes or “voxels.” 3ds Max calculates which hairs are in each voxel, and when a ray enters a voxel, it calculates for those hairs. This allows unneeded
voxels to be removed from memory during calculation.
With “geometry” rendering, voxels are used only for calculating instanced hairs.
This value gives the resolution of the subdivision. For example, a value of 3 subdivides the volume into 3 x 3 x 3 voxels,
for a total of 27. The higher this value, the more efficient calculations can be. Default=5.
- Lighting
-
- (The default.) Uses standard 3ds Max calculations for light falloff.
- Performs a simpler internal calculation for light falloff within the buffer render. It applies only to the buffer hair rendering
itself, not the 3ds Max scene. This mode omits features such as illumination textures on the hair, and light falloff calculation might be slightly
inaccurate, but rendering is somewhat faster.
- Raytrace the Reflections/Refractions
-
Available only for the “buffer” Hairs option. When on, reflections and refractions are ray-traced. When off, they are calculated
as usual. Turning this option on can increase realism at the cost of render time. Default=off.
Motion Blur group
In order to render motion-blurred hairs, Motion Blur must be enabled for the growth object.
- Duration
-
The number of frames over which motion blur is calculated for each frame.
- Interval
-
The point in the duration at which the “snapshot” of the hair is captured, before blurring. The choices are “start”, “middle”,
and “end”. The default is “middle”, which causes blurring to occur at the start and end of the duration.
Buffer Rendering Options group
This setting applies only to the ”buffer” rendering method.
- Oversampling
-
Controls the level of antialiasing applied to the Hair “buffer” render. The available choices are “draft”, “low”, “medium”,
“high”, and “maximum”. The “draft” setting uses no antialiasing; “high” is suitable for most final renders; in extreme cases,
use “maximum”. The higher the Oversampling level, the greater the memory requirements and render time. Default=”low.”
- Tile Memory Usage
-
Sets the maximum amount of main memory to be used by a “tile.” Hair And Fur renders hair one tile at a time. Default = 70
Megabytes.
TipWe recommend that you increase the value of Tile Memory Usage to 100.
- Transparency Depth
-
Sets a maximum depth for rendering transparent or translucent hairs. Default=30.
Composite Method group
This option lets you choose the method by which Hair composites hair with the rest of the scene. Compositing options are available
only with the “buffer” rendering method.
- Renders the hair only, with occlusion. The resulting image is ready to composite.
- Renders hair shadows but not the hair.
- (The default.) Does standard rendering and composites the occluded hair with the rest of the scene in the Rendered Frame Window.
Because of the occlusion, hair will not appear behind (through) transparent objects.
- Buffer-rendered hair appears behind most transparent objects. Transparent refractive objects aren't supported.
Occlusion Objects group
This setting lets you choose which objects will occlude hair in the scene; that is, if the object is closer to the camera
than part of the hair array, the hairs behind it won't render. By default, all objects in the scene occlude hair behind them.
- (The default.) All renderable objects in the scene occlude hair behind them.
- All objects in the scene, including non-renderable objects, occlude hair behind them.
- Lets you specify the objects that will occlude hair. Choosing this option makes the buttons on the right slide of the list
available. If you choose Custom but don't specify any occlusion objects, no objects will occlude the hair; that is, the hair
will appear in front of all objects, whether or not it's closer to the camera than the objects.
- List
-
The list of custom occlusion objects. To edit this list, choose Custom and then use the buttons on the right side of the list.
- Add
-
Adds a single object to the list. Click Add and then in a viewport, click the object to add.
- Add List
-
Adds multiple objects to the list. Click Add List and then in a viewport, click each object to add in turn. To finish, right-click
the viewport or click Add List again to turn it off.
- Replace
-
To replace an object in the list, highlight its name in the list, click Replace, and then in a viewport click the replacement
object.
- Delete
-
To remove an object from the list, highlight its name in the list and then click Delete.
Global Illumination group
- Apply Skylight
-
When on, Hair And Fur supports takes sky light into account, provided it is present in the scene. Default=off.
- Multiplier
-
Available only when Skylight is turned on. This Multiplier value lets you adjust the amount of sky light that is used when
rendering hair.
Lighting group
These settings control the illumination of hair and shadow-casting from hair by supported lights in the scene.
The following light types are not supported when rendering hair with the “buffer” method: Skylight, mr Area Omni, mr Area Spot, IES Sun, IES Sky, mr Sky and mr Sun.
However, mr Area Omni, mr Area Spot, mr Sky, and mr Sun are supported for hair when you use the “mr prim” method and the mental ray renderer.
NoteFor the purposes of rendering shadows in hair, Direct lights are treated as point (omni) lights.
- Shadow Density
-
Specifies the relative darkness of the shadows. At the default, highest value, 100.0, shadows are darkest. At the lowest value,
0.0, shadows are fully transparent, so they don't render. Range=0.0 to 100.0. Default=100.0.
- Use all lights at render time
-
When on, causes all supported lights in the scene to illuminate and cast shadows from hair when the scene is rendered. (Shadows
are cast only from lights whose Shadows toggle is on.) When off, for a light to cast shadows from hair, you explicitly must
add hair properties. In either case, shadow maps for hair use the settings from the Hair Light Attr(ibutes) rollout Default=on.
NoteThese settings apply only to “buffer”-rendered hair (the default type, set in the Hair Rendering Options group, as described
above).
- Add hair properties
-
Adds the Hair Light Attr(ibutes) rollout to selected lights in the scene. If you want to assign hair-specific shadow properties on a per-light basis, this rollout
is necessary. Available only when at least one supported light is selected.
When Use All Lights At Render Time is off, only lights with hair properties can illuminate hair.
- Remove hair properties
-
Removes the Hair Light Attr(ibutes) rollout from selected lights in the scene. Available only when at least one light with hair properties added is selected.