Dynamics Rollout (Hair And Fur)


Command entry:Select an object with the Hair And Fur modifier applied. Modify panel Dynamics rollout

For hair to seem natural in an animation, it must respond to the motion of the body it's attached to and to external influences such as wind and gravity. Hair's Dynamics functions let the hair behave like real-world hair, in interactive (Live) or Precomputed mode.

Designating Collision Surfaces

Hair dynamics uses guide hairs to calculate collision. To reduce computation, you have to explicitly designate the objects with which hair will collide. The object from which the hair grows is a special case: to have hair collide with this object (for example, a human head), simply turn on Use Growth Object.

If you want more than one Hair modifier to interact with a particular collision object, you have to add that object as a collision object for each different Hair And Fur modifier.

The modifier provides two different methods for calculating collision: Sphere and Polygon. Spherical collision uses a bounding sphere for collision objects; polygonal collision uses the collision object's actual geometry. The Polygon option is more accurate, but the Sphere option is quicker to calculate.

Procedures

Example: To view hair dynamics in real time:

  1. Apply the Hair And Fur modifier to an object.
  2. On the Dynamics rollout (scroll the command panel to view it), set Mode to Live.
  3. Move the object around.

    The hair moves realistically.

  4. On the Tools rollout, click Regrow Hair.

    The hair resumes its default position, growing straight out of the object.

  5. Click (Play Animation).
  6. The hair settles and droops, as if affected by gravity. Note that, as the animation repeats, the effects of gravity are cumulative; the hair animation doesn't restart at the first frame.
  7. On the Tools rollout, click Regrow Hair again.
  8. Add a Wind space warp to the scene.
  9. On the Dynamics rollout, set Dynamics Params Gravity to 0.0.
  10. In the External Forces group (at the bottom of the Dynamics rollout), click Add and then select the Wind space warp.
  11. Play the animation again.

    This time, the hair isn't affected by gravity, but simply blown by the wind. Again, the effect is cumulative and the animation doesn't repeat.

    All of this animation takes place only in real time; no keyframes are set, so it can't be rendered. To learn how to set up a renderable dynamics simulation with Hair, see the following procedure.

To generate a precomputed dynamics simulation with Hair:

  1. Apply the Hair And Fur modifier to an object.
  2. Set up the animation. It could simply be motion of the growth object, or you could use the Dynamics rollout External Forces group to add space warps, such as Wind, that should affect the hair. Actually, because the hair is affected by its own gravity by default, you don't need to set up any explicit animation at all to see hair dynamics.
  3. On the Modify panel Dynamics rollout, use the Collisions group to set objects the hair should collide with. Also set other simulation parameters in the Dynamics Params group.
  4. In the Stat Files group, click the ellipsis (...) button. Use the Save As dialog to specify the location and name of the stat files to be generated.
    NoteWhen you run the simulation, Hair will generate a separate stat file for each animation frame.
    ImportantIf you plan to render the animation with a networked render farm, make sure the path you specify can be seen in exactly the same way from each node on the render farm. If stat files aren’t found, hair will be stiff and just oriented to the skin as it moves. If the wrong stat files are found, hair can float right off an object.
    TipIf using Windows XP, click the My Network Places button to set a path using the Universal Naming Convention (UNC), even if it's on a local drive. Such a path can be accessed readily by other computers on the network.

    The path and stat file name appear in the text field next to the ellipsis button.

  5. In the Simulation group, set the frame range for the simulation and then click Run.

    Hair runs the dynamics simulation and generates a stat file for each frame in the animation. It also automatically sets the mode to Precomputed, so when you play or render the animation, it reads the stat files and uses the information for the hair positioning in each frame.

  6. Play the animation.

    The dynamics simulation stored in the stat files appears in the viewports.

  7. In the Mode group, choose None, and then play the animation again.

    The dynamics animation no longer appears. However, it's still stored in the stat files, and will reappear if you choose Precomputed.

  8. Make sure Precomputed is on, and then render the animation.

Interface

Mode group

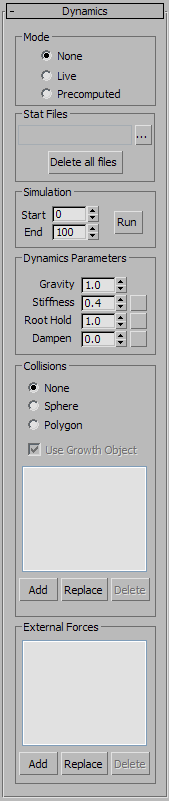
Chooses the method Hair uses to generate dynamics. Live mode is suitable for experimentation, but for best results when rendering animation with Hair, use Precomputed mode.

  • NoneHair doesn't simulate dynamics.
  • LiveHair simulates dynamics interactively in the viewports, but doesn't generate animation keyframes or stat files for the dynamics. For best results with Live mode, turn off Display rollout Display Hairs group As Geometry.

    For some methods of using live dynamics, see this procedure: Example: To view hair dynamics in real time:.

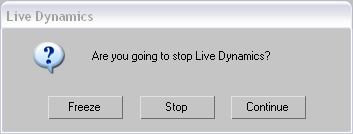
    If you press ESC while using live dynamics, 3ds Max displays a dialog that asks whether you want to stop live dynamics. Both Freeze and Stop reset the mode to None, but Freeze freezes the hair in its current position. You can use this as a starting point for precomputed dynamics, or as a point from which you style the hair.

  • PrecomputedLets you generate stat files for rendering dynamics-animated hair. Available only after setting a name and location for stat files (see following and To generate a precomputed dynamics simulation with Hair:).

Stat Files group

Stat files let you record and play back a Hair-generated dynamics simulation. For a workflow example, see this procedure: To generate a precomputed dynamics simulation with Hair:.

Text field

Displays the path and file name for the stat files.

(ellipsis button)

Click to choose a name prefix and location for stat files using the Save As dialog.

Hair adds a four-digit frame number (with leading zeroes) and the file name extension “.stat” to the name you provide (for example, hair_test0001.stat).

Delete all files

Deletes stat files from the target directory. The files must have the name prefix you assigned using the ... button.

TipYou can still use stat files even if you move them to another location. Follow this procedure:
  1. Open the MAX file used to generate the stat files.
  2. On the Modify panel Dynamics rollout, click (the ellipsis button).
  3. Use the Save As dialog to navigate to the directory with the stat files, and then click any stat file. Its name appears in the File Name field.
  4. Edit the File Name field to delete the four-digit extension after the stat file name. For example, if the stat file name is test0033.stat , delete the “0033” so that it reads test.stat .
  5. Click the Save button. The new stat file path appears in the Stat Files field.

Now, when you play or render the animation, Hair uses the stat files as originally generated.

Simulation group

Determines the extent of the simulation, and lets you run it. These controls become available only after you choose Precomputed mode and specify stat files in the Stat Files group. Set Start and End to the frames at which to begin and end the simulation, and then click the Run button. 3ds Max then computes the dynamics and saves the stat files.

Start

The first frame to consider in calculating the simulation.

End

The final frame to consider in calculating the simulation.

Run

Click to run the simulation and generate the stat files within the frame range indicated by Start and End.

To abort a simulation while it's running, click Cancel on the status bar.

Dynamics Params group

These controls specify the basic parameters for the dynamics simulation. The Stiffness, Root Hold, and Dampen values can be mapped: click the map button to the right of the spinner to assign a map. Grayscale values in the map multiply the parameter's value at that hair location.

Gravity

Lets you specify a force that moves hair vertically in world space. Negative values pull hair up while positive values pull it down. To cause hair not to be affected by gravity, set the value to 0.0. Default=1.0. Range=–999.0 to 999.0.

Stiffness

Controls the magnitude of the effect of dynamics. If you set Stiffness to 1.0, the dynamics will have no effect. Default=0.4. Range=0.0 to 1.0.

Root Hold

Comparable to stiffness, but affects the hair only at the roots. Default=1.0. Range=0.0 to 1.0.

Dampen

Dynamic hair carries velocity forward to the next frame. Increasing dampening increases the amount by which these velocities are diminished. Thus, a higher Dampen value means that hair dynamics will be less active (the hair can also start to get “floaty”). Default=0.0. Range=0.0 to 1.0.

Collisions group

Use these settings to determine which objects hair collides with during a dynamic simulation and the method by which collision is calculated.

  • NoneCollisions are not considered during the dynamic simulation. This can cause the hair to penetrate its growth object as well as other objects it comes into contact with.
  • SphereHair uses a spherical bounding box to calculate collisions. This method is faster because it requires less computation, but can cause inaccurate results. It's most effective when the hair is seen from a distance.
  • PolygonHair considers each polygon in the collision objects. This is the slowest method, but the most accurate.
Use Growth Object

When on, hair collides with the growth (mesh) object.

Objects list

Lists the names of scene objects with which hair should collide.

Add

To add an object to the list, click Add and then click the object in a viewport.

Replace

To replace an object, highlight its name in the list, click Replace, then click a different object in a viewport.

Delete

To remove an object, highlight its name in the list, then click Delete.

External Forces group

This group lets you specify space warps that will affect the hair during the dynamics simulation. For example, you can add a Wind space warp to cause the hair to be blown by a breeze.

NoteHair dynamics already has a built-in gravity force, so it's not necessary to add one.
Objects list

Lists the names of forces that dynamically affect the hair.

Add

To add a space warp to the list, click Add and then click the warp's icon in a viewport.

Replace

To replace a space warp, highlight its name in the list, click Replace, then click a different warp's icon in a viewport.

Delete

To remove a space warp, highlight its name in the list, then click Delete.