


Animation Layer pane
The Animation Layer pane is where your stack of animation layers displays. Refer to Animation layer stack for information on the stack itself.
The Animation Layer pane has three main components that affect each animation layer in the stack:
Using the options in the Show menu, you can specify whether you want the Animation Layer pane to display all animation layers you create (Show > All Layers), or only the animation layers that contain attributes for objects you select in your scene (Show > All Affected Layers).
You can use the Animation layer pane to Re-order animation layers or to Parent and unparent animation layers. You can also Change the animation layer stack display to flip the display of layers in the stack.
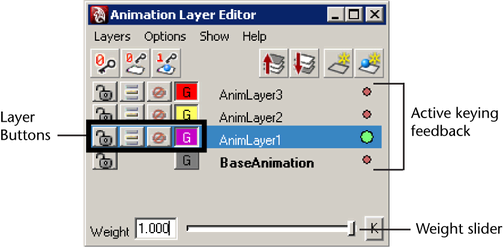
As you keyframe objects on animation layers, Active keying feedback displays on each layer in this pane.
The Animation Layer Buttons appear next to each animation layer in the stack.
You can use these controls to lock, mute, or solo each animation layer. You can also use the controls to turn layer ghosts on and off, and to change the ghost/layer color.
The Animation Layer Buttons include the following:
|
Lock | Locks the animation layer so that it does not receive keyframes. This lets you set keyframes on a layer that is lower in the stack without having to mute all of the layers above it. When an animation layer is locked its keys continue to contribute to the result animation, but it can't receive new keys. The BaseAnimation bar also has a lock button so that you can lock your non-layered animation. |
|
Mute | When on, the animation layer is muted. Muting an animation layer is like making it transparent – you no longer see its effect in the viewport. Muted layers become inactive, so their animation is not evaluated in the final result. If you want muted layers to also be locked so that they do not receive keyframes, turn on the Lock Muted Layer Lock Muted Layer option. |
|
Solo | When an animation layer is soloed, it becomes the only active layer at its level of the hierarchy. This means it is the only layer that can be keyframed, and the only layer whose animation plays back in the result. All other layers at the same level of the hierarchy and their child layers are muted. Soloing a parent layer does not affect the soloing or muting of child layers. |
|
Ghost/Layer Color | Toggles the display of animation layer ghosts, and lets you set the ghost color for each layer. See Display ghosts for layered animation. |
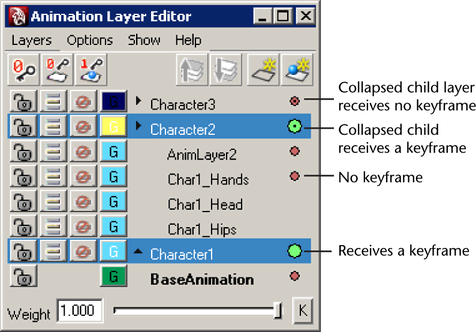
Visual feedback on each layer in the Animation Layer pane shows you which layer will be keyed if you set a keyframe at the current time. The state of each animation layer depends on the keying mode you have selected in the Options menu. (See also Animation layer states and Keyframe objects on animation layers.)
The ‘traffic light’ indicators to the right of each animation layer change color as you select objects and set keyframes, showing you which layers are active and which are affected.
The following table describes the active keying feedback that displays in the Animation Layer pane.
The Weight slider lets you control how much of the layer’s animation plays in the result.
By default, the Weight value for animation layers is set to 1, meaning the animation from the layer plays fully in the result. Setting the Weight value to 0 effectively mutes the layer, so none of its animation plays in the scene.
See also Animation layer weight.


