


Keyframe objects on animation
layers
Keyframing objects on animation layers is very similar to regular keyframing. After you have added an object’s attributes to a layer, you can keyframe in your scene as usual.
As you key, visual feedback
in the Animation Layer Editor shows
you the status of each layer. A green dot  displays
next to the layer name if the layer is active, and a red dot
displays
next to the layer name if the layer is active, and a red dot  displays
if the layer is affected. A layer’s status is determined by the
keying mode you are using and whether it includes objects selected
in the scene.
displays
if the layer is affected. A layer’s status is determined by the
keying mode you are using and whether it includes objects selected
in the scene.
For additional information on the red and green indicators, see Active keying feedback. To better understand when a layer is active or affected, see Animation layer states.
To keyframe on animation layers
For example, if you create two layers for animating a sphere, you can add its Translation attributes to one layer and its Rotation attributes to the other.
Three keying modes let you set how layers become active for keyframing:
This is the simplest keying mode. When Key in Selected Layer(s) is turned on, a layer must be selected to be active for keying.
When Key In Last Active Layer(s) is turned on, Maya automatically selects which layer is active. In this mode, the active layer is the last layer you added for the selected object. For example, if you have added AnimLayer1, AnimLayer2, and AnimLayer3 for an object, AnimLayer3 is active if you select this keying mode.
This is the default keying mode for layers and it provides a combination of the previous two keying modes. When Hybrid keying mode is on, Maya will set keyframes on the last added layer for the selected object, unless you have selected a different layer.
Refer to the Options menu for more detailed information on each keying mode.
As you set keys, use the Active keying feedback to monitor which animation layers are being keyed.
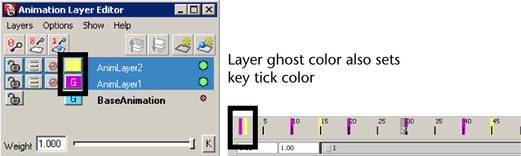
To set the key tick color for each animation layer
Setting the layer ghost color also sets the layer’s key tick color in the Time Slider. See Set the ghost color.
To change the size of key ticks, see Set the appearance of key ticks in the Time Slider.
Zero keys let you define a point in time where you want the layer’s animation to have no offset from the original animation. Using Zero keys, you can demarcate the time range where you want a layer’s animation to start and end.
For example, if you have an animation sequence of 50 frames and you only want to modify the animation between frames 20 and 30, set Zero keys at frame 20 and 30 to bracket the area you want to edit. Create your modified animation between frames 20 and 30, then play your result animation. The original animation plays fully before frame 20 and after frame 30, with your modified animation playing fully in between.

 in the