If you plan to create animation on different layers, it’s important to understand how animation layers blend together to create the result animation in your scene.
The following sections introduce you to the various concepts, options, and settings that affect the way animation layers blend together to produce the result animation:
Animation layers are stacked in the Animation Layer Editor in the order that you create them. By default, layers are stacked bottom-to-top, meaning new layers are added at the top of the layer pane, and existing layers are pushed down.
If you prefer, you can change the stack to display layers top-to-bottom, with new layers being added at the bottom of the layer pane. (See Change the animation layer stack display.)
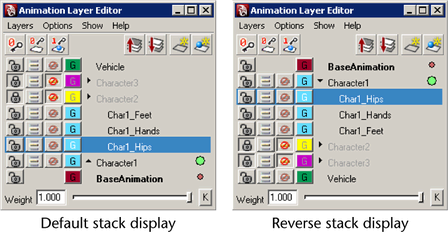
No matter which way you choose to display the stack, the animation layers are always effectively stacked on top of the BaseAnimation.
You can reorganize layers by changing the order of individual layers in the stack (see Re-order animation layers), although it’s important to first understand the ways this can affect your result animation.
Changing the order of layers in the stack changes the order in which Maya calculates the result animation. If none of your layers share the same attributes, the order of evaluation does not matter, and re-ordering layers does not change the result.
If you have keyframed the same attributes on more than one layer, there are two settings that can affect your result animation when you re-order the layers:
Animation layers in Override mode block the animation from any preceding layer with shared attributes. Changing the position of an Override layer changes which layers it overrides.
In most cases, changing the order of layers in Additive mode does not change the result. However, if the Additive layer contains Boolean attributes (such as Visibility) or Enum type attributes, those attributes are always calculated as if they are in Override mode.
For layers with rotation attributes, re-ordering only affects the result if you set the Accumulation option to Quaternion Rotation. Re-ordering does not affect the result if you use Euler Rotation.
In addition, re-ordering layers that share attributes can affect which layer receives keyframes. In all three layer keying modes, the order of layers in the stack can influence the order in which Maya considers them for receiving keyframes. For more information on each keying mode and how Maya manages which layers receive keyframes, see Key in Selected Layer(s), Key in Last Active Layer(s), and Hybrid in the Options menu.
You can parent and unparent animation layers to create a hierarchy in the stack, letting you organize and group your animation layers logically. See Parent and unparent animation layers.
If you organize your layers into hierarchies, it is important to note that the state of the parent layer can affect the child layer in the following ways:
For example, if the child layer’s Weight is 1 and its parent layer’s Weight is 0.5, half the child layer’s animation plays in the result.
Depending on which layer keying mode you have selected, child layers can still receive keyframes even if their parent layer is collapsed and they are deselected. (See Options menu for information on each keying mode.)
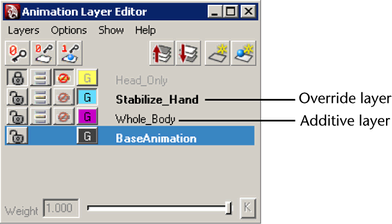
There are two main modes for animation layers that affect how the result animation is calculated: Additive and Override. The following sections describe each mode. See also Set the animation layer modes.
When in Additive mode, an animation layer ‘adds’ its animation to layers that precede it in the stack and affect the same attributes.
For example, if AnimLayer1 and AnimLayer2 both contain the translateX attribute for a sphere, the resulting translateX value for the sphere is the sum of the translateX values from both layers.
When in Override mode, an animation layer overrides the animation of any layer that shares the same attributes and precedes it in the stack.
For example: AnimLayer1 and AnimLayer2 are both in Override mode. The translateX value for a sphere on AnimLayer1 is 10, and on AnimLayer2 the same attribute has a value of 15. In the result animation, the sphere will have a translateX value of 15.
When an animation layer is in Override mode, its name displays in bold in the Animation Layer Editor.
You can modify the opacity of Override layers by turning on the Passthrough option and animating the Weight value. The following section describes Override-Passthrough mode.
When an animation layer is in Override mode, you can also turn on the Passthrough option. Passthrough lets you turn the opacity of Override layers on and off.
When Passthrough is off, the layer is always completely opaque, blocking all animation from preceding layers with shared attributes. When Passthrough is on, you can modify the layer’s opacity to control how much animation from preceding layers is allowed to play in the result.
If you think of Override layers like a gate in the animation layer stack, the Passthrough option controls whether the gate is locked or unlocked. When Passthrough is off, the gate is locked shut and no animation from preceding layers can get through. When Passthrough is on, the gate can open, and it is possible for other animation to get through.
With Passthrough on, you control the opacity of the layer by animating its Weight value. The gate is unlocked, and the Weight value determines how far it will swing open.
The following image illustrates the opacity of an Override animation layer as the Weight value changes with Passthrough mode on and off.
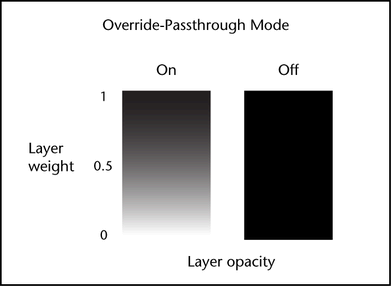
When Passthrough is on and the Weight value is set to 1, the layer is completely opaque and its full animation plays in the result. When the Weight is set to 0.5, half the layer’s animation plays in the result, mixed with half the animation from preceding layers. If the Weight is 0, the layer is completely transparent. None of its animation plays in the result, and the full animation from the preceding layers plays.
When Passthrough is off the layer is completely opaque, blocking all animation from preceding layers. Animating the Weight value still controls how much of the layer’s animation plays in the result.
An animation layer’s state determines whether it will receive keyframes and whether its information displays in other windows and editors. Animation layers can be described as being in the following states:
 next
to the layer name. Multiple layers can be active at the same time.
next
to the layer name. Multiple layers can be active at the same time.
 next
to the layer name.
next
to the layer name.
Each animation layer has a Weight value that determines how much of its animation plays in the result animation.
When the Weight value is set to 1, all of the layer’s animation plays in the result. A Weight value of 0 means none of the layer’s animation plays in the result.
As the result animation is calculated, the attributes of the animation layer are multiplied by the layer’s Weight value. For example, if you animate the translateY value for a bouncing ball on AnimLayer1, then decrease the Weight value to 0.5, the ball only bounces half as high when you playback the animation of AnimLayer1.
If you are working with a layer in Override-Passthrough mode, the Weight value also lets you control the opacity of the Override layer. See Override-Passthrough mode.
See also Keyframe the weight of animation layers.


