Display ghosts for layered
animation
Ghosts for layered animation let you preview the position of an object with each added layer of animation. The ghost options in the Animation Layer Editor let you show and hide ghosts for objects animated on multiple layers.
When a layer is ghosted, the ghost of the object is drawn such that the layer stack is evaluated up to and including the layer being ghosted. For example, if an object is added to AnimLayer1, AnimLayer2, and AnimLayer3, turning on the ghost for AnimLayer2 shows the result of the evaluation including the BaseAnimation, AnimLayer1, and AnimLayer2. The effect of AnimLayer3 is excluded.
Using the ghosting options,
you can specify that you want objects to be auto-ghosted when you
toggle the layer Ghost buttons  on,
or you can choose to turn ghosting on manually.
on,
or you can choose to turn ghosting on manually.
To display ghosts for selected objects automatically
on for
any layer.
To display ghosts for all objects in a layer
on for
any layer whose objects you want to ghost.
Ghosts display in the scene for all the layer’s associated objects, letting you preview the animation from each layer.
With this option on, you can use the main Animate > Ghost Selected option and the layer Ghost buttons to control what is ghosted in your scene. See also Ghost an object.
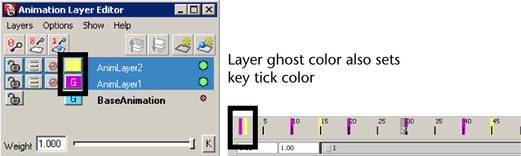
By default, animation layer ghosts are dark red. You can use the ghost buttons in the Animation Layer Editor to change the color of the ghosted objects for each layer.
 -click
a Ghost button in the Animation
Layer Editor. The Color Index Settings open.
-click
a Ghost button in the Animation
Layer Editor. The Color Index Settings open.
The layer’s ghost button and the ghosts of its animated objects change to the color you select.
To change how many animation layer ghosts display
Ghosts display the position of the animated object for a specified number of frames before and after the current frame. You can change how many ghosts display, for example if you want to view ghosts only for the current frame.
 from
the main menu bar.
from
the main menu bar.
One ghost per object per layer now displays at the current frame.