Lighting creates mood, focus, and drama.
You can create a light using the Create light tools or using the Multi-lister. You can use the light options to set properties for any new light you create.
By default, lights are named sequentially as you create them: Light, Light#2, and so on. To avoid confusion, however, name all lights as you create them. If you let the system assign default names and later combine two or more files, all lights are renumbered to avoid duplicate names. It may then become difficult to distinguish lights by name.
Light#1 is not used explicitly as a name; the first light with a given name is implicitly numbered 1.
To create a light using the Light tools

If shelves are not visible choose Windows > Shelves .
.
A new light swatch appears in the Multi-lister, and a new light icon appears in the modeling window. Each type of light has a unique modeling window icon and Multi-lister swatch.
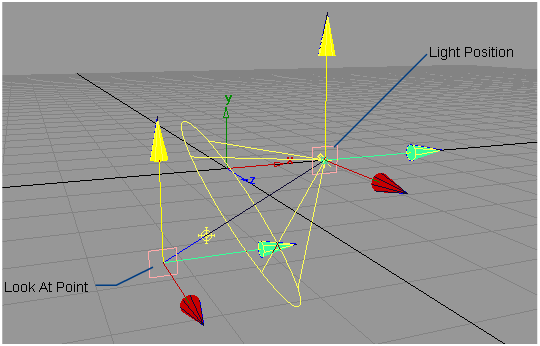
In addition, light manipulators are displayed in the modeling window.
(To display the manipulators for an existing light, select the Pick > Object tool, select the light, and select a Light tool.)

Most lights have one manipulator that controls the light’s position. Spot lights have two manipulators: one manipulator controls the light’s position, the other manipulator controls its direction (look-at point). Each manipulator consists of a square icon at its center, and three colored arrow icons radiating from the center in the X, Y, and Z directions.
By dragging a square icon you can move the light or the light’s look-at point across the view plane (in orthographic windows)
or parallel to the ground plane (in perspective windows). By holding the  (Windows) or
  (Mac) key while you drag a square icon you can snap the light to grid points.
By dragging an arrow icon you can move the light or the light’s look-at point in the X, Y, or Z direction.
To create a light using the Multi-lister
 > Lights), select Edit > New Light. A new point light swatch appears in the Multi-lister, and a new point light icon appears in the modeling windows at 0,0,0. Double-clicking the icon opens up the Control Window
that allows you to change the light type and other parameters.
To display the light options box
Do one of the following: