Creates a geometrical volume that illuminates objects contained within the volume without illuminating objects outside the volume.
Volume lights define a closed volume within which objects are illuminated; nothing outside the volume is illuminated by the volume light.
Within the volume, the direction and intensity can vary with many different parameters. A volume light is a convenient way to “link” a light spatially, instead of by object. One main use of the volume light is as an emitter of forces or particles. Volume lights are also useful for removing hot spots or glare by using a negative Intensity value.
You can create a light using the Create light tools or using the Multi-lister. You can use the light options to set properties for any new light you create.
By default, lights are named sequentially as you create them: Light, Light#2, and so on. To avoid confusion, however, you should name all lights as you create them. If you let the system assign default names and later combine two or more files, all lights are renumbered to avoid duplicate names. It may then become difficult to distinguish lights by name.
To create a light using the Light tools

If shelves are not visible choose Windows > Shelves .
.
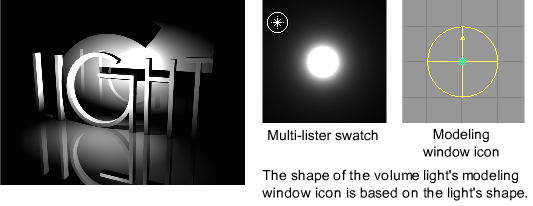
A new light swatch appears in the Multi-lister, and a new light icon appears in the modeling window. Each type of light has a unique modeling window icon and Multi-lister swatch.
In addition, light manipulators are displayed in the modeling window.
(To display the manipulators for an existing light, select the Pick > Object tool, select the light, and select a Light tool.)
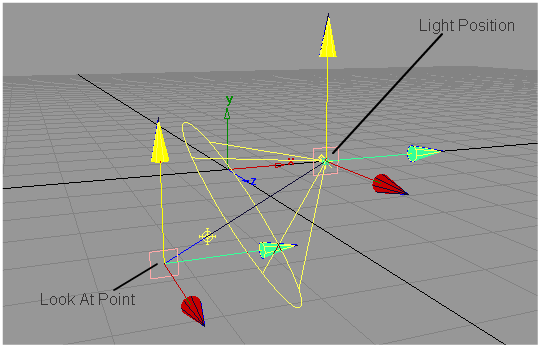
Most lights have one manipulator that controls the light’s position. Spot lights have two manipulators: one manipulator controls the light’s position, the other manipulator controls its direction (look-at point). Each manipulator consists of a square icon at its center, and three colored arrow icons radiating from the center in the X, Y, and Z directions.
By dragging a square icon you can move the light or the light’s look-at point across the view plane (in orthographic windows)
or parallel to the ground plane (in perspective windows). By holding the  (Windows) or
  (Mac) key while you drag a square icon you can snap the light to grid points.
By dragging an arrow icon you can move the light or the light’s look-at point in the X, Y, or Z direction.
To create a light using the Multi-lister
The Volume Light Options can be opened using the Volume light tool.
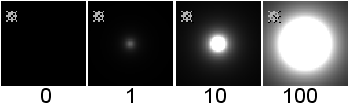
The brightness of the light. If the light exerts a force, this value sets its strength. A light with an Intensity value of 0 produces no light. A light with negative Intensity value removes light from a scene in the area of the light’s influence. The slider range is 0 to 100. The default value is 1.
The Volume Parameters can be accessed by double-clicking the Volume light swatch in the Multi-lister (Render > Multi-lister > Lights).
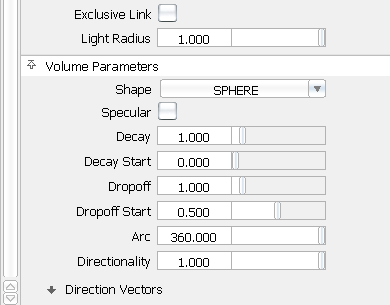
Volume lights have many parameters which define the shape of the volume and the direction of the light/force in the volume.
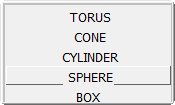
Defines the shape of the volume light as either a BOX, SPHERE, CYLINDER, CONE, or TORUS. The default setting is SPHERE.
This option is also available from the Volume light tool’s option box.
You can also use the Transform tools to position or reshape a volume light. Apply the Transform to the light icon in the modeling window or to the DAG node above the light in the SBD window.
Controls how quickly the light intensity decreases with distance within the light’s volume. (The volume light Decay parameter differs slightly from the Decay parameter for other light types.) The slider range is 0 to 10. The default value is 1.
| 0 | No decay (light reaches everything within the volume and nothing outside). |
| > 0 | Light intensity decreases from the center to the edges of the volume. For example, a value of 0.5 produces a linear dropoff from the center to the edges. With a value close to 1, intensity drops off very fast from the middle. With a value close to 0, intensity drops off slowly in the middle and fast near the edges. |
| < 0 | Light intensity decreases from the edges to the center of the volume. |
The direction that light decays depends on the volume light’s Shape setting.
| Shape | Decay Direction |
|---|---|
| BOX and SPHERE | all directions from the center |
| CYLINDER and CONE | in the direction of the principal axis |
| TORUS | perpendicular to the principal axis |
If Emit Particles is ON under Active Effects, the Decay value controls where within the volume the particles are emitted. For large positive values of Decay, particle emission is concentrated in the center of the volume. For large negative values, particle emission is entirely on the surface of the volume.
If Force is set (that is, not OFF) under Active Effects, the Decay value controls how quickly the force intensity decreases with distance within the light’s volume.
Controls the rate at which light intensity decreases from the principal axis to the edge of the light for CONE and CYLINDER volume lights only. The slider range is 0 to 10. Typical values are between 0 and 50. Values of 1 and less produce almost identical results (no discernible intensity decrease along the radius of the volume). The default value is 0 (no dropoff). The volume light Dropoff parameter is similar to the spot light Dropoff parameter (see Decay).
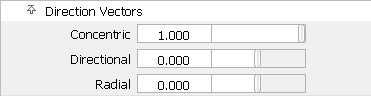
The Direction Vectors define the direction of the directional component of the light. If the Directionality value is 0, the Direction Vectors have no effect.
If Emit Particles is ON under Active Effects, the Direction Vectors determine the initial direction of the particles. If Force is set (that is, not OFF) under Active Effects, the Direction Vectors control the direction of the force within the light’s volume.


