Creates a fluorescent tube-like light.
Linear lights are one-dimensional lines of light like fluorescent tubes. A linear light is initially two units long. Use Transform > Scale to re-size a linear light.
Linear light shadows are much more costly than point light shadows. The increase in cost is proportional to the complexity of the scene and the length of the linear light.
You can create a light using the Create light tools or using the Multi-lister. You can use the light options to set properties for any new light you create.
By default, lights are named sequentially as you create them: Light, Light#2, and so on. To avoid confusion, however, you should name all lights as you create them. If you let the system assign default names and later combine two or more files, all lights are renumbered to avoid duplicate names. It may then become difficult to distinguish lights by name.
To create a light using the Light tools

If shelves are not visible choose Windows > Shelves .
.
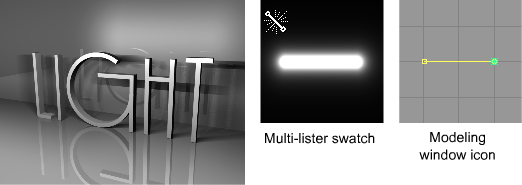
A new light swatch appears in the Multi-lister, and a new light icon appears in the modeling window. Each type of light has a unique modeling window icon and Multi-lister swatch.
In addition, light manipulators are displayed in the modeling window.
(To display the manipulators for an existing light, select the Pick > Object tool, select the light, and select a Light tool.)
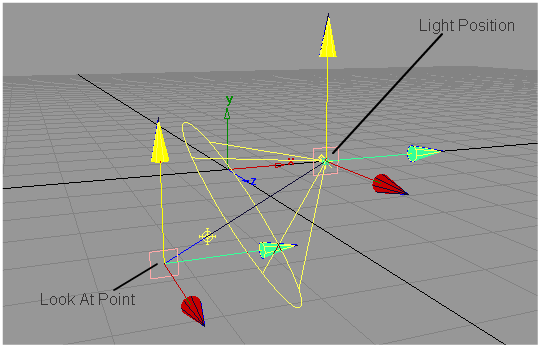
Most lights have one manipulator that controls the light’s position. Spot lights have two manipulators: one manipulator controls the light’s position, the other manipulator controls its direction (look-at point). Each manipulator consists of a square icon at its center, and three colored arrow icons radiating from the center in the X, Y, and Z directions.
By dragging a square icon you can move the light or the light’s look-at point across the view plane (in orthographic windows)
or parallel to the ground plane (in perspective windows). By holding the  (Windows) or
  (Mac) key while you drag a square icon you can snap the light to grid points.
By dragging an arrow icon you can move the light or the light’s look-at point in the X, Y, or Z direction.
To create a light using the Multi-lister
The Linear Light Options can be opened using the Linear light tool.
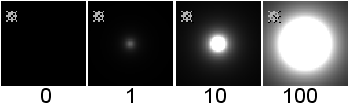
The brightness of the light. If the light exerts a force, this value sets its strength. A light with an Intensity value of 0 produces no light. A light with negative Intensity value removes light from a scene in the area of the light’s influence. The slider range is 0 to 100. The default value is 1.
Controls how quickly light intensity decreases with distance. The Decay setting has no effect at distances less than 1 unit. If Force is set (that is, not OFF) under Active Effects, the Decay value controls how quickly the force intensity decreases with distance.
The Decay parameter works differently for volume lights (see Decay). Valid settings are 0, 1, 2 or 3. The default setting is 1.
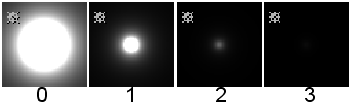
| 0 | no decay; light reaches everything |
| 1 | light intensity decreases directly (linearly) with distance (slower than real world light) |
| 2 | light intensity decreases proportionally with the square of distance (the same as real world light) |
| 3 | light intensity decreases proportionally with the cube of distance (faster than real world light) |