 Command entry:Create or select an object.
 Modify panel Modifier List Object-Space Modifiers Edit Poly
Command entry:Create or select an object. modeling ribbon Polygon Modeling panel Apply Edit Poly Mod
Modify panel Modifier List Object-Space Modifiers Edit Poly
Command entry:Create or select an object. modeling ribbon Polygon Modeling panel Apply Edit Poly Mod
The Edit Poly modifier provides explicit editing tools for different sub-object levels of the selected object: vertex, edge, border, polygon, and element. The Edit Poly modifier includes most capabilities of the base Editable Poly object, except for Vertex Color information, Subdivision Surface rollout, Weight and Crease settings, and Subdivision Displacement rollout. Edit Poly lets you animate sub-object transforms and parameter changes. In addition, because it's a modifier, you can retain the object creation parameters and change them later. For detailed information about animating with Edit Poly, see these procedures.
Edit Poly gives you these options:
Overriding Actions with Press/Release Keyboard Shortcuts
While working with poly objects, you can use a “press/release keyboard shortcut” to temporarily override the current operation and perform a different one. As soon as you release the keyboard shortcut, you return to the previous operation.
For example, you might be working at the Polygon sub-object level, moving polygons, and need to rotate the object to access a different part of it. Instead of having to exit the Polygon sub-object level, rotate the object and then re-enter the sub-object level, you could simply press and hold 6, rotate the object, release the key, and immediately return to moving polygons.
To see a list of press/release keyboard shortcuts, go to Customize Customize User Interface Keyboard panel, open the Group drop-down list, and choose Edit Poly or Editable Poly. The actions in boldface are the ones
that you can assign as press/release shortcuts. Not all are assigned; for information about assigning keyboard shortcuts,
see Keyboard Panel.
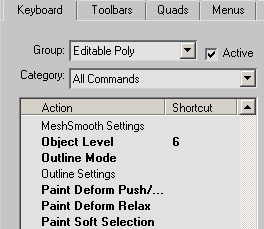
The actions in boldface can function as press/release shortcuts.
Differences Between Edit Poly and Editable Poly
Functionality in Edit Poly is mostly the same as that of Editable Poly. Please note the following differences:
For example, if you extrude a polygon using the Extrude Polygons dialog, there will be three Undo actions. The first undoes the Commit, which happens automatically when you click the dialog OK button at the end; the second undoes the change in height (from 0 to the height you set); and the third undoes the entry into the Extrude operation.
Following is a table showing the Edit Poly functions that are and are not animatable. Functions that are not animatable are unavailable in Animate mode. Functions marked “Yes” can be animated explicitly in Animate mode.
Functions marked “Proc” cannot be animated explicitly, but can be animated procedurally. This means they can be applied to different parts of the Edit Poly object at different points in the animation by means of an animated sub-object selection passed up the stack. For further information, see this procedure.
| Function | Animatable? |
|---|---|
| Transform sub-objects | Yes |
| Shift+Transform sub-objects | Yes |
| Constraints | No |
| Preserve UVs | No |
| By Vertex | No |
| Ignore Backfacing | No |
| Ring | No |
| Loop | No |
| Shrink | No |
| Grow | No |
| Selection conversion | No |
| Named Selection copy/paste | No |
| Soft Selection (most settings) | Yes (but not painting soft selection) |
| Shaded Face toggle | No |
| Delete | Proc |
| Create Vertex | No |
| Create Face | No |
| Create Edge | No |
| Collapse | Proc |
| Attach / Attach List | No |
| Detach | No |
| Slice | Yes |
| Quickslice | No |
| Cut | No |
| MSmooth | Proc |
| Tessellate | Proc |
| Make Planar | Proc |
| View Align | Yes |
| Grid Align | Yes |
| Relax | Yes |
| Hide Selected | No |
| Hide Unselected | No |
| Unhide All | No |
| Remove | Proc |
| Break | Proc |
| Extrude | Yes |
| Chamfer | Yes |
| Bridge | Yes |
| Weld (selected) | Proc (can animate Weld Threshold) |
| Target Weld | No |
| Connect | Yes |
| Remove Isolated Vertices | Proc |
| Remove Unused Map Verts | Proc |
| Remove | Yes |
| Split | Yes |
| Insert Vertex | No |
| Weld (selected) | Yes (Threshold) |
| Target Weld | No |
| Connect (Vertex) | Proc |
| Connect (Edge) | Yes |
| Create Shape | No |
| Edit Triangulation | No |
| Cap | Proc |
| Insert Vertex | No |
| Extrude | Yes |
| Bevel | Yes |
| Outline | Yes |
| Inset | Yes |
| Retriangulate | Proc |
| Flip | Proc |
| Hinge from Edge | Yes |
| Extrude Along Spline | Yes |
| Set Material ID | Yes |
| Select by Material ID | No |
| Set Smoothing Group | Yes |
| Select by Smoothing Group | No |
| Auto Smooth | Proc |
Edit Poly differs from other Edit modifiers in 3ds Max in that it provides two different modes, available on the Edit Poly Mode rollout: one for modeling and another for animating. By default, Edit Poly operates in Model mode, whose modeling functionality is mostly the same as that of Editable Poly; animation is unavailable in this mode. Alternatively, you can work in Animate mode, which makes available only functions that you can animate.
Each Edit Poly modifier set to Animate mode can preserve any number of keyframes animating a single operation type, such as transforming faces, on the same sub-object selection. To animate other parts of the object, or to animate a different operation on the same sub-object selection, just use another Edit Poly modifier.
You’ll find functions specific to the active sub-object level on a special rollout, leaving the Edit Geometry rollout with functions that can be used at most sub-object levels, as well as at the object level.
 Also, many commands are accompanied by a Settings button, which gives you a second way to use the command:
Interactive Manipulation mode is well suited to experimentation. You activate this mode by clicking the command's Settings
button. This opens a non-modal settings interface (typically a caddy) and places you in a preview mode, where you can set parameters and see the results immediately in the viewport on the current sub-object selection. You
can then accept the results or cancel the operation. Alternatively, you can apply the settings to the current sub-object selection
and then make one or more subsequent selections and apply or change the settings. Make the selection, optionally change the
settings, click Apply And Continue, and then repeat with a different selection.
To animate an Edit Poly operation on a sub-object selection:
 Select an object.
 (Auto Key).
Modify panel Edit Poly Mode rollout, choose Animate.
Make a sub-object selection.
(Auto Key).
Modify panel Edit Poly Mode rollout, choose Animate.
Make a sub-object selection.
If you change the selection, the existing animation is applied to the new selection, and lost from the previous one. If you change the operation, any changes from the previous animation are frozen (that is, “baked” into the model) at the current frame, and only new keyframes are recorded in the current Edit Poly modifier.
To animate different sub-object selections using different operations, use multiple applications of the Edit Poly modifier.
To apply an Edit Poly operation to an animated sub-object selection:
This procedure demonstrates procedural animation with Edit Poly: the ability to change the location of application on an object during an animation using an existing, animated sub-object selection.
Select an object.
Modify panel Edit Poly Mode rollout, choose Animate.
Now, when you  play the animation, the Edit Poly effect moves along with the animation of the sub-object selection.
If you decide to animate a different function procedurally, first click Edit Poly Mode rollout Cancel.
Example: To apply an Edit Poly operation procedurally to an animated model:
Edit Poly lets you layer an animated sub-object operation on top of an existing animation. Try this brief example:
(Auto Key).
Play the animation.
The extrusion animation plays “on top” of the existing animation. This isn't possible with the Edit Mesh modifier.
For more information on the stack display, see Modifier Stack.
Because Edit Poly is a modifier, if you apply further modifiers and then return to the Edit Poly stack entry, Show End Result is on by default, and you can still see the results of any modifiers above Edit Poly on the stack. This is different from the Editable Poly object, where if you apply a modifier such as Symmetry and then return to the Editable Poly stack entry, you cannot see the effect of the modifier on the object's geometry. While at a sub-object level, if you turn on Show Cage on the Edit Poly Mode rollout, you can see the final object as a white mesh, the original sub-object selection as a yellow mesh, and the original Edit Poly object as an orange mesh.
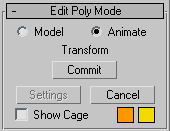
This rollout provides access to Edit Poly's two modes of operation: Model, for modeling, and Animate, for animation of modeling effects. For example, you can animate the Taper and Twist settings for polygons extruded along a spline.
During and between sessions, 3ds Max remembers the current mode for each object separately. The same mode remains active at all sub-object levels.
Edit Poly Mode also gives you access to the current operation's caddy, if any, and lets you commit to or cancel out of modeling and animation changes.
Lets you animate using the Edit Poly functions.
In addition to choosing Animate, you must turn on Auto Key or use Set Key for animating sub-object transforms and parameter changes. Alternatively, in Animate mode you can apply a single command, such as Extrude or Chamfer, to an animated sub-object selection passed up the stack.
For example, say you want to animate a polygon extruding from an object from frame 1 to 10, and then moving back to the original position over the next 10 frames. You can accomplish this with a single Edit Poly modifier using the Extrude function, setting one keyframe at 10 and another at 20. However, say you want to animate a polygon extruding outward, and then animate movement of one of the resultant side polygons. In that case, you'd need two Edit Poly modifiers: one for the extrusion, and another for the poly transform.
Shows the current command, if any. Otherwise, it shows <No Current Operation>.
When you're working in Model mode using direct manipulation (that is, working in the viewports), the label shows the current operation during drag operations, and then returns to the unavailable state.
When you're working in Model mode using a caddy, or in Animate mode using direct manipulation or a caddy, the label continually shows the current operation.
Toggles the caddy for the current command.
Toggles the display of a two-color wireframe that shows the editable poly object before modification or subdivision. The cage colors are shown as swatches to the right of the check box. The first color represents unselected sub-objects, and the second color represents selected sub-objects. Change a color by clicking its swatch. The Show Cage toggle is available only at sub-object levels.
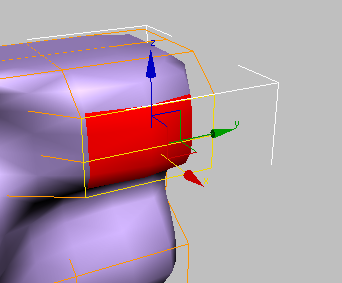
The cage displays the original structure of the edited object.
Typically this feature is used in conjunction with the MeshSmooth modifier because it lets you easily toggle visibility of the unsmoothed base object while simultaneously viewing the smoothed result, but it works with any modifier.
The Selection rollout provides tools for accessing different sub-object levels and display settings and for creating and modifying selections. See Selection Rollout (Edit Poly Modifier).
Soft Selection controls apply a smooth falloff between selected sub-objects and unselected ones. When Use Soft Selection is on, unselected sub-objects near your selection are given partial selection values. These values are shown in the viewports by means of a color gradient on the vertices, and optionally on the faces. They affect most types of sub-object deformations, such as the Move, Rotate, and Scale functions and any deformation modifiers (such as Bend) applied to the object. This provides a magnet-like effect with a sphere of influence around the selection.
For more information, see Soft Selection Rollout.
The Edit (sub-object) rollouts provide sub-object-specific functions for editing an Edit Poly object and its sub-objects. For specific information, click any of the following links:
The Edit Geometry rollout provides global functions for editing an Edit Poly object and its sub-objects.
Paint Deformation lets you stroke elevated and indented areas directly onto object surfaces. For more information, see Paint Deformation Rollout (Polymesh).
The Selection rollout provides tools for accessing different sub-object levels and display settings and for creating and modifying selections. It also displays information about selected entities.
Edit Poly (Object) functions are available when no sub-object levels are active. These functions are also available at all sub-object levels, and work the same in each mode, except as noted below.
Vertices are points in space: They define the structure of other sub-objects that make up the poly object. When vertices are moved or edited, the geometry they form is affected as well. Vertices can also exist independently; such isolated vertices can be used to construct other geometry but are otherwise invisible when rendering.
An edge is a line connecting two vertices that forms the side of a polygon. An edge can't be shared by more than two polygons. Also, the normals of the two polygons should be adjacent. If they aren't, you wind up with two edges that share vertices.
A border is a linear section of a mesh that can generally be described as the edge of a hole. This is usually a sequence of edges with polygons on only one side. For example, a box doesn't have a border, but the teapot object has several: on the lid, on the body, on the spout, and two on the handle. If you create a cylinder, and then delete an end polygon, the adjacent row of edges forms a border.
A polygon is a closed sequence of three or more edges connected by a surface. Polygons provide the renderable surface of Edit Poly objects.
The Edit Geometry rollout provides global controls for changing the geometry of the poly object, at either the top (Object) level or the sub-object levels. The controls are the same at all levels, except as noted in the descriptions below.
This Edit Poly-specific dialog lets you change the alignment method after using the View Align or Grid Align function. Available only in Animate mode after using the View Align or Grid Align command.
This dialog lets you specify how a sub-object selection is detached from an Edit Poly object.


