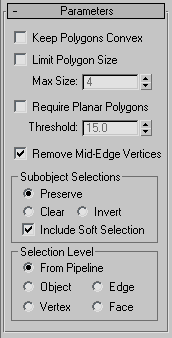
The Turn To Poly modifier lets you apply object conversions in the modifier stack. Also, when you apply the general-purpose modifiers, such as Normal, Material, or UVW Map, it can be helpful to explicitly control the type of object beforehand.
When you use Turn To Poly, you're joining triangles into polygons, so you might need to have restrictions on polygon convexity, size, and planarity. All conversions from patches produce quads and triangles. Conversions from meshes can produce arbitrarily large polygons. Mesh polygons are controlled as usual by joining together faces that are separated by invisible edges.
Example: To prevent interior vertices from being passed up the stack:
 Create panel
 (Shapes)
  Splines
  Object Type rollout
  NGon.
NGon.
 Modify panel and convert the NGon to an editable mesh by right-clicking the modifier stack and choosing Convert to
  Editable Mesh.
 Object Properties to display the Object Properties dialog.
 Modify panel
  Modifier List
  Turn To Poly. Notice the interior vertex clears.

Does not join across edges if the resulting polygon would not be convex. "Convex" means that you can connect any two points in the polygon with a line that doesn't go outside the polygon. A polygon is not convex if you can draw a line between vertices and that line lays outside of the polygon.
Problems that can occur with non-convex polygons include the fact that changes in the geometry of the input object can result in a different topology for the Turn To Poly result. For instance, in a box, if you drag one of the top corners across the middle of the top face, the box becomes non-convex. Turn To Poly would then see this as two triangles instead of one quad, and the number of points in the result would change.
These options control the selection of sub-objects.
Affects the action of sub-object Move, Rotate, and Scale functions. When these are on, 3ds Max applies a spline curve deformation to unselected vertices surrounding the transformed selected sub-object. This provides a magnet-like effect, with a sphere of influence around the transformation. Use this when you want to preserve the soft selection from beneath. For example, if Use Soft Selection is on when you select vertices on an editable mesh, and you apply Turn To Poly with Include Soft Selection on, then the same soft selection will apply to the polymesh vertices. Default=on.
For more information, see Soft Selection Rollout.
These options set the sub-object selection level for passing up the rest of the stack.
Uses the equivalent of whatever the input object uses (patch level becomes face level, and so on). For example, if you create a box, convert it to an editable mesh in face mode, and apply a Turn To Poly modifier to it, 3ds Max passes a sub-object selection in face mode up the stack. The Turn To Poly modifier takes the sub-object face selection into account and selects the polygons that derive from the face selection.