Set Key Animation mode allows you to create keys for selected objects individual tracks using a combination of the Set Keys button and Key Filters. Unlike Auto Key, Set Key mode gives you control over what you key and when. It allows you to pose a character (or transform any object) and then if you like it, use that pose to create keys. If you move to another point in time without keying, your pose is discarded. Set Key also works with object parameters.
You can try out different values and then when you have what you like use it to create keys. Combine this with keyable tracks in the Curve Editor to create keys on just the object parameters you want to key.
To animate something using Set Key mode, you first turn on Set Key Mode. You can then select the object you want to animate and use the Key Filters button to set which tracks you want to keyframe. You can also use Show Keyable icons in Track View edit windows to make individual tracks keyable or not. With all this setup work completed, you can create keys by clicking the Set Key button (the large button with the key icon) or using Keyboard shortcut (K). Move ahead in time, then make changes to your character or object (transforms or parameter changes) and click Set Keys to use those changes to create keys.
If you do not click the Set Keys button and move to another frame the object changes will be lost, as if you had never made them. This is fundamentally different behavior from Auto Key mode, where you would need to use undo to lose the changes you made. Use the right mouse button on the time slider to drag a pose or transform to a different point in time.
For faster workflow you can define keyboard shortcuts for the Key Filters and Show Keyable tools by going to Customize menu
 Customize User Interface and assigning keystroke combinations in the Main UI group.
To animate using Set Key mode:
 (Toggle Set Key Mode).
 Select the objects you want to keyframe, and then right-click and choose Curve Editor.
 (Show Keyable Icons), then use the keyable icons in the controller window to define which tracks will be keyed.
A  red key means the track will be keyed. Click a key to toggle its keyable status.
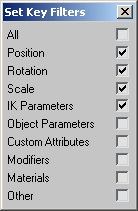
 (Key Filters) and then turn on the tracks you want to keyframe. By default, Position Rotation, Scale, and IK Parameters are
on. For this example, turn off Rotation and Scale.
 (Set Keys).
The Set Keys button flashes red to show that 3ds Max has set a key, and a key appears on the track bar.

Repeat this process, moving the time slider and setting keys.
To keyframe all parameters using Set Key mode:
 (Toggle Set Key Mode).
 (Key Filters) and then turn on Key All.
 (Set Keys).
To move a pose or position in time without update:
 (Toggle Set Key Mode).
The time slider moves, but the position does not change. The pose or position is maintained and transferred to the new point in time.
 (Set Keys).
 Set Key
 Set Keys
Click this button to set a key on each track in the selection set. It checks that the tracks are keyable, and that Key filters allow the tracks to be keyed. If both these are satisfied, a key is set. Set Keys also sets keys in Auto Key mode and in Layout mode (when neither Auto Key nor Set Key is turned on). The default keyboard shortcut for this command is K.
 Selection List
Provides quick access to named selection sets and track sets while working in Set Key animation mode. Use this to switch quickly among different selection sets and track sets.
 Key Filters
Turn on the tracks you want to key. Default=Position, Rotation, Scale and IK Parameters.

The following options are available: