The Selection rollout provides tools for accessing different sub-object levels and display settings and for creating and modifying selections. It also displays information about selected entities.
When you first access the Modify panel with an Edit Poly object selected, you're at the Object level, with several functions available as described in Edit Poly (Object). You can toggle the various sub-object levels and access relevant functions by clicking the buttons at the top of the Selection rollout.
Clicking a button here is the same as choosing a sub-object type in the modifier stack display. Click the button again to turn it off and return to the Object selection level.
Converting Sub-object Selections
You can convert sub-object selections in three different ways with the use of the Ctrl and Shift keys:

Face selection (left) converted to vertex border (center) and edge border (right)

Vertex selection (left) converted to edge border (center) and face border (right)

Edge selection (left) converted to face border (center) and vertex border (right)

 Vertex
 Edge
Edge Border
Accesses the Border sub-object level, which lets you select a sequence of edges that borders a hole in the mesh. A border comprises only connected edges with faces on only one side of them, and is always a complete loop. For example, a default box primitive doesn't have a border, but the teapot object has a couple of them: one each on the lid, the body, and the spout, and two on the handle. If you create a cylinder and delete one end, the row of edges around that end forms a border.
When Border sub-object level is active, you can't select edges that aren't on borders. Clicking a single edge on a border selects that whole border.
You can cap a border, either with the Cap function or by applying the Cap Holes modifier. You can also connect borders between objects with the Connect compound object.
 Polygon
 Element
When on, selection of sub-objects affects only those facing you. When off (the default), you can select any sub-object(s) under the mouse cursor, regardless of their visibility or facing. If there are more than one sub-object under the cursor, repeated clicking cycles through them. Likewise, with Ignore Backfacing off, region selection includes all sub-objects, regardless of the direction they face.
When on, selecting a polygon also selects neighboring polygons based on the numeric Angle setting to the right of the check box. This value determines the maximum angle between neighboring polygons to select. Available only at the Polygon sub-object level.
For example, if you click a side of a box and the Angle value is less than 90.0, only that side is selected, because all sides are at 90-degree angles to each other. But if the Angle value is 90.0 or greater, all sides of the box are selected. This function speeds up selection of contiguous areas made up of polygons that are at similar angles to one another. You can select coplanar polygons with a single click at any Angle value.
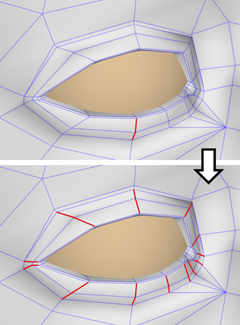
Expands an edge selection by selecting all edges parallel to the selected edges. Ring applies only to edge and border selections.

Ring selection adds to the selection all the edges that are parallel to the ones selected originally.
 [Ring Shift]
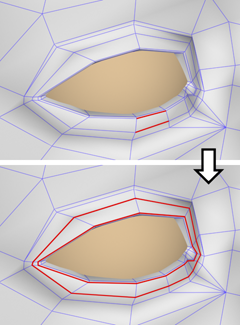
The spinner next to the Ring button lets you move the selection in either direction to other edges in the same ring; that is, to neighboring, parallel edges. If you have a loop selected, you can use this function to select a neighboring loop. Applies only to Edge and Border sub-object levels.

Left: Original loop selection
Upper right: Ring Shift up moves selection outward (from center of model).
Lower right: Ring Shift down moves selection inward (toward center of model).
To expand the selection in the chosen direction, Ctrl+click the up or down spinner button. To shrink the selection in the chosen direction, Alt+click the up or down spinner button.
 .
.
For instructions for using the caddy, see The Caddy Interface.
Expands an edge selection as far as possible, in alignment with selected edges.
Loop selection propagates only through four-way junctions.

Loop selection extends your current edge selection by adding all the edges aligned to the ones selected originally.
 [Loop Shift]
The spinner next to the Loop button lets you move the selection in either direction to other edges in the same loop; that is, to neighboring, aligned edges. If you have a ring selected, you can use this function to select a neighboring ring. Applies only to Edge and Border sub-object levels.
To expand the selection in the chosen direction, Ctrl+click the up or down spinner button. To shrink the selection in the chosen direction, Alt+click the up or down spinner button.
 .
.
For instructions for using the caddy, see The Caddy Interface.

This option lets you preview a sub-object selection before committing to it. You can preview at the current sub-object level, or switch sub-object levels automatically based on the mouse position. The choices are:
To select multiple sub-objects at the current level, press and hold Ctrl, move the mouse to highlight more sub-objects, and then click to select all highlighted sub-objects.

Polygon sub-object selection preview with Ctrl held down
To deselect multiple sub-objects at the current level, press and hold Ctrl+Alt, move the mouse to highlight more sub-objects, and then click a selected sub-object. This deselects all highlighted sub-objects.
To select multiple sub-objects of the same type, press and hold Ctrl after highlighting a sub-object, move the mouse to highlight more sub-objects, and then click to activate that sub-object level and select all highlighted sub-objects.
To deselect multiple sub-objects at the current sub-object level, press and hold Ctrl+Alt, move the mouse to highlight more sub-objects, and then click a selected sub-object. This deselects all highlighted sub-objects. Note that this method does not switch sub-object levels.
At the bottom of the Selection rollout is a text display giving information about the current selection. If 0 or more than one sub-object is selected, the text gives the number and type selected; for example, “4 Polygons Selected.” If one sub-object is selected, the text gives the identification number and type of the selected item; for example, “Polygon 73 Selected.”
When using Preview Selection, a second line gives additional information about the identity or number of highlighted sub-objects.