These topics describe settings for tools for editing Editable Polymesh surfaces. The settings are used in Interactive Manipulation mode, in which you can adjust settings parametrically and see the results immediately in the viewports.

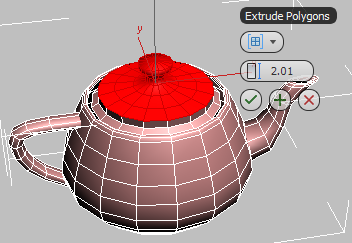
Most settings described in this section use the caddy, a new “in-canvas” interface that comprises a dynamic label and a set of buttons superimposed on the viewport. The caddy supplants the previous settings dialogs, which are no longer available.
You use familiar mouse-based methods for adjusting caddy settings, including clicking and dragging spinners, drop-down lists, and keyboard entry. However, it’s important to understand the specifics of interacting with the caddy interface as detailed following:

Left: The mouse cursor is not over a control, so the caddy label shows the feature name.
Right: The mouse cursor is over the Height control.
To reposition the caddy, drag it by the title. Thereafter it remains in that position relative to the selection. This offset applies to all caddies for all objects.

When the mouse cursor is over the control, the icon changes to a pair of arrows pointing left and right:

The arrows function as a horizontal version of the standard spinner control in 3ds Max. Drag left or right to decrease or increase the value, respectively, or click either arrow to change the value by a small increment. While dragging, right-click to restore the previous value. To increase or decrease the rate of change, Ctrl+drag or Alt+ drag, respectively. You can also right-click the arrows to reset the value to 0 or a reasonable default value, depending on the control.
When the mouse cursor is over the displayed value, it changes to a text cursor. To edit the value with the keyboard, click or double-click and then enter a new value. To finish editing and accept the new value, press Enter, or, to cancel and exit, press Esc.
Undo (Ctrl+Z) works normally with changes made by either method.

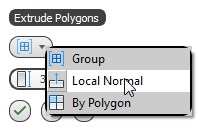
Click the arrow to open the list.
A choice setting can be accompanied by additional controls that are available only when a certain option is active. When a different option is active, the caddy buttons for the additional controls are dark, but you can still see a control name by positioning the mouse over it.
A toggle can be accompanied by additional controls that are available only when the control is on. When the toggle is off, the caddy buttons for the additional controls are dark, but you can still see a control name by positioning the mouse over it.
With the following exception, settings persist throughout the current session and affect subsequent use of the related tool. For example, if you change the Segments value for the Bridge tool, and then use the tool subsequently in Direct Manipulation mode, the altered Segments value is applied automatically.
The exception is where you apply a setting directly, typically by dragging on a sub-object. For example, changing the Chamfer Amount setting with the caddy doesn’t apply to chamfering a sub-object directly, because you set the amount by dragging.
Beveling involves first extruding polygons and then scaling the extruded polygons. Use these settings for beveling polygons in Interactive Manipulation mode.
Use these settings for bridging pairs of polygons, polygon selections, or borders in Interactive Manipulation mode.
Use these settings for bridging pairs of edges in Interactive Manipulation mode.
Chamfering creates new faces around the chamfered entity, along with connecting edges. Or, with the Open option, you can create an open (empty) area instead. For vertices, edges, and borders, you can use the caddy to set the chamfer amount numerically and to toggle the Open option. The Segments setting applies only to edges and borders.
Connecting edges creates new edges between adjacent pairs of selected edges. The Connect Edges settings let you specify the number of new edges, the amount of separation from each other, and their general location.
Use these settings for extruding polygons along splines in Interactive Manipulation mode.
Use these settings for extruding polygons in Interactive Manipulation mode.
Use these settings for extruding vertices, edges, and borders in Interactive Manipulation mode.
Use these settings for hinging polygons in Interactive Manipulation mode.
Use these settings for insetting polygons in Interactive Manipulation mode.
Use these settings to specify how mesh smoothing affects editable poly and Edit Poly objects.
Use these settings for specifying which map channels to preserve when editing sub-objects with the Preserve UVs option on. A preserved map channel doesn't respond to minor editing that changes vertex locations, but a channel whose UVs aren't preserved allows mapping to be changed by changes in vertex locations.
Use these settings for relaxing vertices in Interactive Manipulation mode. Relax in Edit/Editable Poly works much like the Relax modifier: It normalizes the distance between each affected vertex and its neighbors by moving the vertex toward the average position of its neighbors.
Use this caddy to specify how Tessellate subdivides polygons.
Use this caddy for setting the weld threshold for vertices and edges and previewing the number of sub-objects to be welded.